![]() HT64
HT64
Kasutusjuhend![]()
![]()

ETTEVAATUSABINÕUD JA OHUTUSMEETMED
Seade on konstrueeritud kooskõlas direktiiviga IEC/EN61010-1, mis on seotud elektrooniliste mõõtevahenditega. Oma ohutuse tagamiseks ja instrumendi kahjustamise vältimiseks järgige hoolikalt selles juhendis kirjeldatud toiminguid ja lugege läbi kõik märkused, millele eelneb sümbol ![]() ülima tähelepanuga.
ülima tähelepanuga.
Enne ja pärast mõõtmist järgige hoolikalt järgmisi juhiseid:
- Ärge teostage mõõtmisi niiskes keskkonnas.
- Ärge teostage mõõtmisi gaasi, plahvatusohtlike või tuleohtlike ainete või tolmuses keskkonnas.
- Vältige kokkupuudet mõõdetava vooluringiga, kui mõõtmisi ei teostata.
- Vältige kokkupuudet katmata metallosadega, kasutamata mõõtesondide, vooluahelatega jne.
- Ärge teostage mõõtmisi, kui leiate seadmes kõrvalekaldeid, nagu deformatsioon, purunemised, aine lekked, ekraanikuva puudumine jne.
- Pöörake erilist tähelepanu mahu mõõtmiseltagon suurem kui 20 V, kuna on olemas elektrilöögi oht.
Selles juhendis ja instrumendil on kasutatud järgmisi sümboleid:
![]() Hoiatus: järgige selles juhendis antud juhiseid; vale kasutamine võib seadet või selle komponente kahjustada.
Hoiatus: järgige selles juhendis antud juhiseid; vale kasutamine võib seadet või selle komponente kahjustada.
![]() Topeltisolatsiooniga arvesti
Topeltisolatsiooniga arvesti
![]() AC voltage või praegune
AC voltage või praegune
![]() DC voltage või praegune
DC voltage või praegune
![]() Ühendus maandusega
Ühendus maandusega
1.1. EELNÕUJUHEND
- See seade on mõeldud kasutamiseks 2. saasteastmega keskkondades.
- Seda saab kasutada VOL-i jaoksTAGE ja VOOLU mõõtmised paigaldustel CAT IV 600V ja CAT III 1000V.
- Soovitame järgida tavalisi ohutusreegleid, mis on koostatud pinge all olevate süsteemide toimingute tegemisel ja kasutada ettenähtud isikukaitsevahendeid, et kaitsta kasutajat ohtlike voolude eest ja seadet ebaõige kasutamise eest.
- Juhul, kui voltage võib kujutada endast ohtu operaatorile, teostage enne pinge all olevas süsteemis mõõtmist alati katkevuse mõõtmine, et kinnitada juhtmete õiget ühendust ja seisukorda.
- Ainult seadmega kaasas olevad juhtmed tagavad vastavuse ohutusstandarditele. Need peavad olema heas seisukorras ja vajaduse korral asendatud identsete mudelitega.
- Ärge testige vooluringe, mis ületavad määratud mahtutage piirid.
- Ärge tehke katseid keskkonnatingimustes, mis ületavad punktis 6.2.1 näidatud piire.
- Kontrollige, kas aku on õigesti sisestatud.
- Veenduge, et LCD-ekraan ja pöördlüliti näitavad sama funktsiooni.
1.2. KASUTAMISE AJAL
Lugege hoolikalt läbi järgmised soovitused ja juhised:
![]() ETTEVAATUST
ETTEVAATUST
Ettevaatusabinõude ja/või juhiste eiramine võib seadet ja/või selle komponente kahjustada või olla kasutajale ohuallikas.
- Enne pöördlüliti aktiveerimist ühendage testjuhtmed mõõdetavast vooluringist lahti.
- Kui seade on ühendatud mõõdetavasse vooluringi, ärge puudutage ühtegi kasutamata klemmi.
- Ärge mõõtke takistust välise voltages on olemas; isegi kui instrument on kaitstud, on liigne voltage võib põhjustada talitlushäireid.
- Kui mõõdetava suuruse väärtus või märk jääb mõõtmise ajal muutumatuks, kontrollige, kas funktsioon HOLD on lubatud.
1.3. PÄRAST KASUTAMIST
- Kui mõõtmine on lõppenud, lülitage seade välja, lülitades pöördlüliti välja.
- Kui seadet pikemat aega ei kasutata, eemaldage patareid.
1.4. MÕÕTMISE MÄÄRATLUS (ÜLEMALDTAGE) KATEGOORIA
Standard “IEC/EN61010-1: Ohutusnõuded mõõtmis-, juhtimis- ja laboriseadmete elektriseadmetele, osa 1: üldnõuded” määratleb, milline mõõtekategooria, mida tavaliselt nimetatakse ülevooluks.tage-kategooria, on. § 6.7.4: Mõõdetud vooluringid, kõlab järgmiselt: (VÄLJA JÄETUD)
Vooluahelad on jagatud järgmistesse mõõtmiskategooriatesse:
- IV mõõtekategooria on mõeldud madala võimsuse allika juures tehtud mõõtmiste jaokstage paigaldamine. NäideampNeed on elektriarvestid ja mõõtmised primaarsetel liigvoolukaitseseadmetel ja pulsatsioonijuhtimisseadmetel.
- III mõõtekategooria on ette nähtud mõõtmiseks, mis tehakse hoonete sisestel paigaldustel. NtampNeed on jaotuskilpide, kaitselülitite, juhtmestiku, sh kaablite, siinide, harukarpide, lülitite, statsionaarsete paigaldiste pistikupesade ja tööstusliku kasutuse seadmete ja mõnede muude seadmete, nt.ample, statsionaarsed mootorid püsiühendusega fikseeritud paigaldusega.
- II mõõtekategooria on mõeldud mõõtmiseks, mis viiakse läbi vooluahelates, mis on otse ühendatud madala helitugevusegatage paigaldamine. NäideampNeed on kodumasinate, kaasaskantavate tööriistade jms seadmete mõõdud.
- Mõõtmiskategooria I on mõeldud mõõtmiseks, mis tehakse vooluringides, mis ei ole otseselt VÕRKUGA ühendatud. Ntamples on mõõtmised vooluringidel, mis ei tule VÕRKEST, ja spetsiaalselt kaitstud (sisemised) MAINS-tuletatud ahelad. Viimasel juhul on mööduvad pinged muutlikud; sel põhjusel nõuab standard, et kasutajale tehakse teatavaks seadme ajutine vastupidavus.
ÜLDKIRJELDUS
Seade teeb järgmised mõõtmised:
- DC/AC/AC+DC TRMS vooltage
- DC/AC voltage madala takistusega (LoZ)
- DC/AC/AC+DC TRMS vool
- DC/AC/AC+DC TRMS voolutugevus andurigaamps
- Vahelduvvoolu, vahelduvvoolu ja alalisvoolu tegelik ressursvool
- 4-20mA% ekraan
- Vastupidavuse ja järjepidevuse test
- Dioodi test
- Mahutavus
- Sagedus
- Töötsükkel
- Temperatuur K-tüüpi sondiga
- Andmelogeri funktsioon ja mõõdetud andmete graafikute kuvamine
Kõiki neid funktsioone saab valida vastava lüliti abil. Seade on varustatud ka funktsiooniklahvide (vt § 4.2), analoogtulpdiagrammi ja suure kontrastsusega LCD TFT värviekraaniga. Seadmel on ka funktsioon Auto Power OFF, mis lülitab instrumendi automaatselt välja pärast teatud (programmeeritavat) tühikäiguaega.
2.1. KESKMISTE VÄÄRTUSTE JA TRMS VÄÄRTUSTE MÕÕTMINE
Vahelduvate suurustega mõõteriistad jagunevad kahte suurde perekonda:
- AVERAGE-VALUE arvestid: instrumendid, mis mõõdavad ainsa laine väärtust põhisagedusel (50 või 60 Hz).
- TRMS (True Root Mean Square) VALUE arvestid: seadmed, mis mõõdavad testitava koguse TRMS väärtust.
Täiuslikult sinusoidse lainega annavad kaks instrumendi perekonda identseid tulemusi.
Moonutatud lainete korral erinevad näidud. Keskmise väärtuse arvestid annavad ainsa põhilaine efektiivväärtuse; TRSM-mõõturid annavad selle asemel kogu laine efektiivväärtuse, sealhulgas harmoonilised (instrumendi ribalaiuse piires). Seetõttu on mõlema perekonna instrumentidega sama suurust mõõtes saadud väärtused identsed ainult siis, kui laine on täiesti sinusoidne. Kui see on moonutatud, peavad TRMS-arvestid andma kõrgemaid väärtusi kui keskmise väärtusega arvestite loetud väärtused.
2.2. TÕELISE JUURE KESKMISE RUUTVÄÄRTUSE JA KREST FAKTORI MÄÄRATLUS
Voolu ruutkeskmine väärtus on defineeritud järgmiselt: „Perioodiga võrdse aja jooksul hajutab takistil ringlev vahelduvvool ruutkeskmise väärtusega 1A sama energiat, mis sama aja jooksul hajuks alalisvool intensiivsusega 1A”. Selle määratluse tulemuseks on numbriline avaldis:
![]() Ruutkeskväärtus on tähistatud akronüümiga RMS.
Ruutkeskväärtus on tähistatud akronüümiga RMS.
Crest Factor on defineeritud kui seos signaali tippväärtuse ja selle vahel
RMS väärtus: CF![]() See väärtus muutub koos signaali lainekujuga, puhtalt siinuslaine puhul on see nii
See väärtus muutub koos signaali lainekujuga, puhtalt siinuslaine puhul on see nii ![]() Moonutuse korral võtab Crest Factor kõrgemad väärtused, kui lainemoonutus suureneb.
Moonutuse korral võtab Crest Factor kõrgemad väärtused, kui lainemoonutus suureneb.
ETTEVALMISTUS KASUTAMISEKS
3.1. ESMAKONTROLLID
Enne saatmist on seadet kontrollitud nii elektriliselt kui ka mehaaniliselt view. Võetud on kõik võimalikud ettevaatusabinõud, et instrument tarnitaks kahjustamata. Siiski soovitame seadet üldiselt kontrollida, et tuvastada võimalikud transpordi käigus tekkinud kahjustused. Anomaaliate avastamisel võtke viivitamatult ühendust ekspediitoriga. Samuti soovitame kontrollida, et pakend sisaldaks kõiki punktis 6.3.1 märgitud komponente. Lahknevuste korral võtke ühendust edasimüüjaga. Kui instrument tuleks tagastada, järgige § 7 toodud juhiseid.
3.2. INSTRUMENTIDE TOITEVÕTE
Seadet toidab 1 × 7.4 V laetav liitiumioonaku, mis on komplektis kaasas. Kui aku on tühi, kuvatakse sümbol „![]() ” ilmub ekraanile. Aku laadimise kohta vaadake palun § 6.1.
” ilmub ekraanile. Aku laadimise kohta vaadake palun § 6.1.
3.3. SÄILITAMINE
Täpse mõõtmise tagamiseks oodake pärast pikka säilitusaega, kuni instrument normaliseerub (vt § 7.1.3).
NOMENKLATUUR
4.1. INSTRUMENTI KIRJELDUS

CIPTION:
- LCD ekraan
- Funktsiooniklahv F2
- Funktsiooniklahv F3
- Funktsiooniklahv F1
- Funktsiooniklahv F4
- RANGE klahv
- HOLD/REL-klahv
- Pöördlüliti
- Sisendklemm 10A
- Sisendklemm

- Sisendklemm mAuA
- Sisendklemm COM
4.2. FUNKTSIOONIKLAHVIDE KIRJELDUS
4.2.1. HOLD/REL-klahv
HOLD/REL-klahvi vajutamine külmutab mõõdetud suuruse väärtuse ekraanil. Pärast selle nupu vajutamist ilmub ekraanile teade „Hold“. Funktsioonist väljumiseks vajutage uuesti HOLD/REL-klahvi. Väärtuse salvestamiseks ekraanile vt § 4.3.3. Suhtelise mõõtmise aktiveerimiseks/deaktiveerimiseks hoidke HOLD/REL-klahvi pikalt all. Seade nullib ekraani ja salvestab kuvatud väärtuse võrdlusväärtusena, millele järgnevad mõõtmised viidatakse (vt § 4.3.4). Ekraanile ilmub sümbol „A“. See funktsioon ei ole asendis aktiivne.![]() Funktsioonist väljumiseks vajutage ja hoidke uuesti all nuppu HOLD/REL.
Funktsioonist väljumiseks vajutage ja hoidke uuesti all nuppu HOLD/REL.
4.2.2. RANGE klahv
Manuaalrežiimi aktiveerimiseks ja automaatse vahemiku valimise funktsiooni keelamiseks vajutage RANGE nuppu. Ekraani vasakus ülanurgas kuvatakse „AUTO” asemel teade „MANUAL”. Manuaalrežiimis vajutage mõõtepiirkonna muutmiseks RANGE nuppu: vastava koma asukoht muutub. RANGE klahv ei ole asendites aktiivne.![]() Hz%,
Hz%, ![]() Automaatse vahemiku valimise režiimis valib seade mõõtmiseks kõige sobivama mõõtesuhte. Kui näit on suurem kui maksimaalne mõõdetav väärtus, ilmub ekraanile kiri „OL“. Manuaalrežiimist väljumiseks ja automaatse vahemiku valimise režiimi taastamiseks vajutage ja hoidke RANGE nuppu all kauem kui 1 sekund.
Automaatse vahemiku valimise režiimis valib seade mõõtmiseks kõige sobivama mõõtesuhte. Kui näit on suurem kui maksimaalne mõõdetav väärtus, ilmub ekraanile kiri „OL“. Manuaalrežiimist väljumiseks ja automaatse vahemiku valimise režiimi taastamiseks vajutage ja hoidke RANGE nuppu all kauem kui 1 sekund.
4.2.3. Funktsiooniklahvid F1, F2, F3, F4
Seadme sisemiste funktsioonide haldamiseks kasutage klahve F1, F2, F3 ja F4 (vt § 4.3).
4.2.4. LoZ funktsioon
See režiim võimaldab teostada AC/DC voltage mõõtmine madala sisendtakistusega, et vältida hajuva mahu tõttu valesid näitutage mahtuvuslikus sidestuses.
![]() ETTEVAATUST
ETTEVAATUST
Instrumendi sisestamisel faasi- ja maandusjuhtmete vahele võivad RCD-de kaitseseadmed testi ajal välja lülituda. Faas-PE voltagMõõtmine pärast RCD-seadme paigaldamist: ühendage eelnevalt testjuhtmed faasi- ja neutraalkaablite vahele vähemalt 5 sekundiks ning seejärel tehke faasi-PE mõõtmine, et vältida ootamatuid väljalülitusi.
4.2.5. Ekraanil kuvatav LEAD-teade
Seadme väljalülitatud olekust (OFF) ![]() kostab lühike helisignaal ja mõneks ajaks kuvatakse teade „LEAD”, mis annab märku testjuhtmete kasutamisest voolu mõõtmiseks.
kostab lühike helisignaal ja mõneks ajaks kuvatakse teade „LEAD”, mis annab märku testjuhtmete kasutamisest voolu mõõtmiseks.
4.3. SISEMISTE FUNKTSIOONIDE KIRJELDUS
4.3.1. Ekraani kirjeldus
 CIPTION:
- Automaatse/käsitsi režiimi märguanne
- Süsteemi aja näit
- Aku laetuse taseme näidik ja klahvitooni aktiveerimine/deaktiveerimine (ei ole seotud järjepidevuse testiga)
- Mõõteühiku märge
- Mõõtmistulemuse näitamine
- Analoogbargraaf
- Funktsiooniklahvidega F1, F2, F3, F4 seotud näidud
4.3.2. Vahelduv- ja alalisvoolu helitugevustage ja Voolu mõõtmine
Seade on võimeline mõõtma kattuvate vahelduvate komponentide võimalikku olemasolu üldisel mahultage või voolu otselainekuju. See võib olla kasulik mittelineaarsete koormuste tüüpiliste impulsssignaalide mõõtmisel (nt keevitusmasinad, elektriahjud jne).
- Valige positsioon
 .
. - Vajutage klahvi F2, et valida „
 " " või " " režiimid (vt joonis 3)
 - Järgige § 5.1 või § 5.9 juhiseid.
 4.3.3. HOLD-funktsioon ja salvestamine

- Tulemuse külmutamiseks vajutage uuesti nuppu HOLD/REL. Ekraanile ilmub teade „Hold“.
- Andmete salvestamiseks seadme mällu vajutage klahvi F3.
- Salvestatud tulemuse kuvamiseks avage menüü Üldine (vt § 4.3.7).
4.3.4. Suhteline mõõtmine

- Suhtelise mõõtmise sisestamiseks vajutage ja hoidke all nuppu HOLD/REL (vt joonis 5 – parem külg). Kuvatakse teade „REL“ ja sümbol „
 ” ilmub ekraanile.
 - Üldmenüüsse sisenemiseks, mõõtetulemuse salvestamiseks ja kuvamiseks vajutage klahvi F4 (vt § 4.3.7).
4.3.5. MIN/MAX/AVERAGE ja PEAK väärtuste salvestamine 
- Mõõdetava suuruse MAX, MIN ja keskmise väärtuse mõõtmisrežiimi sisenemiseks vajutage F4-klahvi (vt joonis 6 – keskosa). Ekraanile ilmub teade „MAX MIN“.
- Väärtused uuendatakse seadme poolt automaatselt ning antakse lühike piiks iga kord, kui kuvatud väärtused ületatakse (kõrgem MAX-väärtuse, madalam MIN-väärtuse puhul).
- Väärtuste tuvastamise peatamiseks vajutage klahvi F2 ja mõõtmise uuesti alustamiseks klahvi F1.
- Mõõtetulemuse salvestamiseks (vt joonis 6 – parem pool) ja kuvamiseks (vt § 4.3.7) vajutage klahvi F3.

- Mõõdetava suuruse tippväärtuste mõõtmisrežiimi sisenemiseks vajutage F4-klahvi (vt joonis 7 – parem külg). Ekraanile ilmub teade „PEAK“ ja väärtusi uuendatakse samamoodi nagu MAX/MIN-funktsiooni puhul.
- Väärtuste tuvastamise peatamiseks vajutage klahvi F2 ja mõõtmise uuesti alustamiseks klahvi F1.
- Tulemuse salvestamiseks ja kuvamiseks vajutage klahvi F3 (vt § 4.3.7).
4.3.6. Mõõtmisgraafikute loomine ja salvestamine

- Mõõdetava suuruse graafiku loomise sektsiooni sisenemiseks vajutage F1-klahvi (vt joonis 8 – vasak pool).
- Vajutage klahvi F2 (Kiire) või F3 (Aeglane), et määrata kiirus.ampling-intervall, mida instrument graafiku loomisel võrdluspunktina kasutab. Saate valida järgmiste väärtuste vahel: 0.2 s, 0.5 s, 1.0 s, 2.0 s, 5.0 s, 10 s
- Graafiku loomise alustamiseks vajutage F1-klahvi. Mõõtevahemik (seadme poolt automaatselt sisestatud) ja reaalajas väärtus kuvatakse seadmel (vt joonis 8 – keskosa).
- Graafiku lõpetamiseks vajutage F4-klahvi.
- Graafiku salvestamiseks instrumendi mällu vajutage klahvi F1 või uue graafiku alustamiseks klahvi F4 (vt joonis 8 – parem külg).
4.3.7. Instrumendi üldmenüü
- Kui mõõtmine on ekraanil (vt joonis 9 – vasak pool), vajutage instrumendi üldmenüüsse sisenemiseks funktsiooniklahvi F3. Ekraanile kuvatakse ekraan (vt joonis 9 – parem pool).
 Mõõtmiste salvestamine
 - Mõõtmise salvestamiseks vajutage klahvi F1 (ENTER).
Andmete salvestamine (logija) - Valige klahvi F2 või F3 abil sümbol „Record“ ja vajutage klahvi F1 (vt joonis 10 – vasak pool).

- Kasutage klahvi F2 või F3, et valida:
➢ Salvestuse kestuse seadistamine 1 minutist kuni 23 tunni ja 59 minutini
➢ S-i seadistamineampling intervall 1 sekundist 59 minutini: 59 sekundit - Redigeerimisfunktsioonide lubamiseks vajutage klahvi F1 ja soovitud sätete tegemiseks klahve F2 (+) ja F3 (>>).
- Sätete kinnitamiseks vajutage klahvi F1 (OK) või muutmisse naasmiseks klahvi F4 (TÜHISTA) (vt joonis 10 – parem külg).
- Põhiekraanile naasmiseks vajutage klahvi F4 (SULGE).
- Valige suvand „Alusta salvestamist“ ja vajutage klahvi F1. Ekraanile ilmub järgmine ekraan.

- Seade näitab järelejäänud aega ja sekundite arvu.ampreaalajas tehtud pildid ja salvestamise lõpus kuvatakse teade „Peatatud” (vt joonis 11 – vasak pool). Salvestamise igal ajal peatamiseks vajutage klahvi F4 (STOP).
- Salvestatud andmete sisemällu salvestamiseks vajutage klahvi F2 ja view see uuesti ekraanil
- Salvestuse trendi kuvamiseks vajutage klahvi F3 (TREND) (vt joonis 11 – keskosa).
- Kursori graafikul liigutamiseks vajutage klahvi F4 (>>) ja klahvi F2 (+) graafiku suumifunktsiooni aktiveerimiseks, suurendades eraldusvõimet (sümbol „Xy”, kus y = maksimaalne suumimõõt, ilmub ekraani ülaosas paremal küljel) (vt joonis 11 – parem külg). Saate suumida X1 abil vähemalt 15 mõõtepunkti, X2 abil vähemalt 30 mõõtepunkti, X3 abil vähemalt 60 mõõtepunkti ja nii edasi maksimaalselt 6 suumimisoperatsiooni ulatuses.
- Eelmisele ekraanile naasmiseks vajutage klahvi F4 (TAGASI). Instrumendi mälu kustutamine
- Valige klahvi F2 või F3 abil sümbol „Kustuta“ ja vajutage klahvi F1 (vt joonis 12 – vasak pool).
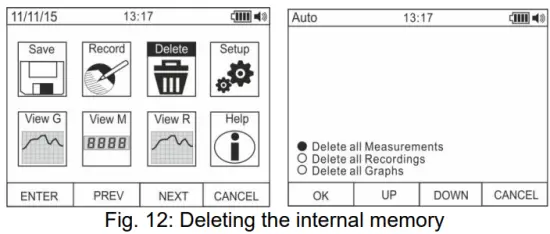
- Suvandite valimiseks kasutage klahvi F2 või F3:
➢ Kustuta kõik mõõtmised → kõik hetktõmmised (mõõtmised) kustutatakse
➢ Kustuta kõik salvestised → kõik salvestised kustutatakse
➢ Kustuta kõik graafikud → kõik graafikud kustutatakse. - Valitud toimingu tegemiseks vajutage klahvi F1 (OK) (seadmele kuvatakse kinnitusteade). Seadme üldised sätted
- Valige klahvi F2 või F3 abil sümbol „Setup“ ja vajutage klahvi F1 (vt joonis 13 – vasak pool).

- Suvandite valimiseks kasutage klahvi F2 või F3:
➢ Lähtestamine → taastab seadme vaikeseaded.
➢ Formaat → võimaldab aktiveerida klahvitooni, määrata kuupäeva/kellaaja vormingu ja kuvatavate numbrite vormingu (kümnendsüsteem, koma või punkt).
➢ Üldine → võimaldab määrata süsteemi kuupäeva/kellaaja, automaatse väljalülituse intervalli, taustavärvi ja ekraani fondi värvi ja tüübi ning valida süsteemi keele.
➢ Mõõtja info → annab teavet sisemise püsivara versiooni ja saadaoleva mälumahu kohta. - Valitud toimingu tegemiseks vajutage klahvi F1 (ENTER) või mõõtmiskuvale naasmiseks klahvi F4 (CANCEL). Seadme üldised seaded – lähtestamine

- Lähtestamise aktiveerimiseks vajutage klahvi F1 (OK).
- Lähtestamistoiming ei kustuta seadme sisemälu.
Instrumendi üldised seaded – vorming
- Suvandite valimiseks kasutage klahvi F2 või F3: ➢ Klahvitoon → võimaldab funktsiooniklahvide tooni aktiveerida/deaktiveerida.
➢ Numbriline vorming → võimaldab määrata ekraanil kuvatavate numbrite vormingu järgmiste valikute vahel: 0.000 (kümnendkoht) ja 0,000 (koma)
➢ Kuupäeva vorming → võimaldab määrata süsteemi kuupäeva vormingu järgmiste valikute vahel: KK/PP/AA ja PP/KK/AA
➢ Ajavorming → võimaldab määrata süsteemiaja vormingu järgmiste valikute vahel: - MEIE JA 24 TUNDI
- Seadistuste muutmiseks kasutage klahvi F1 (EDIT) ja klahve F2 ja F3 või eelmisele ekraanile naasmiseks klahvi F4. Seadme üldised sätted – ekraan

- Suvandite valimiseks kasutage klahvi F2 või F3:
➢ Kuupäeva määramine → võimaldab määrata süsteemi kuupäeva vastavalt menüüs Vorming määratletud väärtusele.
➢ Määra kellaaeg → võimaldab määrata süsteemi kellaaja vastavalt menüüs Vorming määratletud väärtusele.
➢ Automaatne väljalülitus → võimaldab määrata seadme automaatse väljalülituse intervalli tühikäigul töötamise ajal vahemikus: 5 min 60 min täpsusega 1 minut. Funktsiooni keelamiseks määrake väärtus 00. Pärast automaatset väljalülitumist vajutage seadme uuesti sisselülitamiseks klahvi F3.
➢ Esiplaan → võimaldab määrata ekraani taustavärvi ja fondi värvi.
➢ Valige Font → võimaldab määrata fondi tüübi või kuvamise saadaolevate valikute (0, 1, 2) hulgast.
➢ Keel → võimaldab valida süsteemi keele järgmiste valikute hulgast: itaalia, inglise, hispaania, saksa ja prantsuse keel
Instrumendi üldised seaded – instrumendi info
- Seade kuvab järgmist teavet:
➢ Püsivara versioon → sisemine püsivara versioon
➢ Vaba mälu → protsenttage) hetktõmmiste (SAVE), salvestiste (REC) ja graafikute (GRAPH) salvestamiseks mõeldud vaba mäluruumi väärtused. - Eelmisele ekraanile naasmiseks vajutage klahvi F4. Graafikute kuvamine ekraanile.

- Sümboli „“ valimiseks kasutage klahvi F2 või F3.View G” ja vajutage klahvi F1 (vt joonis 18 – vasak külg).
- Valige instrumendi mällu salvestatud graafikute hulgast soovitud graafik klahvide F2 (PREV) või F3 (NEXT) abil ja avage graafik klahviga F1 (ENTER) (vt joonis 18 – keskosa).
- Liigutage kursorit graafikul kahes suunas klahvide F2 (<<) või F3 (>>) abil, jälgides vastavat väärtust ekraani allosas (vt joonis 18 – parem külg).
- Valitud graafiku kustutamiseks vajutage klahvi F1 (DELETE) või eelmisele ekraanile naasmiseks klahvi F4 (BACK). Mõõdetud andmete (hetktõmmiste) kuvamine ekraanil

- Sümboli „“ valimiseks kasutage klahvi F2 või F3.View M” ja vajutage klahvi F1 (vt joonis 19 – vasak pool).
- Valiku tegemiseks ja salvestamiseks kasutage klahvi F2 (EELMINE) või F3 (JÄRGMINE). view soovitud takt instrumendi mällu salvestatud taktide hulgast (vt joonis 19 – parem pool). Takti viide kuvatakse ekraani paremas alaosas.
- Valitud takti kustutamiseks vajutage klahvi F1 (DELETE) või põhiekraanile naasmiseks klahvi F4 (CLOSE). Salvestiste ekraanile tagasitoomine

- Sümboli „“ valimiseks kasutage klahvi F2 või F3.View R” ja vajutage klahvi F1 (vt joonis 20 – vasak pool).
- Valige instrumendi mällu salvestatud salvestiste hulgast (vt joonis 20 – keskmine osa) soovitud salvestis klahvi F2 (PREV) või F3 (NEXT). Salvestise viide kuvatakse ekraani allosas.
- Salvestuse trendi kuvamiseks vajutage klahvi F1 (TREND).
- Kursori liigutamiseks graafikul ja vastava väärtuse jälgimiseks ekraani allosas vajutage klahvi F3 (>>).
- Graafiku suumimisfunktsiooni aktiveerimiseks (kui see on saadaval) vajutage klahvi F2 (+).
- Valitud salvestise kustutamiseks vajutage klahvi F1 (DELETE) või eelmisele ekraanile naasmiseks klahvi F4 (BACK).
Ekraanil olev abi
- Valige klahvi F2 või F3 abil sümbol „Abi“ ja vajutage klahvi F1 (vt joonis 21).
- Kontekstipõhise veebipõhise abi lehtede sirvimiseks kasutage F2 (ÜLES) või F3 (ALLA).
- Põhiekraanile naasmiseks vajutage klahvi F4 (SULGE).
KASUTUSJUHEND
5.1. Alalisvool, vahelduvvool + alalisvool helitugevusTAGE MÕÕTMINE
![]() ETTEVAATUST
ETTEVAATUST
Maksimaalne sisend DC voltage on 1000 V. Ära mõõda voltagületab selles juhendis antud piire. Ületab voltagPiirangud võivad põhjustada kasutajale elektrilööke ja seadet kahjustada.

- Valige positsioonid V Hz% või mV
- Sisestage punane kaabel sisendterminali ja must kaabel sisendterminali COM.
- Asetage punane juhe ja must juhe vastavalt mõõdetava vooluahela positiivse ja negatiivse potentsiaaliga kohtadesse (vt joonis 22). Ekraanil kuvatakse voltage.
- Kui ekraanil kuvatakse teade “OL”, valige kõrgem vahemik.
- Kui instrumendi ekraanile ilmub sümbol “-”, tähendab see, et voltage on vastupidine suund joonisel 22 kujutatud ühenduse suhtes.
- HOLD, RANGE ja REL funktsioonide kasutamise kohta vt § 4.2.
- Vahelduv- ja alalisvoolu mõõtmise kohta vt § 4.3.2 ja sisemiste funktsioonide kasutamise kohta vt § 4.3.
5.2. AC VOLTAGE MÕÕTMINE
![]() ETTEVAATUST
ETTEVAATUST
Maksimaalne sisend AC voltage on 1000 V. Ära mõõda voltagületab selles juhendis antud piire. Ületab voltagPiirangud võivad põhjustada kasutajale elektrilööke ja seadet kahjustada.

- Valige positsioonid V Hz% või mV
- mV asendis vajutage F2 (MODE) klahvi, et view sümbol „~” ekraanil.
- Sisestage punane kaabel sisendterminali
 ja must kaabel sisendterminali COM.
 - Asetage punane juhe ja must juhe vastavalt mõõdetava vooluringi kohtadesse (vt joonis 23). Ekraanil kuvatakse voltage.
- Kui ekraanil kuvatakse teade “OL”, valige kõrgem vahemik.
- Sisendvolu sageduse ja töötsükli väärtuste kuvamiseks vajutage klahvi F2 (MODE), et valida mõõtmised „Hz“ või „%“.tage. Funktsiooni „%“ positiivse või negatiivse poollaine valimiseks vajutage klahvi F1(TRIG). Tulbagramm ei ole nendes funktsioonides aktiivne.
- HOLD, RANGE ja REL funktsioonide kasutamise kohta vt § 4.2.
- Sisemiste funktsioonide kasutamiseks vaata § 4.3
5.3. AC/DC VOLTAGE MÕÕTMINE MADALA TARKASTUSEGA (LOZ)
![]() ETTEVAATUST
ETTEVAATUST
Maksimaalne sisend AC/DC voltage on 600 V. Ära mõõda voltagületab selles juhendis antud piire. Ületab voltagPiirangud võivad põhjustada kasutajale elektrilööke ja seadet kahjustada.

- Valige positsioon LoZV
 Kuvatakse sümbolid „LoZ” ja „DC”.
 - Vajadusel valige mõõtühikuks „AC” klahvi MODE (F2).
- Sisestage punane kaabel sisendterminali ja must kaabel sisendterminali COM
- Asetage punane juhe ja must juhe vastavalt mõõdetava vooluringi soovitud kohtadesse (vt joonis 24) või mõõdetava ahela positiivse ja negatiivse potentsiaaliga kohtadesse (vt joonis 22). Ekraanil kuvatakse voltage.
- Teade “OL” näitab, et DC voltage ületab maksimaalse mõõdetava väärtuse.
- Kui instrumendi ekraanile ilmub sümbol “-”, tähendab see, et voltage on vastupidine suund joonisel 22 kujutatud ühenduse suhtes
- HOLD, RANGE ja REL funktsioonide kasutamiseks vt § 4.2.
- Sisemiste funktsioonide kasutamiseks vaata § 4.3
5.4. SAGEDUSE JA TÖÖTsükLI MÕÕTMINE
![]() ETTEVAATUST
ETTEVAATUST
Maksimaalne sisend AC voltage on 1000 V. Ära mõõda voltagületab selles juhendis antud piire. Ületab voltagPiirangud võivad põhjustada kasutajale elektrilööke ja seadet kahjustada.

1. Valige asend Hz%.
2. Vajutage F2 (MODE) klahvi, et valida mõõtühikuks „Hz“ või „%“, et kuvada sisendvolumeetri sageduse ja töötsükli väärtusi.tage.
3. Ühendage punane kaabel sisendklemmiga![]() ja must kaabel sisendterminali COM.
ja must kaabel sisendterminali COM.
4. Asetage punane ja must juhe vastavalt mõõdetava vooluringi punktidesse (vt joonis 25). Ekraanil kuvatakse sageduse (Hz) või töötsükli (%) väärtus. Tulbadiagramm ei ole nendes funktsioonides aktiivne.
5. HOLD ja REL funktsioonide kasutamiseks vt § 4.2.
6. Sisemiste funktsioonide kasutamiseks vt § 4.3
5.5. TAKISTUSE MÕÕTMINE JA JÄDEVASTE TEST
![]() ETTEVAATUST
ETTEVAATUST
Enne takistuse mõõtmist katkestage mõõdetavast vooluringist toide ja veenduge, et kõik kondensaatorid on tühjenenud, kui need on olemas.

- Valige positsioon

- Sisestage punane kaabel sisendterminali ja must kaabel sisendterminali COM.
- Asetage testjuhtmed mõõdetava vooluringi soovitud kohtadesse (vt joonis 26). Ekraanil kuvatakse takistuse väärtus.
- Kui ekraanil kuvatakse teade “OL”, valige kõrgem vahemik.
- Vajutage F2 (MODO) klahvi, et valida järjepidevuse testiga seotud mõõtmine ))))” ja asetage testjuhtmed mõõdetava vooluringi soovitud kohtadesse.
- Takistuse väärtus (mis on ainult soovituslik) kuvatakse numbril 2 ja kui takistuse väärtus on <50 Ω, annab seade helisignaali.
- HOLD, RANGE ja REL funktsioonide kasutamise kohta vt § 4.2.
- Sisemiste funktsioonide kasutamiseks vaata § 4.3.
5.6. DIOODI TEST
![]() ETTEVAATUST
ETTEVAATUST
Enne takistuse mõõtmist katkestage mõõdetavast vooluringist toide ja veenduge, et kõik kondensaatorid on tühjenenud, kui need on olemas.

- Valige positsioon
- Vajutage F2 (MODE) klahvi, et valida mõõtühik „+“.
- Sisestage punane kaabel sisendterminali ja must kaabel sisendterminali COM.
- Asetage juhtmed testitava dioodi otstesse (vt joonis 27), järgides näidatud polaarsust. Otsepolariseeritud läve väärtus voltagEkraanil kuvatakse e.
- Kui läviväärtus on võrdne OmV-ga, on dioodi PN-siirde lühis.
- Kui ekraanil kuvatakse teade “OL”, on dioodi klemmid vastupidised joonisel 27 toodud näidu suhtes või dioodi PN-liides on kahjustatud.
- HOLD ja REL funktsioonide kasutamise kohta vaata § 4.2.
- Sisemiste funktsioonide kasutamiseks vaata § 4.3.
5.7. MAHTUVUSE MÕÕTMINE
![]() ETTEVAATUST
ETTEVAATUST
Enne vooluahelate või kondensaatorite mahtuvuse mõõtmist katkestage testitavast vooluringist toide ja laske sellel kogu mahtuvusel tühjeneda. Multimeetri ja mõõdetava mahtuvuse ühendamisel järgige õiget polaarsust (vajadusel).

- Valige positsioon
- Vajutage klahvi F2 (MODE), kuni kuvatakse sümbol „nF”.
- Sisestage punane kaabel sisendterminali ja must kaabel sisendterminali COM.
- Enne mõõtmiste alustamist vajutage REL/A nuppu.
- Asetage juhtmed testitava kondensaatori otstesse, vajadusel järgides positiivset (punane kaabel) ja negatiivset (must kaabel) polaarsust (vt joonis 28). Ekraanil kuvatakse väärtus. Sõltuvalt mahtuvusest võib seadmel kuluda umbes 20 sekundit, enne kui kuvatakse õige lõppväärtus. Tulpdiagramm ei ole selle funktsiooni puhul aktiivne.
- Teade “OL” näitab, et mahtuvuse väärtus ületab maksimaalset mõõdetavat väärtust.
- HOLD ja REL funktsioonide kasutamise kohta vaata § 4.2.
- Sisemiste funktsioonide kasutamiseks vaata § 4.3.
5.8. TEMPERATUURI MÕÕTMINE K-TYPE SONDIGA
![]() ETTEVAATUST
ETTEVAATUST
Enne mis tahes temperatuuri mõõtmist katkestage mõõdetavast vooluringist toide ja veenduge, et kõik kondensaatorid on tühjad, kui need on olemas.

- Valige positsioon

- Vajutage klahvi F2 (MODE), kuni kuvatakse sümbol „°C” või „F”.
- Sisestage kaasasolev adapter sisendklemmidele (polaarsus +) ja COM (polaarsus -) (vt joonis 29)
- Ühendage kaasasolev K-tüüpi traatsond või valikuline K-tüüpi termopaar (vt § 7.2.2) adapteri abil instrumendiga, järgides positiivset ja negatiivset polaarsust. Ekraanil kuvatakse temperatuuri väärtus. Tulpdiagramm ei ole selle funktsiooni puhul aktiivne.
- Teade “OL” näitab, et temperatuuri väärtus ületab maksimaalset mõõdetavat väärtust.
- HOLD ja REL funktsioonide kasutamise kohta vaata § 4.2.
- Sisemiste funktsioonide kasutamiseks vaata § 4.3.
5.9. Alalisvoolu, vahelduvvoolu ja alalisvoolu mõõtmine ning näit 4–20 mA%
![]() ETTEVAATUST
ETTEVAATUST
Maksimaalne sisendvoolutugevus on 10 A (sisend 10 A) või 600 mA (sisend mAuA). Ärge mõõtke voolutugevusi, mis ületavad selles kasutusjuhendis antud piire. Ületab voolutugevusttagPiirangud võivad põhjustada kasutajale elektrilööke ja seadet kahjustada.

- Katkesta toide mõõdetavast vooluringist.
- Valige positsioon µA, mA või 10A 20mA 4–20 mA jaoks
 näit. alalisvoolu või sama positsiooni mõõtmiseks 4-
 - Ühendage punane kaabel sisendklemmiga 10A või sisendklemmiga mAµA ja must kaabel sisendklemmiga COM.
- Ühendage punane ja must juhe järjestikku vooluahelaga, mille voolu soovite mõõta, järgides polaarsust ja voolu suunda (vt joonis 30).
- Toide mõõdetavat vooluringi.
- Ekraanile ilmub alalisvoolu väärtus (vt joonis 30 – vasak pool).
- Ekraanile ilmub näidu 4-20mA% väärtus (0mA = -25%, 4mA = 0%, 20mA = 100% ja 24mA = 125%) (vt joonis 30 paremal pool). Tulbadiagramm ei ole selle funktsiooni puhul aktiivne.
- Kui ekraanil kuvatakse teade “OL”, on maksimaalne mõõdetav väärtus saavutatud.
- Kui instrumendi ekraanile ilmub sümbol “-”, tähendab see, et voolul on vastupidine suund joonisel 30 kujutatud ühenduse suhtes.
- Funktsioonide HOLD, RANGE ja REL kasutamiseks vt § 4.2.
- Vahelduv- ja alalisvoolu mõõtmise kohta vt § 4.3.2 ja sisemiste funktsioonide kasutamise kohta vt § 4.3.
5.10. AC VOOLU MÕÕTMINE
![]() ETTEVAATUST
ETTEVAATUST
Maksimaalne sisendvahelduvvool on 10 A (sisend 10 A) või 600 mA (sisend mAuA). Ärge mõõtke voolusid, mis ületavad selles kasutusjuhendis antud piire. Ületab voolutugevusttagPiirangud võivad põhjustada kasutajale elektrilööke ja seadet kahjustada.

- Katkesta toide mõõdetavast vooluringist.
- Valige positsioonid μA, mA või 10A
- Vajutage F2 (MODE) klahvi, et valida mõõtmine „AC“.
- Ühendage punane kaabel sisendklemmiga 10A või sisendklemmiga mAµA ja must kaabel sisendklemmiga COM.
- Ühenda punane ja must juhe järjestikku vooluringiga, mille voolutugevust soovid mõõta (vt joonis 31).
- Toide mõõdetavat vooluringi. Ekraanil kuvatakse voolu väärtus.
- Kui ekraanil kuvatakse teade “OL”, on maksimaalne mõõdetav väärtus saavutatud.
- Funktsioonide HOLD, RANGE ja REL kasutamiseks vt § 4.2.
- Sisemiste funktsioonide kasutamiseks vaata § 4.3
5.11. Alalisvoolu, vahelduvvoolu, vahelduvvoolu+alalisvoolu voolu mõõtmine muunduriga CLAMPS
![]() ETTEVAATUST
ETTEVAATUST
- Maksimaalne voolumõõt selles funktsioonis on 3000A AC või 1000A DC. Ärge mõõtke voolusid, mis ületavad selles juhendis antud piire
- Seade teostab mõõtmist, kasutades mõlemat painduvat andurit clamp (lisavarustus F3000U) ja muu standardne klamp HT perekonna muundurid. Anduri jaoks clampHT väljundpistikuga seadmete ühendamiseks on vajalik NOCANBA valikuline adapter.

- Valige positsioon

- Mõõtmise valimiseks vajutage klahvi F2(MODE) ja valige režiimiks „AC“, „DC“ või „AC+DC“.
- Vajutage RANGE klahvi, et valida instrumendil sama vahemik, mis on seadistatud andurile clamp valikute hulgast: 1000mA, 10A, 30A, 40A (ainult HT4006 jaoks), 100A, 300A, 400A (ainult HT4006 jaoks), 1000A, 3000A. Valitud vahemik kuvatakse ekraani vasakus ülanurgas.
- Sisestage punane kaabel sisendterminali ja must kaabel sisendklemmiga COM. Teiste standardsete HT-pistikuga muundurite (vt §) puhul kasutage NOCANBA valikulist lisatarvikut. Teavet muunduri kasutamise kohta leiate jaotisestamps vaadake vastavat kasutusjuhendit
- Sisestage kaabel lõualuu sisse (vt joonis 32). Ekraanile ilmub voolu väärtus
- Kui ekraanil kuvatakse teade “OL”, on maksimaalne mõõdetav väärtus saavutatud
- Funktsioonide HOLD, RANGE ja REL kasutamiseks vaadake § 4.2
- Sisemiste funktsioonide kasutamiseks vaata § 4.3
HOOLDUS
![]() ETTEVAATUST
ETTEVAATUST
- Hooldustöid tohivad teha ainult asjatundlikud ja koolitatud tehnikud. Enne hooldustööde alustamist ühendage kõik kaablid sisendklemmidest lahti.
- Ärge kasutage seadet kõrge õhuniiskuse või kõrge temperatuuriga keskkondades. Ärge jätke otsese päikesevalguse kätte.
- Pärast kasutamist lülitage seade alati välja. Kui instrumenti pikemat aega ei kasutata, eemaldage aku, et vältida vedelikulekkeid, mis võivad instrumendi sisemisi vooluringe kahjustada.
6.1. SISEMISE AKU LAADIMINE
Kui vedelkristallekraanil kuvatakse sümbol " ![]() ”, on vaja sisemist akut laadida.
”, on vaja sisemist akut laadida.

- Asetage pöördlüliti asendisse OFF ja eemaldage kaablid sisendklemmidest.
- Sisestage akulaadija toiteploki adapter instrumendi nelja sisendklemmiga (vt joonis 33).
- Sisestage toiteploki pistik adapterisse ja ühendage toiteplokk elektrivõrku.
- Ekraanile ilmub vilkuv roheline aku sümbol. Laadimisprotsess on lõppenud, kui sümbol põleb pidevalt.
- Kui toiming on lõppenud, ühendage akulaadija instrumendist lahti.
 ETTEVAATUST
Kui laadimisprotsess ei käivitu, kontrollige F800mA/1000V kaitsekaitsme terviklikkust (vt § 7.1.2) ja vajadusel vahetage see välja (vt § 6.2).
6.2. SISEMISTE KAITSETE VAHETAMINE

- Asetage pöördlüliti asendisse OFF ja eemaldage kaablid sisendklemmidest.
- Keerake patareipesa kaane kinnituskruvi asendist
 ja eemaldage see (vt joonis 34)
 positsioonile seada
 - Eemaldage kahjustatud kaitse ja paigaldage uus sama tüüpi kaitse (vt § 7.1.2).
- Pange patareipesa kate tagasi oma kohale ja keerake kinnituskruvi asendist positsioonile seada .
6.3. INSTRUMENDI PUHASTAMINE
Kasutage instrumendi puhastamiseks pehmet ja kuiva lappi. Ärge kunagi kasutage märgasid lappe, lahusteid, vett jne.
6.4. ELU LÕPP
![]() HOIATUS: instrumendil olev sümbol näitab, et seade ja selle tarvikud tuleb eraldi koguda ja nõuetekohaselt utiliseerida.
HOIATUS: instrumendil olev sümbol näitab, et seade ja selle tarvikud tuleb eraldi koguda ja nõuetekohaselt utiliseerida.
TEHNILISED ANDMED
7.1. TEHNILISED OMADUSED
Täpsus arvutatakse järgmiselt [%lugemist + (numbrite arv * resolutsioon)] temperatuuril 18 °C 28 °C <75%HR
DC kdtage
| Vahemik | Resolutsioon | Täpsus | Sisendtakistus | Kaitse ülelaadimise eest |
| 600.0mV | 0.1mV | ± (0.1% lugemine + 5 numbrit) | > 10MW | 1000VDC/ACrms |
| 6.000V | 0.001V | |||
| 60.00V | 0.01V | |||
| 600.0V | 0.1V | ± (0.2% lugemine + 5 numbrit) | ||
| 1000V | 1V |
AC TRMS Voltage
| Vahemik | Resolutsioon | Täpsus (*) | Kaitse ülelaadimise eest | |
| (50 Hz × 60 Hz) | (61 Hz × 1 kHz) | |||
| 600.0mV | 0.1mV | ± (0.9% lugemine + 5 numbrit) | ±(3.0% lugemine + 5dgt) | 1000VDC/ACrms |
| 6.000V | 0.001V | |||
| 60.00V | 0.01V | |||
| 600.0V | 0.1V | |||
| 1000V | 1V | |||
(*) Täpsus on määratletud vahemikus 10% kuni 100% mõõtepiirkonnast, sisendtakistus: > 9MΩ;
Täpsus PEAK funktsioon: ±(10% lugemist + 30 numbrit), PEAK reaktsiooniaeg: 1 ms
Mittesinusoidaalsete lainekujude puhul on täpsus: (10.0% näidust + 10 numbrit)
AC+ DC TRMS Voltage
| Vahemik | Resolutsioon | Täpsus (*) (50 Hz × 1 kHz) | Sisendtakistus | Kaitse ülelaadimise eest |
| 6.000V | 0.001V | ±(3.0% lugemine + 20dgt) | > 10MW | 1000VDC/ACrms |
| 60.00V | 0.01V | |||
| 600.0V | 0.1V | |||
| 1000V | 1V |
(*) Täpsus on määratud vahemikus 10% kuni 100% mõõtepiirkonnast
Mittesinusoidaalsete lainekujude puhul on täpsus: (10.0% näidust + 10 numbrit)
DC/AC TRMS Voltage madala takistusega (LoZ)
| Vahemik | Resolutsioon | Täpsus (*) (50 Hz × 1 kHz) | Sisendtakistus | Kaitse ülelaadimise eest |
| 6.000V | 0.001V | ±(3.0% lugemine + 40dgt) | umbes 3 kW | 600VDC/ACrms |
| 60.00V | 0.01V | |||
| 600.0V | 0.1V | |||
| 600V | 1V |
(*) Täpsus on määratud vahemikus 10% kuni 100% mõõtepiirkonnast
Mittesinusoidaalsete lainekujude puhul on täpsus: (10.0% näidust + 10 numbrit)
DC vool
| Vahemik | Resolutsioon | Täpsus | Kaitse vastu ülemaks |
| 600.0 mA | 0.1 mA | ± (0.9% lugemine + 5 numbrit) | Kiirkaitse 800mA/1000V |
| 6000 mA | 1 mA | ||
| 60.00 mA | 0.01 mA | ||
| 600.0 mA | 0.1 mA | ± (0.9% lugemine + 8 numbrit) | |
| 10.00A | 0.01A | ± (1.5% lugemine + 8 numbrit) | Kiirkaitse 10A/1000V |
AC TRMS vool
| Vahemik | Resolutsioon | Täpsus (*) (50 Hz¸1 kHz) | Kaitse vastu ülemaks |
| 600.0 mA | 0.1 mA | ± (1.2% lugemine + 5 numbrit) | Kiirkaitse 800mA/1000V |
| 6000 mA | 1 mA | ||
| 60.00 mA | 0.01 mA | ||
| 600.0 mA | 0.1 mA | ||
| 10.00A | 0.01A | ± (1.5% lugemine + 5 numbrit) | Kiirkaitse 10A/1000V |
(*) Täpsus on määratud vahemikus 5% kuni 100% mõõtepiirkonnast; mittesinusoidaalsete lainekujude puhul on täpsus: +(10.0% näidust + 10 numbrit)
Täpsus PEAK funktsioon: ±(10% lugemist + 30 numbrit), AC+DC TRMS voolutugevus: täpsus (50Hz + 1kHz): +(3.0% lugemist + 20 numbrit)
DC vool koos muunduriga klamp
| Vahemik | Väljundsuhe | Resolutsioon | Täpsus (*) | Kaitse vastu ülemaks |
| 1000 mA | 1V/1A | 1 mA | ±(1.5%rdg+ 6dgt) | 1000VDC/ACrms |
| 10A | 100mV/1A | 0.01A | ||
| 30A | ||||
| 40A (**) | 10mV/1A | ±(1.5% lugemist + 26 numbrit) (***) | ||
| 100A |
0.1A |
±(1.5%rdg+ 6dgt) | ||
| 300A | ||||
| 400A (**) | 1mV/1A | ±(1.5% lugemist + 26 numbrit) (***) | ||
| 1000A | 1mV/1A | 1A | ±(1.5%rdg+6dgt) | |
| 3000A |
(*) Täpsus viitab ainult andurita instrumendile; (**) HT4006 andurigaamp ; (***) Täppisinstrument + clamp
AC TRMS Vool koos muunduriga klamp
| Vahemik | Väljundsuhe | Resolutsioon | Täpsus (*) (50 Hz × 1 kHz) | Kaitse ülelaadimise eest |
| 1000 mA | 1V/1A | 1 mA | ±(2.5%rdg + 10dgt) | 1000VDC/ACrms |
| 10A | 100mV/1A | 0.01A | ||
| 30A | ||||
| 40A (**) | 10mV/1A | ±(3.5% lugemist + 30 numbrit) (***) | ||
| 100A | 0.1A | ±(2.5%rdg + 10dgt) | ||
| 300A | ||||
| 400A (**) | 1mV/1A | ±(3.5% lugemist + 30 numbrit) (***) | ||
| 1000A | 1A | ±(2.5%rdg + 10dgt) | ||
| 3000A |
(*) Täpsus viitab ainult muundurita instrumendile; Täpsus on määratletud vahemikus 5% kuni 100% mõõtepiirkonnast;
(**) HT4006 anduriga clamp ; (***) Täppisinstrument + clamp
Mittesinusoidaalsete lainekujude täpsus on: ![]() (10.0% näidust + 10 numbrit)
(10.0% näidust + 10 numbrit)
Täpsus PEAK funktsioon: ±(10% lugemist + 30 numbrit), AC+DC TRMS voolutugevus: täpsus (50 Hz)![]() 1 kHz):
1 kHz): ![]() (3.0% näidust + 20 numbrit)
(3.0% näidust + 20 numbrit)
4–20 mA% näit
| Vahemik | Resolutsioon | Täpsus | Kirjavahetus |
| -25%¸125% | 0.1% | ±50dgt | 0mA=-25%, 4mA=0%, 20mA=100%, 24mA=125% |
Dioodi test
| Funktsioon | Katsevool | Max voltage avatud vooluringiga |
|
|
<1.5mA | 3.2VDC |
Sagedus (elektroonilised ahelad)
| Vahemik | Resolutsioon | Täpsus | Kaitse vastu ülemaks |
| 40.00 Hz ¸ 10 kHz | 0.01 Hz ¸ 0.001 kHz | ± (0.5% lugemine) | 1000VDC/ACrms |
Tundlikkus: 2 Vrms
Sagedus (elektroonilised ahelad)
| Vahemik | Resolutsioon | Täpsus | Kaitse ülelaadimise eest |
| 6.000 Hz | 0.001 Hz | ±(0.09%rdg+5 numbrit) | 1000VDC/ACrms |
| 60.00 Hz | 0.01 Hz | ||
| 600.0 Hz | 0.1 Hz | ||
| 6.000kHz | 0.001kHz | ||
| 60.00kHz | 0.01kHz | ||
| 600.0kHz | 0.1kHz | ||
| 1.000 MHz | 0.001 MHz | ||
| 10.00 MHz | 0.01 MHz |
Tundlikkus: >2 Vrms (@ 20% +80% töötsükkel) ja f < 100 kHz; >5 Vrms (@ 20% + 80% töötsükkel) ja f > 100 kHz
Vastupidavuse ja järjepidevuse test
| Vahemik | Resolutsioon | Täpsus | Sumiseja | Kaitse ülelaadimise eest |
| 600.0W | 0.1W | ±(0.8% lugemine + 10dgt) | <50W | 1000VDC/ACrms |
| 6.000 kW | 0.001 kW | ± (0.8% lugemine + 5 numbrit) | ||
| 60.00 kW | 0.01 kW | |||
| 600.0 kW | 0.1 kW | |||
| 6.000MW | 0.001MW | |||
| 60.00MW | 0.01MW | ±(2.5% lugemine + 10dgt) |
Töötsükkel
| Vahemik | Resolutsioon | Täpsus |
| 0.1% ¸ 99.9% | 0.1% | ± (1.2% lugemine + 2 numbrit) |
Impulsi sagedusvahemik: 40 Hz + 10 kHz, impulss ampValgustugevus: ±5V (100+s + 100ms)
Mahutavus
| Vahemik | Resolutsioon | Täpsus | Kaitse vastu ülemaks |
| 60.00nF | 0.01nF | ±(1.5% lugemine + 20dgt) | 1000VDC/ACrms |
| 600.0nF | 0.1nF | ± (1.2% lugemine + 8 numbrit) | |
| 6.000mF | 0.001mF | ± (1.5% lugemine + 8 numbrit) | |
| 60.00mF | 0.01mF | ± (1.2% lugemine + 8 numbrit) | |
| 600.0mF | 0.1mF | ± (1.5% lugemine + 8 numbrit) | |
| 6000mF | 1mF | ±(2.5% lugemine + 20dgt) |
Temperatuur K-tüüpi sondiga
| Vahemik | Resolutsioon | Täpsus (*) | Kaitse ülelaadimise eest |
| -40.0 °C ÷ 600.0 °C | 0.1°C | ± (1.5% näit + 3 °C) | 1000VDC/ACrms |
| 600 °C ÷ 1350 °C | 1°C | ||
| -40.0°F ÷ 600.0°F | 0.1°F | ± (1.5%rdg+ 5.4 °F) | |
| 600°F ÷ 2462°F | 1°F |
(*) Instrumendi täpsus ilma sondita; Määratud täpsus stabiilse keskkonnatemperatuuri korral ±1 °C juures
Pikaajaliste mõõtmiste korral suureneb näit 2 °C võrra
7.1.1. Võrdlusstandardid
Ohutus: IEC/EN61010-1
EMC: IEC/EN 61326-1
Isolatsioon: kahekordne isolatsioon
Saasteaste: 2
Ülepingetage kategooria: CAT IV 600V, CAT III 1000V
7.1.2. Üldised omadused
Mehaanilised omadused
Suurus (P x L x K): 175 x 85 x 55 mm (7 x 3 x 2 tolli)
Kaal (patareid kaasas): 400 g (14 untsi)
Mehaaniline kaitse: IP40
Toiteallikas
Aku tüüp: 1 × 7.4 V taaslaetav Li-ION aku, 1300 mAh
Akulaadija toide: 100/240 V vahelduvvool, 50/60 Hz, 10 V alalisvool, 1 A
Aku tühjenemise indikaator: sümbol "![]() ”Ekraanil
”Ekraanil
Aku eluiga: ca. 15 tundi
Automaatne väljalülitus: pärast 5 60 minutit jõudeolekut (võib olla keelatud)
Kaitsmed: F10A/1000V, 10 x 38mm (sisend 10A)
F800mA/1000V, 6 x 32mm (sisend mAuA)
Ekraan
Teisendus: TRMS
Omadused: värviline TFT, 6000 punkti ja tulpdiagramm
Samplingi sagedus: 3 korda sekundis
Mälu MÕÕTMED → max 2000, GRAAFIKUD → max 50 SALVESTUST → 128 max 20 000 punktist
7.1.3. Kasutamise keskkonnatingimused
Võrdlustemperatuur: 18°C ![]() 28 °C (64 °F
28 °C (64 °F ![]() 82 ° F)
82 ° F)
Töötemperatuur: 5 °C ÷ 40 °C (41 °F) ![]() 104 ° F)
104 ° F)
Lubatud suhteline õhuniiskus: <80%RH
Säilitustemperatuur: -20 °C ÷ 60 °C (-4 °F) ![]() 140 ° F)
140 ° F)
Säilitusniiskus: <80%RH
Maksimaalne töökõrgus: 2000 m (6562 jalga)
See instrument vastab Low Voltage Direktiiv 2014/35/EL (LVD) ja elektromagnetilise ühilduvuse direktiiv 2014/30/EL
See seade vastab Euroopa direktiivide 2011/65/EL (RoHS) ja 2012/19/EL (WEEE) nõuetele.
7.2. TARVIKUD
7.2.1. Lisatarvikud olemas
- 2/4 mm otstega testjuhtmete paar
- Adapter + K-tüüpi traatsond
- Li-ioon laetav aku Kood BAT64
- Akulaadija toiteplokk mitmikpistik + liides Kood A64
- Kandekott ja kasutusjuhend
7.2.2. Lisavarustus
- K-tüüpi õhu- ja gaasitemperatuuri andur Kood TK107
- K-tüüpi pooltahke aine temperatuuri sond Kood TK108
- K-tüüpi sond vedela aine temperatuuri mõõtmiseks Kood TK109
- K-tüüpi pinnatemperatuuri andur Kood TK110
- K-tüüpi pinnatemperatuuri andur 90° otsaga Kood TK111
- Paindlik andur klamp AC 30/300/3000A Cod. F3000U
- Standardmuundur klamp Alalis-/vahelduvvool 40–400 A/1 V, kood HT4006
- Standardmuundur klamp AC 1-100-1000A/1V Kod. HT96U
- Standardmuundur klamp AC 10-100-1000A/1V Kod. HT97U
- Standardmuundur klamp DC 1000A/1V Kod. HT98U
- Standardmuunduri adapter clamp HT-pistikuga kood NOCANBA
ABI
8.1. GARANTII TINGIMUSED
Sellel instrumendil on vastavalt üldistele müügitingimustele materjali- või tootmisdefektide garantii. Garantiiaja jooksul võib defektseid osi välja vahetada. Tootja jätab siiski endale õiguse toodet parandada või asendada. Kui instrumendi tagastatakse müügijärgsesse teenindusse või edasimüüjale, kannab transport klient. Saatmisviis lepitakse siiski eelnevalt kokku. Saadetisele lisatakse alati aruanne, milles on märgitud toote tagastamise põhjused. Saatmiseks kasutage ainult originaalpakendit. Mitteoriginaalse pakkematerjali kasutamisest tulenevad kahjustused kannab klient. Tootja ei vastuta inimeste vigastuste ega varalise kahju eest.
Garantii ei kehti järgmistel juhtudel:
- Lisaseadmete ja aku remont ja/või vahetamine (garantii ei kuulu).
- Remont, mis võib osutuda vajalikuks instrumendi ebaõige kasutamise või mitteühilduvate seadmetega kasutamise tõttu.
- Parandustööd, mis võivad osutuda vajalikuks sobimatu pakendamise tagajärjel.
- Remont, mis võib osutuda vajalikuks volitamata personali sekkumise tagajärjel.
- Seadmes tehtud muudatused ilma tootja selgesõnalise loata.
- Kasutamine ei ole instrumendi tehnilistes andmetes ega kasutusjuhendis ette nähtud.
Selle juhendi sisu ei tohi ilma tootja loata ühelgi kujul reprodutseerida.
Meie tooted on patenteeritud ja meie kaubamärgid on registreeritud. Tootja jätab endale õiguse teha tehnilistes andmetes ja hindades muudatusi, kui see on tingitud tehnoloogia täiustamisest.
8.2. ABI
Kui seade ei tööta korralikult, kontrollige enne müügijärgse teeninduse poole pöördumist aku ja kaablite seisukorda ning vajadusel vahetage need välja. Kui seade ikka veel valesti töötab, kontrollige, kas toodet kasutatakse vastavalt käesolevas juhendis antud juhistele. Kui instrument tagastatakse müügijärgsesse teenindusse või edasimüüjale, tasub transport kliendi enda kanda. Saadetis lepitakse siiski eelnevalt kokku. Saadetisele lisatakse alati aruanne, milles on märgitud toote tagastamise põhjused. Kasutage saatmiseks ainult originaalpakendit; mitteoriginaalse pakkematerjali kasutamisest tingitud kahju eest tasub Klient.
HT ITALIA SRL
Via della Boaria, 40
48018 – Faenza (RA) – Itaalia
T + 39 0546 621002
F +39 0546 621144
M info@ht-instrumnents.com
www.ht-instruments.it
HT INSTRUMENTS SL
C/ Legalitat, 89
08024 Barcelona – Hispaania
T +34 93 408 17 77
F +34 93 408 36 30
M info@htinstruments.es
www.ht-instruments.com/es-es/
HT INSTRUMENTS GmbH
Am Waldfriedhof 1b
D-41352 Korschenbroich – Saksamaa
T +49 (0) 2161 564 581
F +49 (0) 2161 564 583
M info@htinstruments.de
www.ht-instruments.de
KUS ME OLEME
 https://l.ead.me/bcsxjF
© Autoriõigus HT ITALIA 2024
Väljalase 3.01 – 04
Dokumendid / Ressursid
 |
HT Instruments HT64 TRMS/AC+DC digitaalne multimeeter värvilise LCD-ekraaniga [pdfKasutusjuhend HT64, HT64 TRMS AC DC digitaalne multimeeter värvilise LCD-ekraaniga, HT64, TRMS AC DC digitaalne multimeeter värvilise LCD-ekraaniga, Digitaalne multimeeter värvilise LCD-ekraaniga, Multimeeter värvilise LCD-ekraaniga, Värviline LCD-ekraan, LCD-ekraan, Ekraan |