1. Sissejuhatus
This manual provides instructions for the safe and efficient operation, installation, and maintenance of your hygger HG268 Water Pump with Controller. This versatile pump is designed for use in various aquatic environments, including aquariums, ponds, and fountains. It can function as a submersible or inline pump and features an external controller for adjustable flow rates and multiple operation modes.
Palun lugege see kasutusjuhend enne toote kasutamist hoolikalt läbi ja hoidke see alles edaspidiseks kasutamiseks.

Image 1.1: The hygger HG268 Water Pump with Controller in an aquarium environment.
2. Toote komponendid
Carefully unpack the product and ensure all components are present and undamaged. If any parts are missing or damaged, contact customer support immediately.
- Water Pump Unit
- Väline kontroller
- Toiteadapter
- Inlet Mesh Covers (2 types: side suction and bottom suction)
- Nozzles (3 sizes: 0.75", 0.98", 1.25")
- Suction Cups (pre-attached to pump base)
- Kasutusjuhend (see dokument)

Pilt 2.1: läbiview of all included components for the hygger HG268 Water Pump.
3. Tehnilised andmed
| Funktsioon | Detail |
|---|---|
| Kaubamärk | naudi |
| Mudeli number | HG268 |
| Võimsus | 15W |
| Maksimaalne voolukiirus | 580 GPH (2200 l/h) |
| Maksimaalne tõstekõrgus | 9.8 jalga (3 m) |
| Toote mõõtmed (P x L x K) | 5.7" x 2.7" x 3.6" (14.5 x 6.9 x 9.3 cm) |
| Voltage | AC 110-120V / 60Hz |
| Materjal | Plastikust |
| Amphibious Use | Yes (Submersible or Inline) |
| Kontrolleri omadused | 10 Adjustable Flow Levels, 3 Operation Modes (Constant, Wave, Feeding), LCD Display |
| Ohutusfunktsioonid | Anti-dry protection, automatic shut-off |
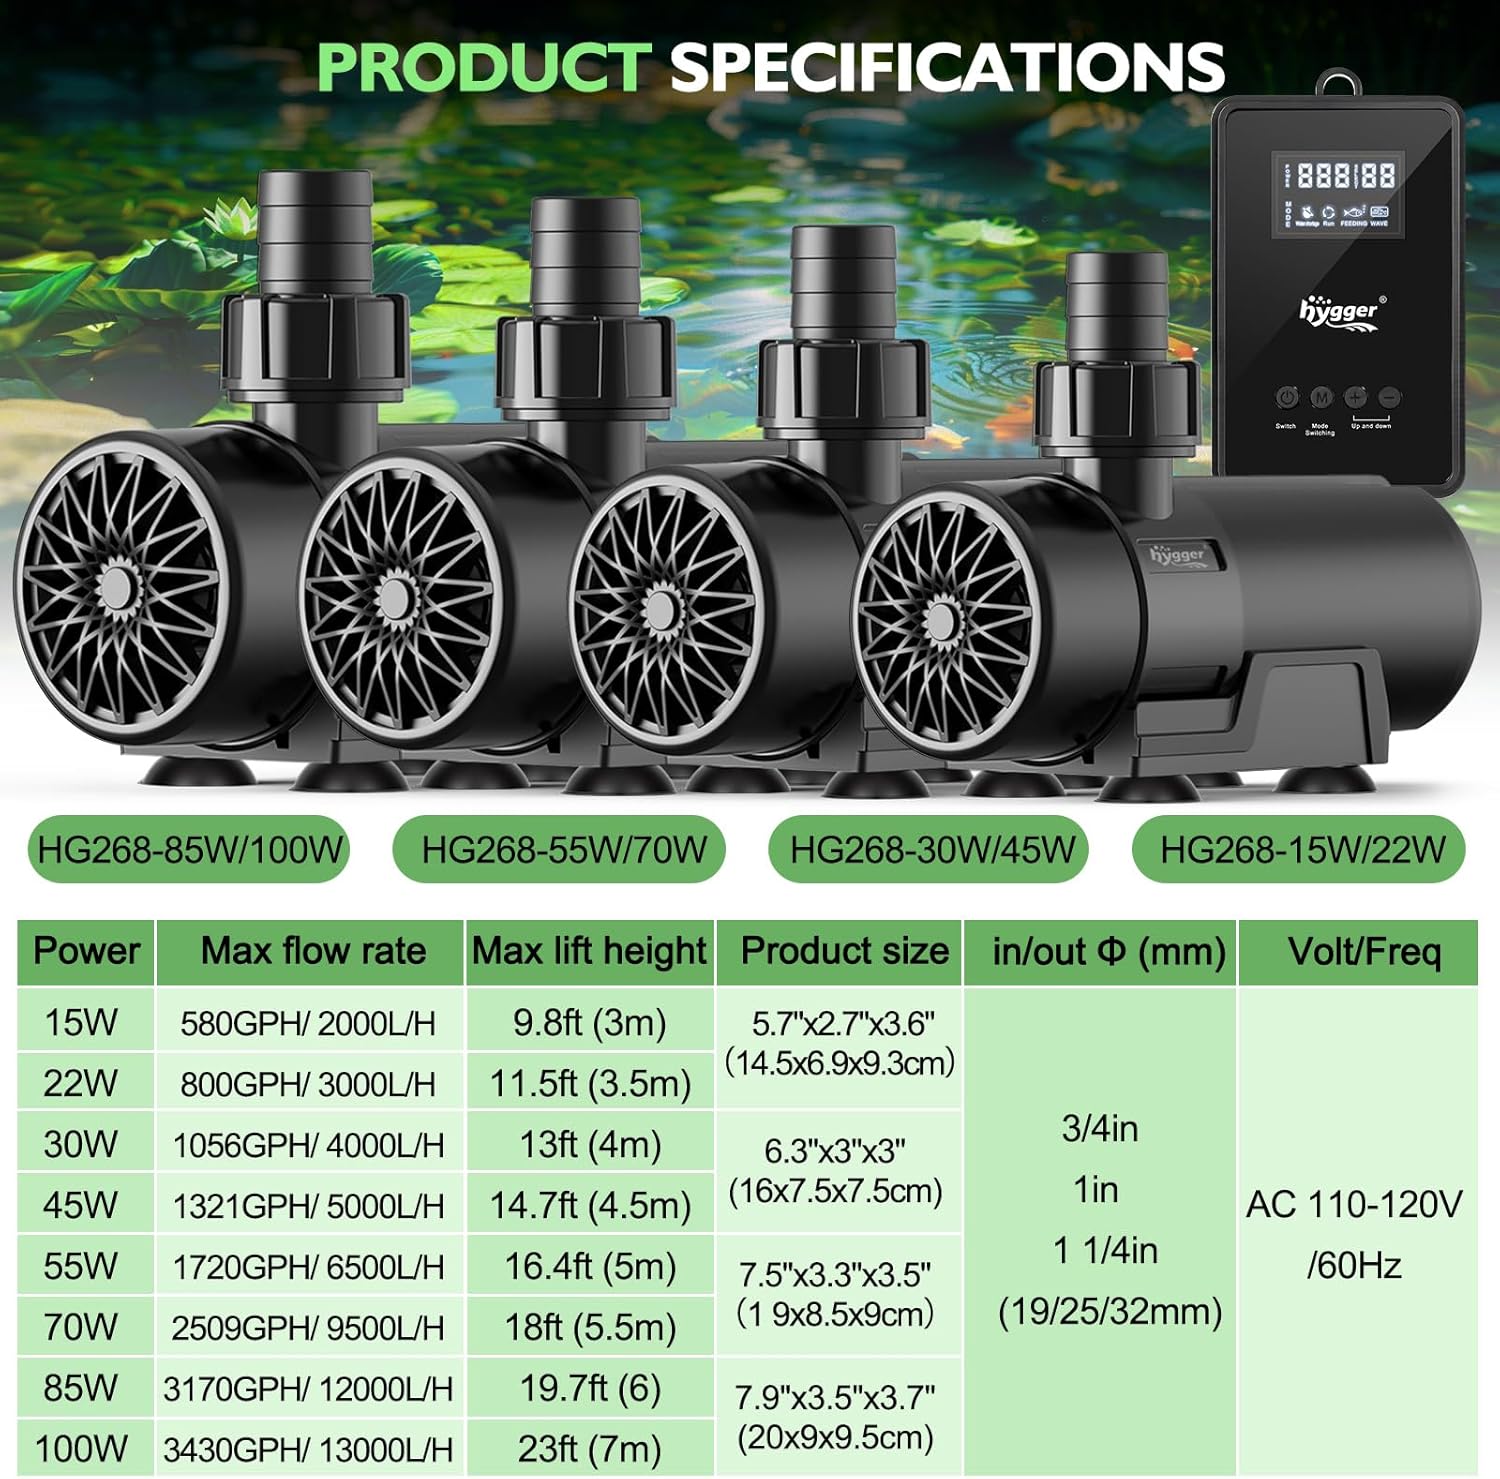
Image 3.1: Detailed specifications for the hygger water pump series, including the HG268 model.
4. Seadistusjuhised
4.1. Paigaldusmeetodi valimine
The hygger HG268 pump can be used in two primary configurations: submersible or inline (external).
Sukelapakas kasutamine:
For submersible use, the pump is placed directly into the water. You can choose between side suction or bottom suction inlet covers depending on your water level requirements.
- Side Suction: Attach the side suction cover to the pump. This is suitable for standard water levels.
- Bottom Suction: Attach the bottom suction cover for operation in lower water levels.
Inline (External) Use:
For inline use, the pump is placed outside the water, and water is fed to it via an inlet pipe. Ensure the pump is filled with water before starting operation to prevent dry running.
- Remove the protective inlet cover.
- Connect rigid or soft pipes to both the inlet and outlet ports.
- Ensure the pump is primed (filled with water) before connecting power.
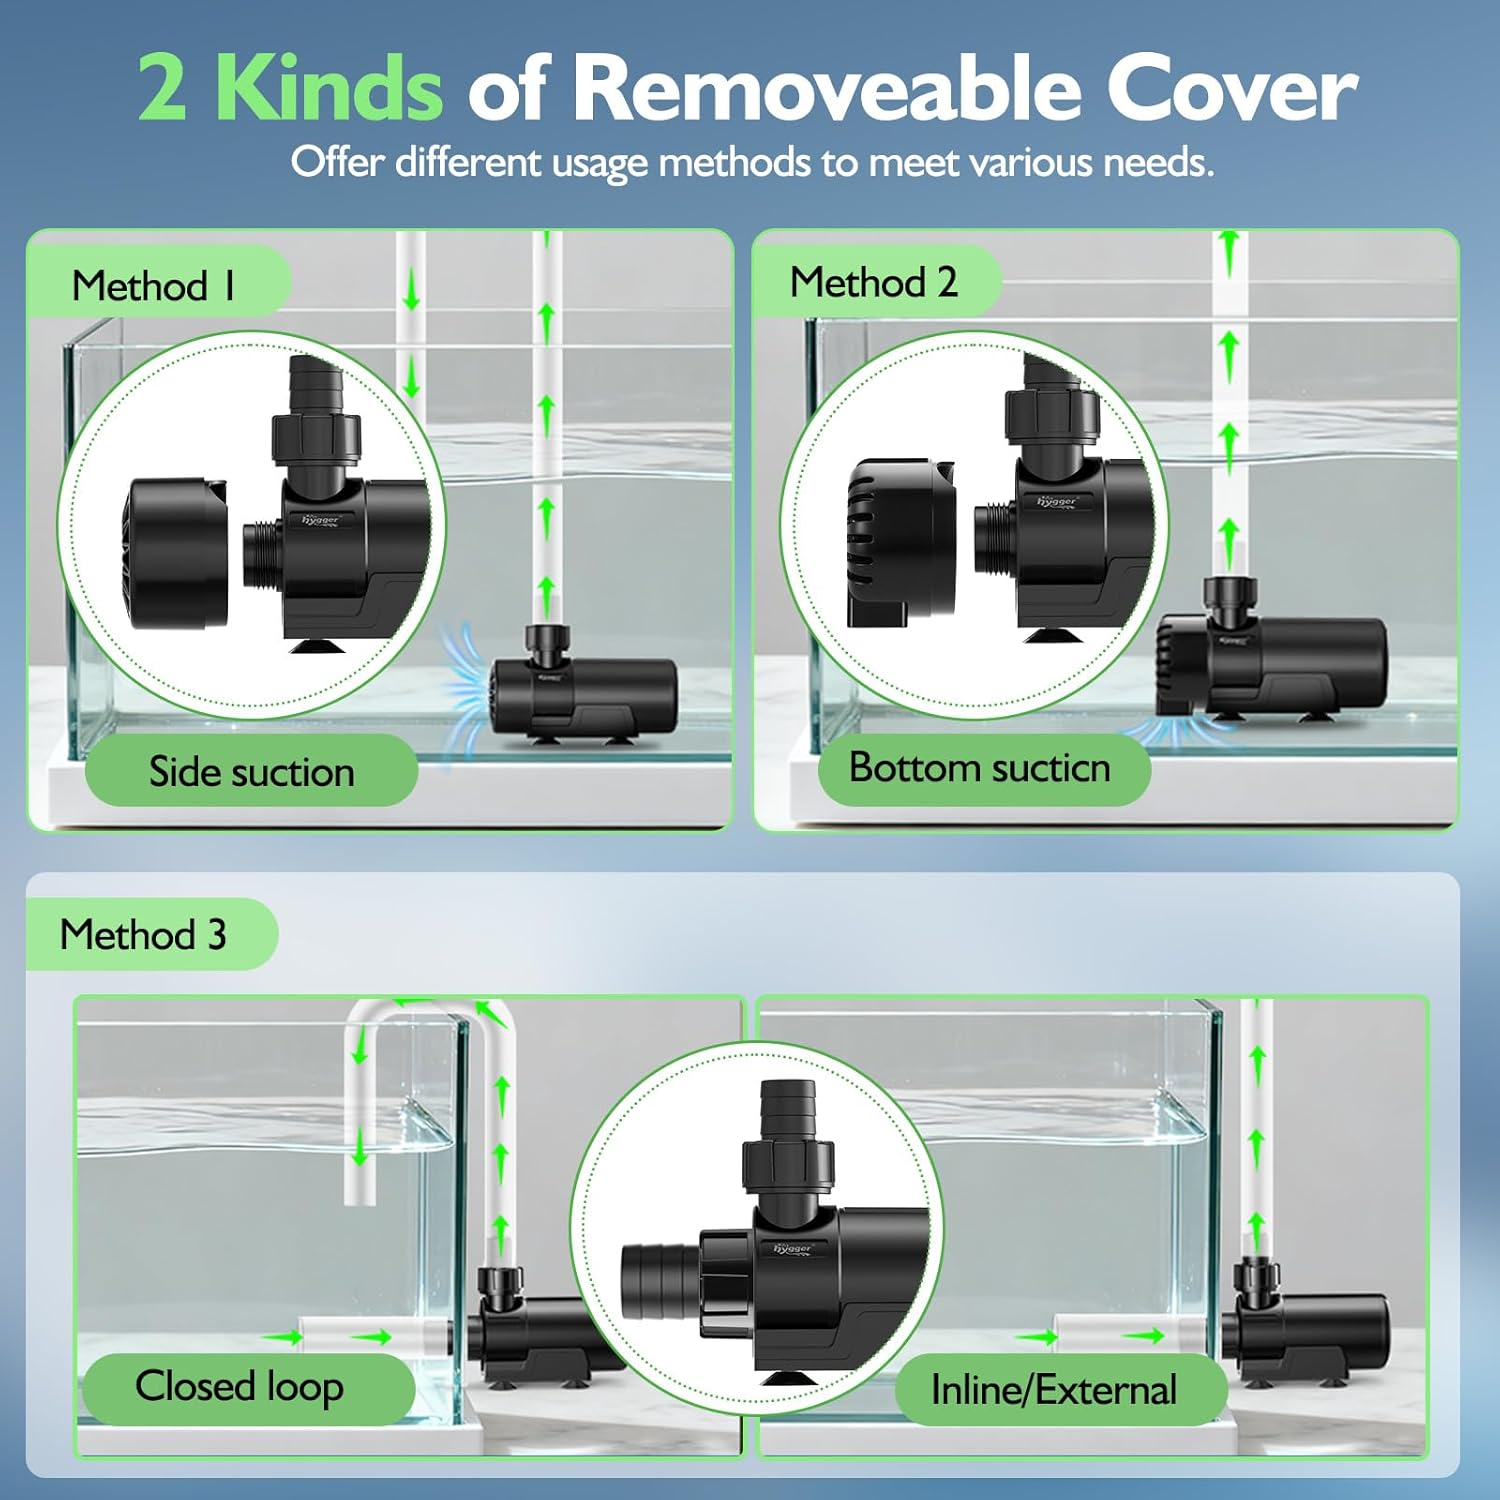
Image 4.1: Various installation methods for the hygger water pump, including submersible with side/bottom suction and inline/external configurations.
4.2. Düüside kinnitamine
The pump comes with three different sized nozzles (0.75", 0.98", 1.25") to accommodate various hose diameters and flow requirements.
- Select the appropriate nozzle size for your hose.
- Screw the chosen nozzle onto the pump's outlet port until secure.

Image 4.2: Different water flow options provided by the three included nozzle sizes.
4.3. Securing the Pump
The pump is equipped with four strong suction cups on its base for secure placement. Ensure the surface is clean and smooth before pressing the pump firmly into place.
5. Kasutusjuhised
5.1. Kontrolleri ühendamine
Connect the pump unit to the external controller, and then connect the controller to a standard AC 110-120V / 60Hz power outlet. The LCD display on the controller will illuminate.

Image 5.1: Instructions for the external controller, detailing button functions and display information.
5.2. Toide sisse/välja
Vajutage nuppu "Switch" button on the controller to turn the pump on or off.
5.3. Adjusting Flow Rate
The pump offers 10 adjustable flow rate levels. Use the "+" ja "-" buttons on the controller to increase or decrease the water flow speed. The current level will be displayed on the LCD screen.

Image 5.2: The adjustable flow rate feature of the hygger water pump, controlled externally.
5.4. Töörežiimid
The controller features three distinct operation modes: Constant Flow, Wave Mode, and Feeding Mode.
- Vajutage nuppu "M" (Mode Switching) nuppu, et saadaolevate režiimide vahel liikuda.
- Constant Flow Mode: Provides a continuous, steady water flow at the set speed.
- Lainerežiim: Creates a pulsating flow to simulate natural wave action. Use the "+" ja "-" buttons to adjust the wave bands.
- Söötmisrežiim: Pauses pump operation for 10 minutes to allow for feeding without disturbing food or fish. The pump will automatically restart after 10 minutes.

Image 5.3: Visual representation of the three adjustable operation modes.
6. Hooldus
Regulaarne hooldus tagab optimaalse jõudluse ja pikendab pumba eluiga.
6.1. Cleaning the Pump
The pump features a detachable design for easy cleaning without tools.
- Disconnect the pump from the power source before any cleaning or maintenance.
- Remove the front cover and impeller cover.
- Carefully remove the impeller/rotor assembly.
- Clean all components, including the impeller, impeller housing, and inlet covers, with a soft brush and clean water to remove any debris, algae, or mineral buildup.
- Inspect the ceramic shaft for wear or damage.
- Paigaldage kõik osad kindlalt tagasi.

Image 6.1: Detachable design for easy cleaning of the pump components.
6.2. Preventing Clogging
Regularly check the inlet mesh covers for debris accumulation. Clogging can reduce pump efficiency and potentially lead to motor strain.
7. Veaotsing
If you encounter issues with your hygger water pump, refer to the following table for common problems and solutions.
| Probleem | Võimalik põhjus | Lahendus |
|---|---|---|
| Pump ei käivitu | Toiteallikas puudub | Kontrollige toiteühendust, veenduge, et pistikupesa töötab. |
| Kontroller on välja lülitatud | Press the "Switch" button on the controller to turn on. | |
| Anti-dry protection activated | Ensure pump is fully submerged or primed for inline use. Check for blockages. | |
| Madal voolukiirus | Inlet/outlet clogged | Clean inlet covers, impeller, and hoses. |
| Liiga madalaks seatud voolukiirus | Increase flow rate using the "+" button on the controller. | |
| Air in pump (inline use) | Ensure pump is fully primed with water before starting. | |
| Liigne müra/vibratsioon | Praht tiivikus | Puhastage tiivik ja korpus. |
| Pump pole kindlalt paigaldatud | Ensure suction cups are firmly attached to a clean, smooth surface. | |
| Air trapped in pump/hoses | Gently shake the pump or adjust its position to release trapped air. |
8. Ohutusalane teave
- Enne hooldus-, paigaldus- või puhastustöid ühendage seade alati vooluvõrgust lahti.
- Do not operate the pump dry (without water) for extended periods, as this can damage the motor. The pump has anti-dry protection, but continuous dry running should be avoided.
- Ensure the power cord and controller are kept away from water to prevent electrical hazards.
- This pump is designed for fresh and marine water use. Do not use with flammable or corrosive liquids.
- Hoida lastele kättesaamatus kohas.
- Kui toitejuhe on kahjustatud, peab selle ohu vältimiseks välja vahetama tootja, hooldusesindaja või sarnase kvalifikatsiooniga isik.
9. Garantii ja tugi
hygger products are designed for durability and performance. This pump features a pure copper brushless motor and anti-corrosion ceramic shaft for efficient and quiet operation, energy-saving, and a longer service life.
If you experience any issues with your hygger water pump, please contact hygger customer support for assistance. Refer to the product packaging or the official hygger webTäpsema garantiiteabe ja kontaktteabe saamiseks külastage veebisaiti.


