1. Toote lõppview
The ikkle 3D Printer Stand provides an integrated storage solution for 3D printers, filament spools, filament dryers, and various 3D printing accessories. This design consolidates printing equipment and materials into a single unit, optimizing workspace organization. The stand features an enlarged left tabletop measuring 26.6 inches wide by 22.5 inches deep, suitable for most 3D printers. It offers extensive storage for up to 54 standard-sized filament spools on the bottom two tiers and up to 20 roll filaments on the top two right-side tiers. Additional open spaces are available for accessories.
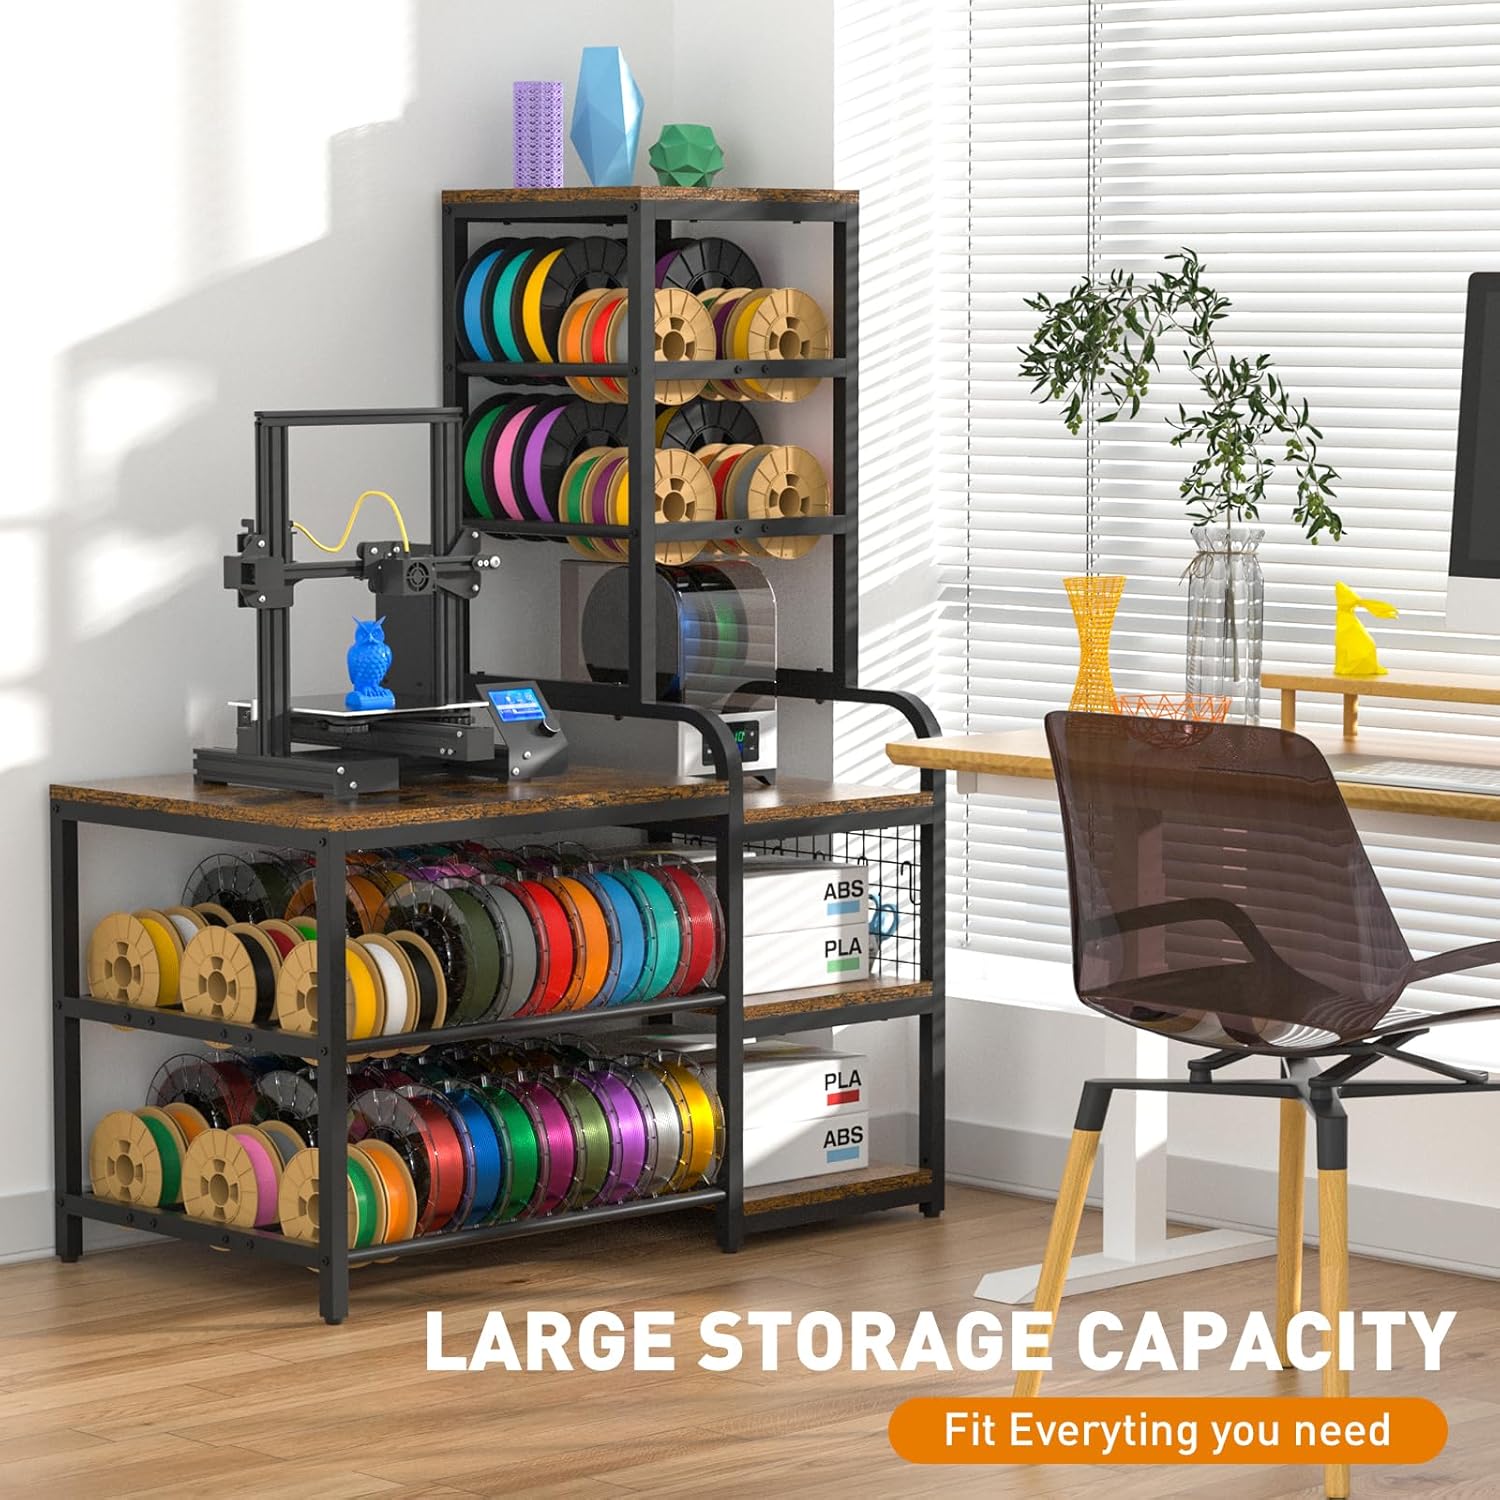
Joonis 1: Üldine view of the ikkle 3D Printer Stand with Filament Storage Rack, showcasing its large storage capacity for a 3D printer, filament spools, and accessories.

Figure 2: Illustration highlighting the stand's large storage capacity for various 3D printing essentials.
2. Pakendi sisu
Enne kokkupaneku alustamist veenduge, et kõik komponendid on olemas. Kui mõni osa on puudu või kahjustatud, võtke ühendust klienditoega.
- 3D Printer Table components (particleboard shelves, metal frame parts)
- Mounting Hardware (screws, bolts, nuts, S-hooks, adjustable feet)
- Paigaldusjuhised (see juhend)
3. Montaažijuhised
The 3D printer stand is designed for straightforward assembly. A detailed instruction manual is included to guide you through the process. It is recommended to have an electric screwdriver for quicker assembly.
3.1 General Assembly Guidance
- Pakkige kõik komponendid lahti ja kontrollige pakendi sisu nimekirja alusel.
- Identify all hardware. Separate screws and bolts by type to avoid confusion.
- Follow the step-by-step diagrams provided in the included installation instructions.
- Ensure all connections are secure but do not overtighten until the unit is fully assembled.
- Attach the adjustable feet to the bottom of the stand to ensure stability on uneven surfaces.
- Install the S-hooks onto the designated grid panel for tool organization.
Joonis 3: Lähivõte view of the adjustable feet and S-hooks, which are part of the assembly and user-friendly design.
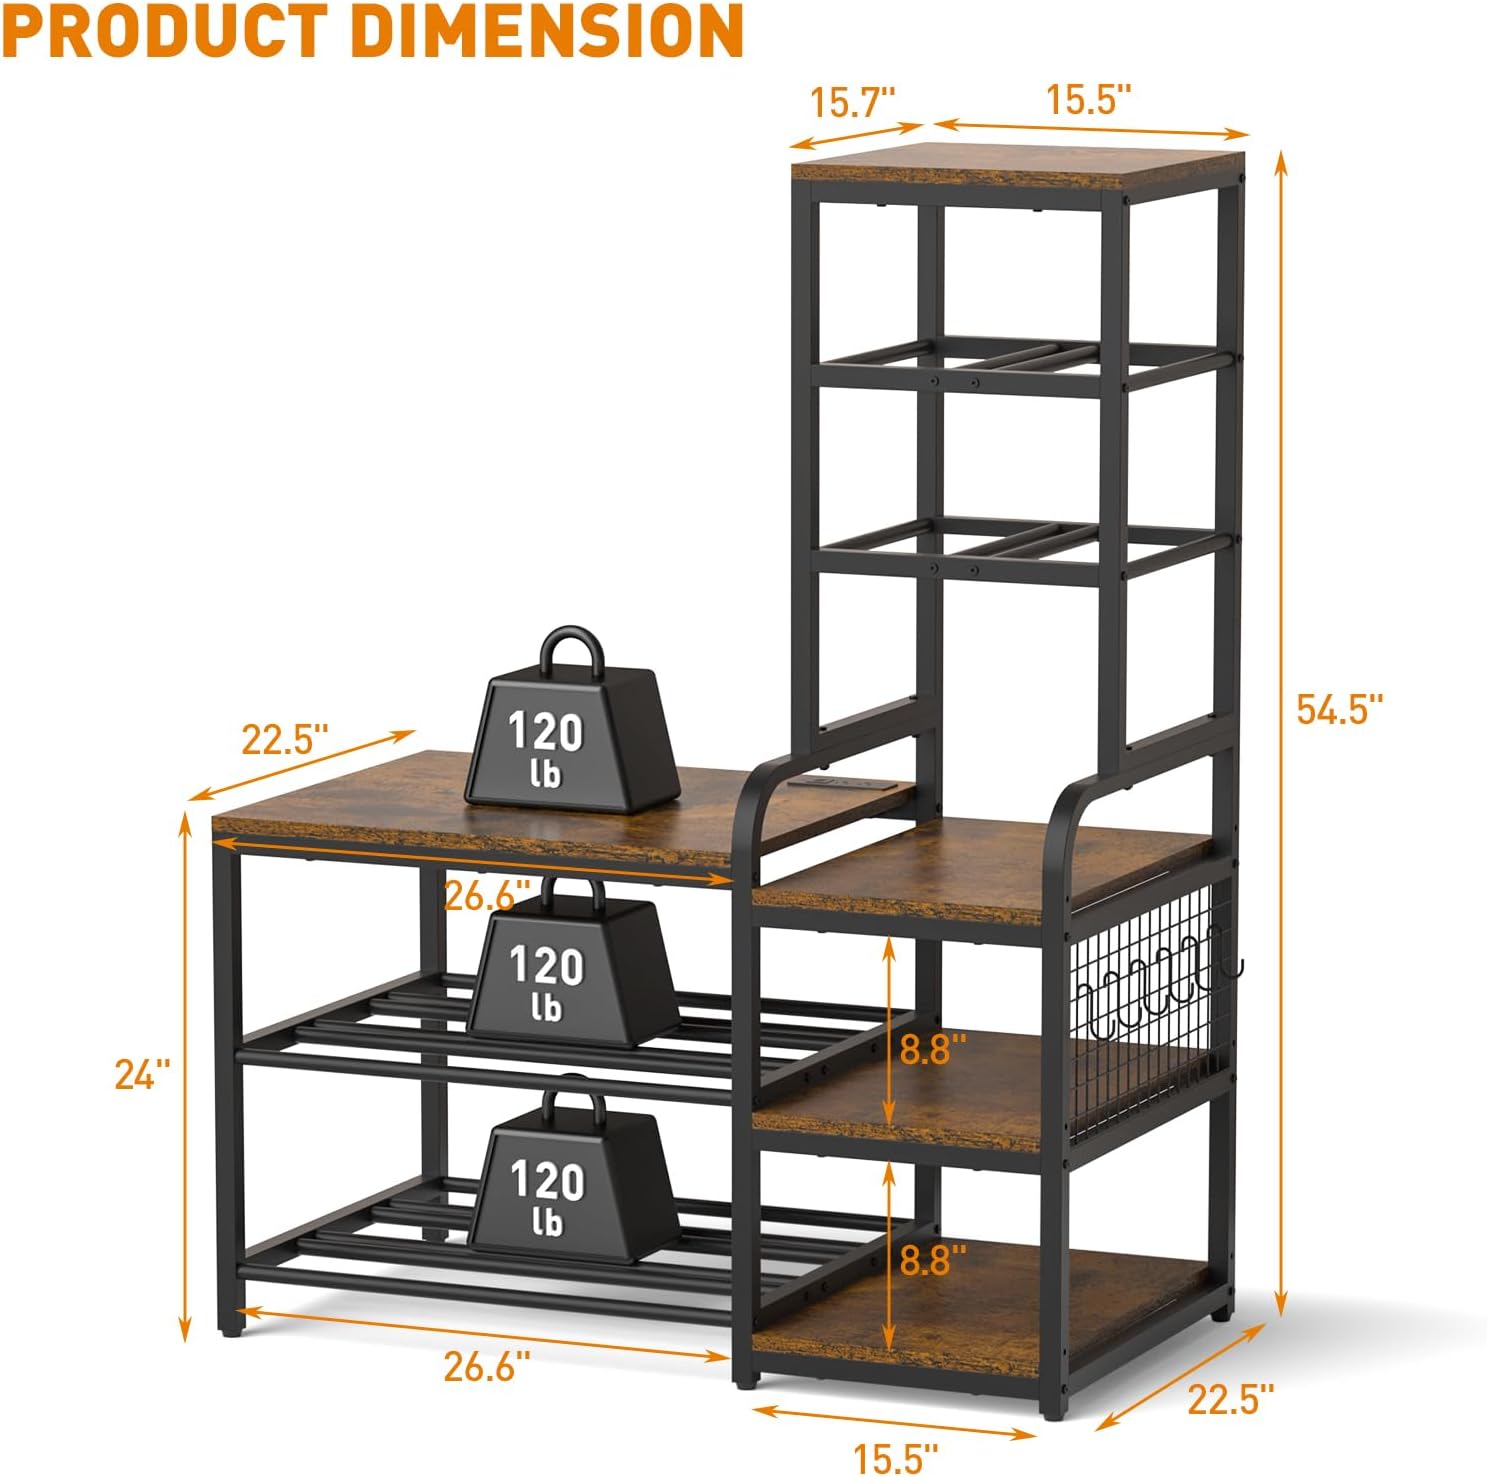
Figure 4: Detail of the open shelves and integrated S-hooks for organizing tools and accessories.
4. Toote omadused ja kasutamine
4.1 Integreeritud laadimisjaam
The stand includes a built-in power strip located on the tabletop. This charging station provides convenient access to power for your 3D printer, laptop, or other electronic devices.
- Vahelduvvoolu pistikupesad: 2 x 120V/12A
- USB-A pordid: 2 x 5V/2.1A
- USB-C port: 1 x 5V/3A
- Toitejuhtme pikkus: 4.9 jalga

Figure 5: Close-up of the integrated charging station with 2 AC outlets, 2 USB-A ports, and 1 USB-C port, along with its 4.9 ft power cord.

Figure 6: Visual representation of the built-in power strip supporting various appliances.
4.2 Filament Storage Capacity
The stand is designed to accommodate a large quantity of filament spools, supporting various sizes.
- Left Side Bottom Tiers: Holds up to 54 standard-sized spools.
- Right Side Top Tiers: Holds up to 20 roll filaments.
- Compatible with 200g (6.2in), 500g (7.9in), and 1kg (7.9in) filament spools.

Figure 7: Image illustrating the filament spool storage capacity, showing various spool sizes (200g, 500g, 1kg) and their dimensions.

Figure 8: Diagram showing the filament storage sections, designed to hold numerous spools.
4.3 Printeri ühilduvus
The enlarged left tabletop (26.6"W x 22.5"D) is designed to accommodate most standard 3D printers.

Figure 9: Image showing the dimensions of the main tabletop (26.6"W x 22.5"D) and examples of compatible 3D printers.
4.4 Stability and Durability
Constructed from premium particleboard and a sturdy metal structure, the stand is designed for durability. The painted surface helps prevent rust and corrosion. The frame is secured with screws to ensure stability, supporting up to 300 lbs per tier.

Figure 10: Diagram showing the overall product dimensions and the 120 lb weight capacity per tier.

Figure 11: Close-up of the sturdy metal frame and particleboard construction, emphasizing durability.
5. Hooldus
To ensure the longevity and appearance of your ikkle 3D Printer Stand, follow these maintenance guidelines:
- Puhastamine: Pühkige pindu pehme, damp lapiga. Vältige abrasiivseid puhastusvahendeid või karme kemikaale, mis võivad viimistlust kahjustada.
- Lekked: Promptly clean any spills, especially on the particleboard surfaces, to prevent water damage. The surface is designed to resist minor liquid exposure.
- Riistvara: Kontrollige regulaarselt kõiki kruvisid ja polte, et need oleksid kindlalt kinni. Vajadusel pingutage neid uuesti, et säilitada konstruktsiooni terviklikkus.
- Paigutus: Avoid placing the stand in direct sunlight or near heat sources to prevent material degradation.

Figure 12: Image showing a surface with water droplets, indicating the water-resistant properties of the stand's finish.
6. Veaotsing
If you encounter issues during assembly or use, refer to the following common troubleshooting tips:
- Raskused kokkupanekul: Ensure you are using the correct hardware for each step as indicated in the detailed instruction manual. Some users have reported issues with bolt sizes; double-check part numbers and contact support if discrepancies are found.
- Seisu kõikumine: Verify that all screws and bolts are securely tightened. Adjust the anti-scratch pads on the bottom of the stand to compensate for uneven floor surfaces.
- Puuduvad osad: If any components or hardware are missing from the package, refer to the package contents list and contact customer support for assistance.
- Pikendusjuhe ei tööta: Ensure the power cord is fully plugged into a functional wall outlet. Check if the power strip's circuit breaker (if present) has tripped.
7. Tehnilised andmed
| Funktsioon | Spetsifikatsioon |
|---|---|
| Kaubamärk | ikkle |
| Mudeli number | IK600204-P |
| Toote mõõtmed (P x L x K) | 22.5 x 42.1 x 54.5 tolli |
| Kauba kaal | 44 naela |
| Materjal | Metal, Wood (Particleboard) |
| Viimistluse tüüp | Maalitud |
| Värv | Black frame with Vintage-paneelid |
| Riiulite arv | 5 |
| Kaaluvõimsus astme kohta | Up to 300 lbs (as per product description, though image shows 120lb) |
| Erifunktsioon | Heavy Duty, Built-in Power Strip, Adjustable Feet, S-Hooks |
| Nõutav kokkupanek | Jah |
Figure 13: Diagram illustrating the product dimensions and individual tier weight capacity.
8. Garantii ja tugi
For any questions, concerns, or issues regarding your ikkle 3D Printer Stand, please contact ikkle customer support. Refer to your purchase documentation for specific warranty details. If you encounter any problems during the assembly or use process, timely contact with customer service is recommended for assistance.


