Oluline ohutusteave
Please read this manual thoroughly before operating the Bear 3L Hot Water Dispenser. Retain this manual for future reference. Failure to follow these instructions may result in electric shock, fire, or serious injury.
- Elektriohutus: Veenduge, et toiteallikas vastaks mahuletage specified on the appliance. Do not immerse the appliance, cord, or plug in water or other liquids. Unplug when not in use and before cleaning.
- Hot Water Caution: The dispenser produces hot water. Exercise extreme caution to prevent burns. Keep hands and face clear of the dispensing nozzle during operation.
- Laste ohutus: This appliance is not intended for use by persons (including children) with reduced physical, sensory, or mental capabilities, or lack of experience and knowledge, unless they have been given supervision or instruction concerning use of the appliance by a person responsible for their safety. Children should be supervised to ensure they do not play with the appliance. The child lock feature should always be engaged when not in active use.
- Paigutus: Place the dispenser on a stable, flat, heat-resistant surface, away from edges and out of reach of children. Do not place near hot gas or electric burners, or in a heated oven.
- Hooldus: Do not attempt to repair the appliance yourself. Contact qualified service personnel for any repairs.
Toode läbiview
Familiarize yourself with the components of your Bear 3L Hot Water Dispenser.
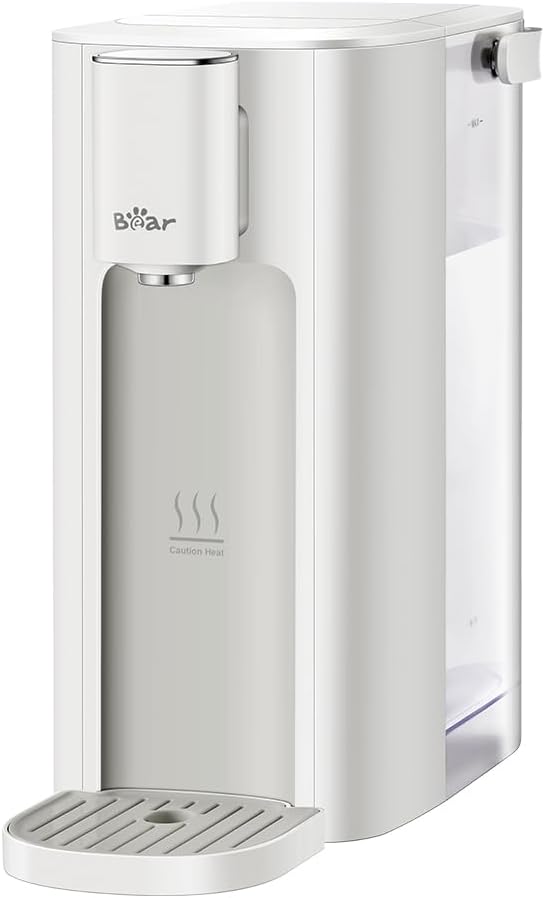
Image 1: Bear 3L Hot Water Dispenser. A front-angled view of the Bear 3L Hot Water Dispenser in cream white. It features a sleek, minimalist design with a water dispensing nozzle on the left, a transparent water tank on the right, and a removable drip tray at the base. The 'Bear' logo is visible above the nozzle, and 'Caution Heat' text with steam icons is printed below it.
Põhikomponendid:
- Veepaak: 3-liter capacity, transparent for easy water level monitoring, and detachable for filling and cleaning.
- Doseerimisotsik: Where hot water is released.
- Juhtpaneel: Digital touch screen for temperature and volume selection, and activation of functions.
- Tilgutusalus: Removable tray at the base to catch any drips or spills.
- Toitejuhe: Seadme ühendamiseks elektrivõrku.
Seadistamine
- Lahtipakkimine: Carefully remove all packaging materials. Inspect the dispenser for any damage.
- Esmane puhastamine: Before first use, wash the detachable water tank and drip tray with mild detergent and rinse thoroughly. Wipe the exterior of the dispenser with a damp riie.
- Paigutus: Place the dispenser on a dry, stable, and level surface. Ensure there is adequate space around the unit for ventilation.
- Veepaagi täitmine:
- Eemaldage veepaak seadme tagaküljelt.
- Fill the tank with clean, potable water. Do not exceed the maximum fill line.
- Securely reattach the water tank to the dispenser.
- First Use Flush: For the first use, or after extended periods of non-use, it is recommended to flush the system.
- Place a large heat-resistant container (at least 500ml capacity) under the dispensing nozzle.
- Select the highest temperature (90°C) and maximum volume (500ml).
- Dispense water. Repeat this process 2-3 times to ensure the internal components are clean.
- Toiteühendus: Ühendage toitejuhe maandatud pistikupessa. Digitaalne ekraan süttib.
Kasutusjuhised
The Bear Hot Water Dispenser features a digital touch screen for easy operation.
- Toide sisse: The dispenser is typically in standby mode when plugged in. Touch the power icon on the digital screen to activate.
- Unlock Feature: For safety, the dispenser has a child lock. Touch and hold the unlock icon (or follow on-screen prompts) to unlock the controls before dispensing.
- Valige temperatuur: Touch the temperature icon to cycle through the available temperature settings: 45°C, 60°C, 70°C, 80°C, 85°C, 90°C. Select your desired temperature. Note: The maximum temperature is 90°C.
- Valige vee maht: Touch the volume icon to cycle through the available water volume settings: 150ml, 200ml, 250ml, 300ml, 500ml. Select the desired volume.
- Väljastage vesi: Place your cup or container under the dispensing nozzle. Once temperature and volume are selected and the unit is unlocked, touch the dispense/start button. Hot water will begin to flow within approximately 3 seconds.
- Väljastamise lõpetamine: To stop water flow before the selected volume is reached, touch the dispense/start button again.
- LED öövalgus: The dispenser is equipped with an LED night light for visibility in low-light conditions. Its operation is typically automatic or can be toggled via the control panel (refer to on-screen icons if available).
Hooldus ja puhastus
Regular cleaning ensures optimal performance and extends the lifespan of your dispenser.
- Enne puhastamist: Always unplug the dispenser from the power outlet and allow it to cool completely before cleaning.
- Väline puhastus: Pühkige välispindu pehme, damp riie. Ärge kasutage abrasiivseid puhastusvahendeid ega lahusteid.
- Veepaagi puhastamine:
- Eemaldage veepaak.
- Wash with mild dish soap and warm water. Rinse thoroughly to remove all soap residue.
- Dry completely before reattaching.
- Tilgaaluse puhastamine:
- Remove the drip tray from the base of the dispenser.
- Tühjendage kogunenud vesi.
- Wash with mild soap and water, then rinse and dry.
- Automaatne puhastusprogramm: The dispenser features an automatic cleaning program to remove accumulated water and deep clean the interior.
- Refer to the digital touch screen for the specific icon or menu option to activate the automatic cleaning program.
- Follow the on-screen instructions. This process typically involves dispensing hot water, so ensure a large container is placed under the nozzle.
- Katlakivi eemaldamine: Over time, mineral deposits (limescale) may build up, especially in hard water areas.
- Use a descaling solution suitable for kitchen appliances, following the product's instructions.
- Alternatively, a solution of white vinegar and water (1:1 ratio) can be used. Fill the water tank with the descaling solution.
- Run the dispenser through several cycles with the descaling solution, ensuring a container is in place.
- After descaling, rinse the water tank thoroughly and run several cycles with fresh, clean water to flush out any remaining descaling solution.
Veaotsing
Enne klienditoega ühenduse võtmist tutvuge palun järgmiste levinud probleemide ja lahendustega.
| Probleem | Võimalik põhjus | Lahendus |
|---|---|---|
| No power/Dispenser not turning on |
|
|
| Vett ei väljastatud |
|
|
| Vesi pole piisavalt kuum |
|
|
| Vee lekkimine |
|
|
Tehnilised andmed
| Funktsioon | Detail |
|---|---|
| Kaubamärk | Karu |
| Mudeli number | YSJ-E40T2-2025NEW |
| Värv | Koorvalge |
| Mahutavus | 3 liitrit |
| Võimsus | 2050W |
| Temperatuuri seaded | 45 °C, 60 °C, 70 °C, 80 °C, 85 °C, 90 °C |
| Water Volume Choices | 150ml, 200ml, 250ml, 300ml, 500ml |
| Toote mõõtmed (P x L x K) | 5.08 x 11.61 x 10.87 tolli |
| Kauba kaal | 4.51 naela |
| UPC | 199284549692 |
| Tootja | Bear Electric Appliance Co., Ltd. |
Garantii ja tugi
For warranty information or technical support, please refer to the documentation included with your purchase or contact Bear customer service. Keep your proof of purchase for warranty claims.
Manufacturer: Bear Electric Appliance Co.,Ltd


