1. Sissejuhatus
The MiBOXER SPIW5 5-in-1 SPI+DMX LED Controller is a versatile lighting control solution designed for both smart home and professional lighting systems. It supports five output modes: DIM, CCT, RGB, RGBW, and RGB+CCT, making it compatible with a wide range of constant voltage LED strips and addressable digital pixel LEDs (SPI). This controller features dual-output functionality for SPI signal (e.g., WS2811, SK6812) and DMX512 protocol, allowing integration with both pixel-based and stage lighting setups. Control is available via the MiBOXER Smart App over WiFi for scene customization, scheduling, and group management, and through 2.4GHz RF for compatibility with MiBOXER remotes.
2. Toote omadused
- Supports WiFi and 2.4G wireless transmitting technology.
- Built-in SPI/DMX dual communication protocol.
- Allows adjustment of different modes, color, brightness, and dynamic illumination effects.
- Output signal: SPI (TTL) 800Kbps, DMX: 250Kbps, 500Kbps, 750Kbps.
- Compatible with DIM, CCT, RGB, RGBW, and RGB+CCT output modes.
- Supports various addressable digital pixel LEDs (e.g., WS2811, SK6812).
- Control via MiBOXER Smart App (WiFi) and 2.4GHz RF remotes.
3. Tehnilised andmed
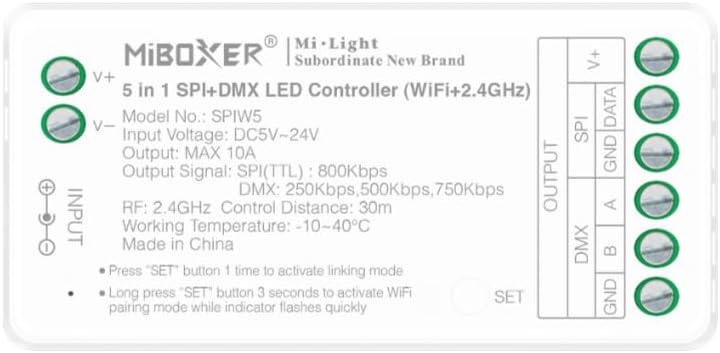
3.1. pilt: Esiosa view of the MiBOXER SPIW5 controller showing input/output terminals and specifications.
| Parameeter | Väärtus |
|---|---|
| Mudeli nr. | SPIW5 |
| Sisend Voltage | DC5V ~ 24V |
| Väljundvool | MAX 10A |
| Output Signal (SPI) | TTL 800Kbps |
| Output Signal (DMX) | 250Kbps, 500Kbps, 750Kbps |
| RF Control Frequency | 2.4 GHz |
| RF Control Distance | 30m (approx. 98 feet) |
| Töötemperatuur | -10 ~ 40 ° C (14 ~ 104 ° F) |
| Mõõtmed | 74.5 mm x 36 mm x 17 mm (umbes 3 x 1.4 x 0.7 tolli) |
| Kauba kaal | 1.6 untsi |
| Materjal | Plastikust |
| Kasutamine siseruumides/välistingimustes | Siseruumides |

3.2. pilt: Detailed dimensions of the MiBOXER SPIW5 controller and its packaging.
4. Pakendi sisu

4.1. pilt: Contents included in the MiBOXER SPIW5 product package.
The MiBOXER SPIW5 package typically includes:
- 1x MiBOXER SPIW5 5-in-1 SPI+DMX LED Controller
- 1x Kasutusjuhend (käesolev dokument)
- 1x Connector Cable (for power or signal, as applicable)
5. Seadistamine ja installimine
Before installation, ensure all power is disconnected. Incorrect wiring can damage the controller or LED strips.
5.1 Ühendusskeem
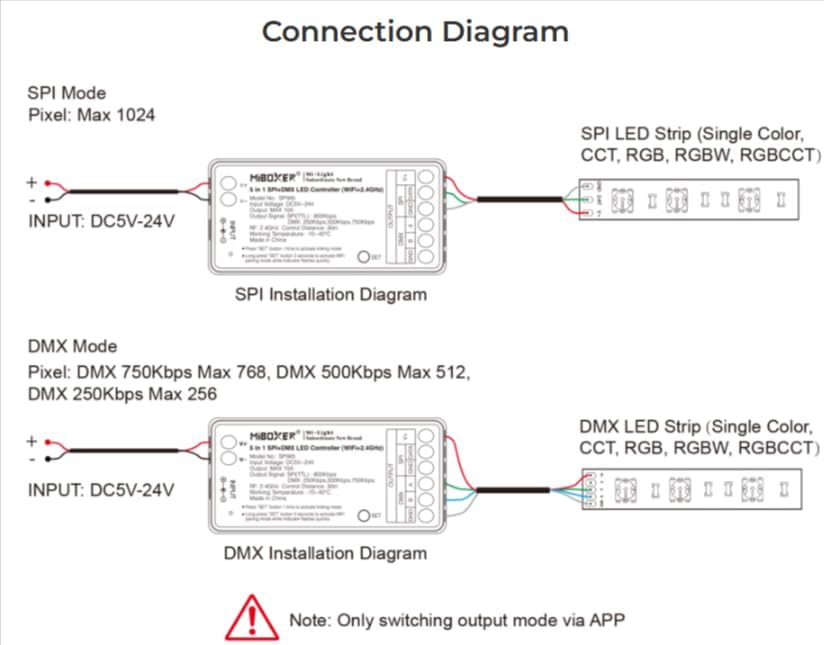
5.1. pilt: Connection diagrams for both SPI and DMX modes, illustrating power and signal connections.
The controller supports both SPI and DMX output modes. The output mode can only be switched via the MiBOXER Smart App.
SPI-režiimi paigaldamine
- Connect the DC5V-24V power supply to the SISEND V+ ja V- terminals of the controller.
- Connect the SPI LED strip (e.g., single color, CCT, RGB, RGBW, RGB+CCT) to the OUTPUT SPI klemmid:
- Ühendage ANDMED line from the LED strip to the ANDMED kontrolleri terminal.
- Ühendage GND line from the LED strip to the GND kontrolleri terminal.
- Ensure the maximum pixel count for SPI mode is 1024.
DMX-režiimi paigaldamine
- Connect the DC5V-24V power supply to the SISEND V+ ja V- terminals of the controller.
- Connect the DMX LED strip (e.g., single color, CCT, RGB, RGBW, RGB+CCT) to the OUTPUT DMX klemmid:
- Ühendage DMX A line from the LED strip to the A kontrolleri terminal.
- Ühendage DMX B line from the LED strip to the B kontrolleri terminal.
- Ühendage GND line from the LED strip to the GND kontrolleri terminal.
- Note the maximum pixel counts for DMX mode based on speed: 750Kbps Max 768 pixels, 500Kbps Max 512 pixels, 250Kbps Max 256 pixels.
6. Kasutusjuhised
The MiBOXER SPIW5 controller can be operated via WiFi using the MiBOXER Smart App or via 2.4GHz RF remotes.
6.1 Süsteem läbiview

6.1. pilt: Diagram illustrating the various control methods for the MiBOXER SPIW5 controller, including app, voice assistants, and remote.
6.2 WiFi Pairing (MiBOXER Smart App)
- Laadige alla MiBOXER Smart App oma seadme rakenduste poest.
- Veenduge, et teie nutitelefon oleks ühendatud 2.4 GHz WiFi-võrguga.
- Power on the SPIW5 controller.
- Long press the "SET" button on the controller for 3 seconds until the indicator light flashes quickly. This activates WiFi pairing mode.
- Open the MiBOXER Smart App, follow the on-screen instructions to add a new device, and connect to the controller.
- Once paired, you can control the LED strips, adjust modes, colors, brightness, and set schedules via the app.

6.2. pilt: Examples of the MiBOXER Smart App interface for controlling LED lighting.
6.3 2.4G RF Remote Linking
- Ensure the SPIW5 controller is powered on.
- Press the "SET" button on the controller one time to activate linking mode. The indicator light will flash slowly.
- Within 3 seconds of pressing the "SET" button, perform the linking operation on your MiBOXER 2.4G RF remote control (refer to your remote's specific instructions for linking).
- Successful linking is usually indicated by the LED strip flashing or changing color.
7. Hooldus
- Keep the controller in a dry environment, away from moisture and direct sunlight.
- Puhastage seadet pehme ja kuiva lapiga. Ärge kasutage tugevaid kemikaale ega abrasiivseid puhastusvahendeid.
- Tagage kontrolleri ümber piisav ventilatsioon, et vältida ülekuumenemist.
- Kontrollige regulaarselt juhtmestikuühenduste turvalisust ja terviklikkust.
8. Veaotsing
| Probleem | Võimalik põhjus | Lahendus |
|---|---|---|
| LED-riba ei sütti. | No power, incorrect wiring, faulty LED strip, incorrect output mode. | Check power supply connection. Verify wiring according to diagrams. Test LED strip with another power source. Ensure correct output mode (SPI/DMX) is selected via the app. |
| WiFi kaudu ei saa ühendust luua. | Controller not in pairing mode, incorrect WiFi network (not 2.4GHz), incorrect password, router issues. | Long press "SET" for 3 seconds until indicator flashes quickly. Ensure phone is on 2.4GHz WiFi. Re-enter WiFi password. Restart router and controller. |
| 2.4G RF remote not working. | Remote not linked, remote battery low, remote out of range. | Press "SET" once on controller, then link with remote within 3 seconds. Replace remote battery. Ensure remote is within 30m range. |
| LED effects are not smooth or incorrect. | Incorrect LED strip type selected in app, pixel count mismatch, signal interference. | Verify the LED strip type and pixel count settings in the MiBOXER Smart App. Check for strong electromagnetic interference. |
9. Garantii ja tugi
Garantiiteabe ja tehnilise toe saamiseks pöörduge MiBOXERi ametliku esindaja poole. webveebisaidilt või võtke ühendust edasimüüjaga. Hoidke ostutšekk ostutõendina alles.
Lisateabe saamiseks võite külastada MiBOXERi pood Amazonis.