1. Sissejuhatus
Thank you for choosing the MYPIN Portable Cordless Pressure Washer, Model CE0413. This device is designed for efficient and convenient cleaning of various surfaces, including vehicles, floors, walls, and fences. Its cordless design and adjustable pressure settings provide versatility for different cleaning tasks. Please read this manual thoroughly before operation to ensure safe and effective use.
2. Ohutusjuhised
- Always wear appropriate safety gear, including eye protection, when operating the pressure washer.
- Keep hands, face, and body parts away from the spray nozzle during operation. The high-pressure water stream can cause injury.
- Do not direct the water stream at people, pets, or electrical equipment.
- Ensure the battery is fully charged before use and properly inserted into the device.
- Disconnect the battery when the pressure washer is not in use or during maintenance.
- Use only clean water with the pressure washer. Do not use corrosive liquids or solvents.
- Hoidke seadet lastele kättesaamatus kohas.
- Inspect the hose, nozzle, and connections for damage before each use. Do not operate if any components are damaged.
3. Pakendi sisu
Veenduge, et kõik allpool loetletud esemed on teie pakendis olemas:
- 1 x Cordless High-Pressure Washer
- 2 x Lithium-Ion Batteries (3.0Ah)
- 1 x Charging Plug
- 1 x Suitcase for storage
- 1 x 5-meter (196-inch) PVC Hose
- 1 x 6-in-1 Nozzle
- 1 x Foam Bottle
- 1 x Towel
- 1 x Bottle Connector
- 1 x kiirühendus
- 1x veefilter
- 1 x kasutusjuhend

Pilt: Üleview of all included accessories and the pressure washer unit.
4. Seadistusjuhised
Survepesuri esmakordseks kasutamiseks ettevalmistamiseks järgige neid samme:
- Laadige akusid: Connect the charging plug to the battery and a power outlet. The indicator light will be red during charging and turn green when fully charged.
- Connect the Water Filter: Insert the water filter into one end of the PVC hose. This filter prevents impurities from entering the pump.
- Kiirühenduse paigaldamine: Attach the quick connector to the other end of the PVC hose.
- Attach Hose to Sprayer Gun: Connect the quick connector on the hose to the inlet on the sprayer gun.
- Paigalda düüs: Press and twist the desired 6-in-1 nozzle onto the sprayer gun.
- Sisestage aku: Slide a fully charged battery into the battery slot on the pressure washer handle until it clicks into place.
- Veeallika ettevalmistamine: Place the end of the PVC hose with the water filter into a bucket of water or a water pool. Ensure the filter is fully submerged.

Image: Visual guide for connecting the water filter, hose, quick connector, nozzle, and battery.

Image: Illustration of the battery charger with red light indicating charging and green light indicating full charge.

Image: Demonstrates using a water bucket or a water pool as a source for the pressure washer.
5. Kasutusjuhised
Pärast kokkupanekut ja veeallikaga ühendamist võite tööle hakata:
- Toide sisse: Press the power button on the handle. The LCD display will illuminate.
- Adjust Pressure Mode: Use the touch screen on the LCD display to adjust the pressure mode from 1 to 10. Press '+' to increase pressure and '-' to decrease pressure. The display also shows battery percentage.
- Select Nozzle Spray Pattern: Rotate the head of the 6-in-1 nozzle to select the desired spray pattern: 0° (direct stream for stubborn stains), 15°, 25°, 40° (wider spray for general cleaning), Upward (for hard-to-reach areas like undercarriages), or Shower (for gentle rinsing or watering plants).
- Alustage puhastamist: Aim the nozzle at the surface to be cleaned and press the trigger to start the water flow. Release the trigger to stop.
- Using the Foam Bottle: For foam cleaning, fill the foam bottle with detergent and attach it to the sprayer gun. The pressure washer will mix the detergent with water to create foam.
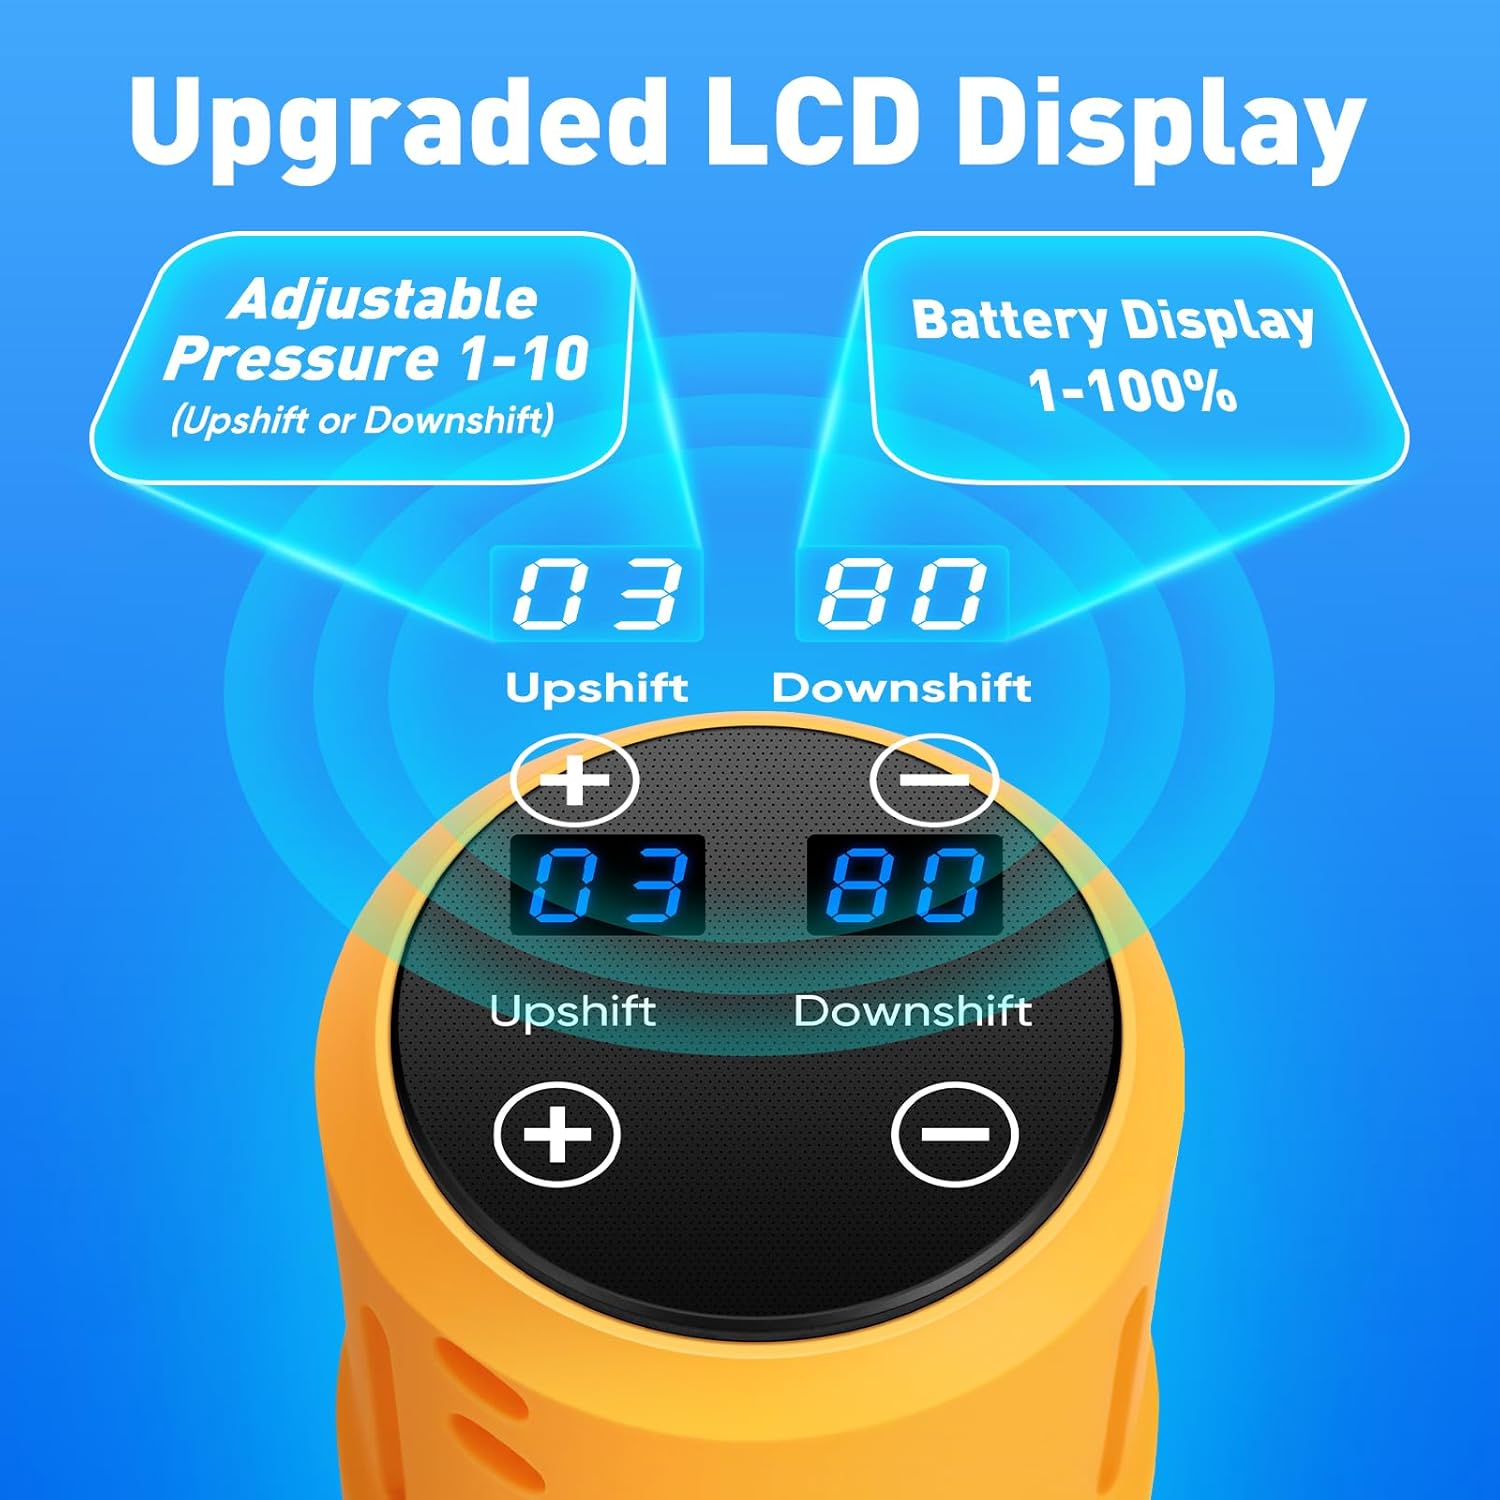
Image: The LCD display allows for easy adjustment of pressure modes (1-10) and shows battery percentage.
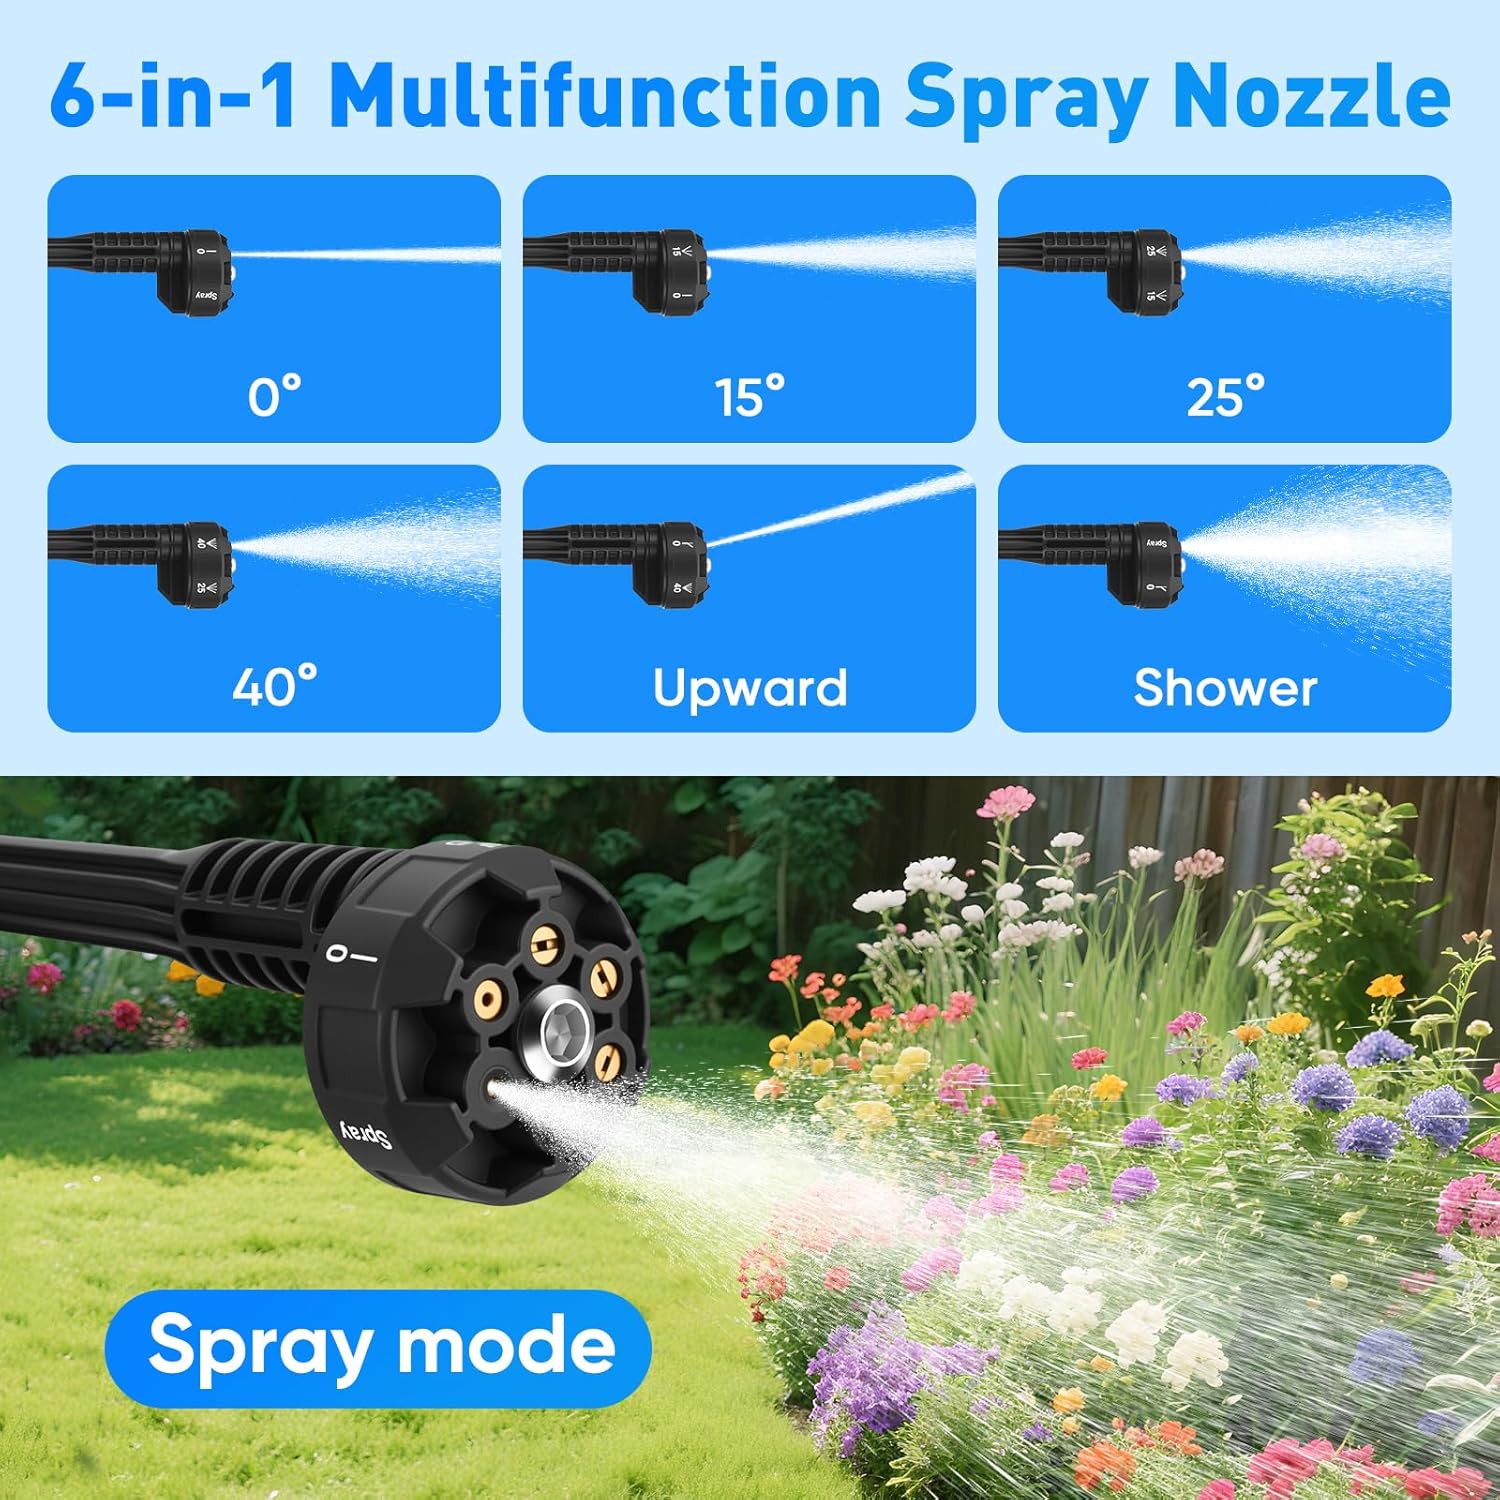
Image: The 6-in-1 nozzle offers various spray modes including 0°, 15°, 25°, 40°, upward, and shower for diverse cleaning needs.
Image: The foam bottle can be used to apply detergent for deeper cleaning, drawing water from a bucket or pool.
6. Hooldus
Regulaarne hooldus tagab optimaalse jõudluse ja pikendab survepesuri eluiga:
- Puhas veefilter: Regularly remove and clean the water filter to prevent clogging and protect the pump from impurities.
- Pärast kasutamist loputage: After using detergents or chemicals, run clean water through the pressure washer for a few minutes to flush out any residue.
- Hoida korralikult: Store the pressure washer and its accessories in the provided suitcase in a dry, cool place, away from direct sunlight and freezing temperatures.
- Aku hooldus: Store batteries in a cool, dry place. Do not expose them to extreme temperatures. Charge them periodically if not used for extended periods.

Image: The water filter effectively removes leaves, sediment, and other impurities to protect the pressure washer.
7. Veaotsing
Probleemide korral vaadake järgmisi levinud probleeme ja lahendusi.
- Veevoolu puudub:
- Ensure the water filter is submerged and not clogged.
- Check that all hose connections are secure.
- Verify the battery is charged and properly inserted.
- Madal rõhk:
- Check the selected pressure mode on the LCD display; increase if necessary.
- Ensure the water filter is clean and not restricting water flow.
- Verify the water source has sufficient volume.
- Seade ei lülitu sisse:
- Veenduge, et aku oleks täielikult laetud.
- Ensure the battery is correctly inserted and locked into place.
8. Tehnilised andmed
| Funktsioon | Spetsifikatsioon |
|---|---|
| Mudeli number | CE0413 |
| Maksimaalne rõhk | 790 PSI |
| Aku mahttage | 21V |
| Aku mahutavus | 2 x 3.0 Ah liitiumioonaku |
| Vooliku pikkus | 196 tolli (5 meetrit) |
| Toote mõõtmed | 2.96" P x 15.35" L x 17.3" K |
| Kauba kaal | 5.7 naela |
| Düüsi tüüp | 6-in-1 Multifunction |
| Rõhurežiimid | 10 Adjustable Modes (via LCD) |
9. Garantii ja tugi
For warranty information, technical support, or service inquiries, please contact the manufacturer or refer to the product's original purchase documentation. Specific warranty terms and conditions may vary.


