Sissejuhatus
The Philips WiFi Smart Lock with Handle offers advanced keyless entry, app control, and seamless smart home integration for your front or back door. This manual provides detailed instructions for installation, operation, and maintenance to ensure optimal performance and security.
Mis on karbis
Enne paigaldamise alustamist veenduge, et kõik komponendid on olemas:
- Väline klahvistiku koost
- Siseamblee
- Kinnitusplaat
- Lukustuspolt
- Sissesõidetav krae
- Mehaanilised võtmed (2)
- AA patareid (4)
- Strike Reinforcement Plate
- Kruvid
- Puurimismall
- Kasutusjuhend
- Kiirjuhend
- Ukse asendi andur
- Door Position Sensor Cap
- WiFi sild

Image: All components included in the Philips WiFi Smart Lock with Handle box, laid out for inspection.
Seadistamine ja installimine
Follow these steps carefully for proper installation of your Philips Smart Lock.
1. Check Door Compatibility
Veenduge, et teie uks vastab nõuetekohaseks paigaldamiseks järgmistele nõuetele:
- Ukse paksus: 1-3/8 inches to 2 inches (35mm to 50mm)
- Ristava ava: 1-1/2 inches or 2-1/8 inches (38mm or 54mm)
- Tagasi: 2-3/8 inches or 2-3/4 inches (60mm or 70mm)
The lock is suitable for both left-handed and right-handed doors. It is compatible with chiseled doors but not with mortise, integrated, or rim cylinder lock types.

Image: A diagram illustrating the required door dimensions (thickness, cross bore, backset) and compatible lock types for installation.
2. Paigaldage riiv
Insert the latch into the door edge. Ensure the latch face is flush with the edge of the door. Secure it with the provided screws.
Video: Visual guide on how to properly install the latch into the door frame, ensuring it is flush with the door edge.
3. Paigaldage väliskoost
With the latch fully retracted, route the cable below the latch. Secure the mounting plate to the door, ensuring not to overtighten the screws.
Video: Demonstrates routing the cable and securing the exterior assembly and mounting plate to the door.
4. Paigaldage siseseade
Insert the cable connector into the socket on the interior assembly. Keep the thumb turn in the vertical position and install the interior assembly by sliding up and down the side buttons. Attach the interior assembly to the mounting plate and fasten using the 2 screws.
Video: Shows how to connect the cable, position the thumb turn, and attach the interior assembly to the door.
5. Install Batteries and Perform Door Handing
Install 4 AA batteries into the interior assembly. Press and hold the reset button for 5 seconds to initiate the lock-handing process. This calibrates the lock to your door's orientation.
Video: Guide on installing AA batteries and performing the lock-handing process using the reset button.
6. Door Position Sensor Mounting
The door position sensor helps monitor if your door is open or closed. Choose between surface mount (recommended) or flush mount (optional).
Video: Instructions for mounting the door position sensor, including both surface and flush mount options.
Kasutusjuhised
Your Philips Smart Lock offers multiple convenient ways to lock and unlock your door.
1. Unlock by Fingerprint
Place your registered finger on the fingerprint sensor for a quick 0.3-second unlock. The lock can store up to 50 unique fingerprints.
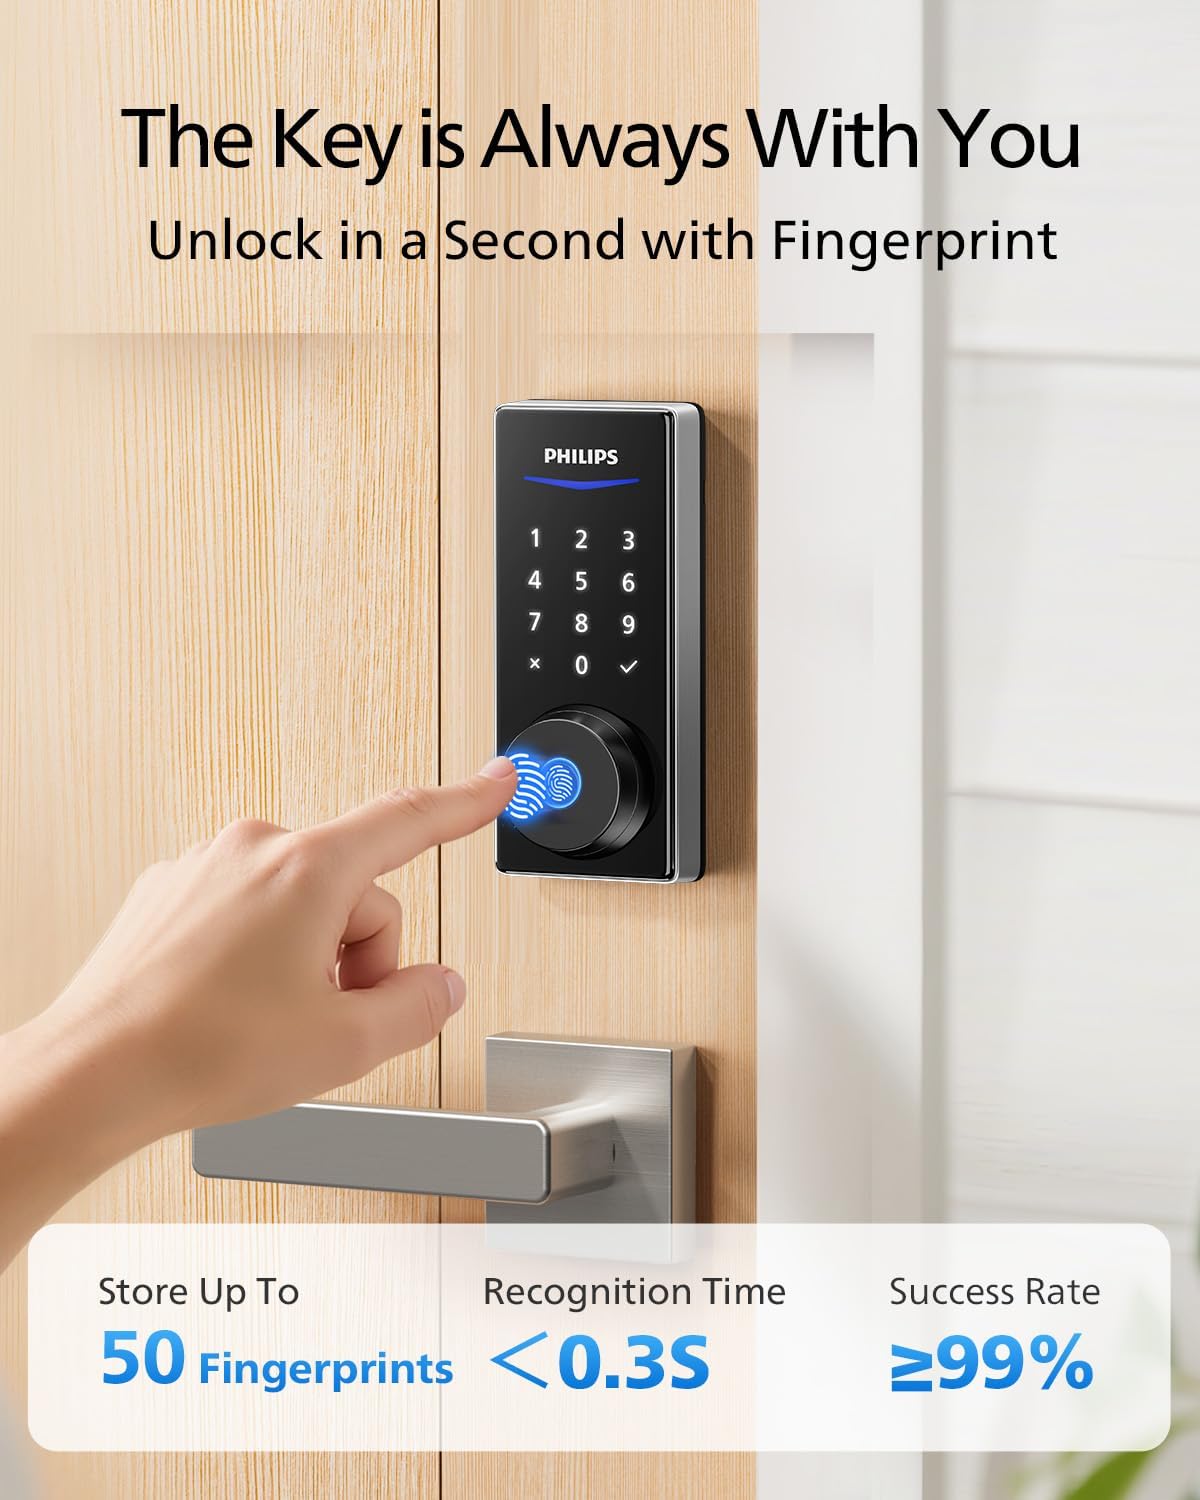
Image: A hand using the fingerprint sensor on the Philips Smart Lock for quick access.
2. Unlock by PIN Code
Wake up the keypad by touching it, then enter your 4-10 digit PIN code followed by the checkmark. You can create permanent, recurring, scheduled, or one-time passwords.

Image: A hand entering a PIN code on the illuminated keypad of the Philips Smart Lock.
3. Unlock by Mechanical Key
For traditional access or in case of emergency, use one of the two provided mechanical keys. The keyhole is located under a cover on the exterior assembly.

Image: A hand inserting a mechanical key into the Philips Smart Lock for backup access.
4. Unlock/Lock via Philips Home Access App
Use the Philips Home Access app to remotely lock or unlock your door from anywhere. The app also provides real-time notifications and access monitoring.

Image: A smartphone screen showing the Philips Home Access app with an unlock button, demonstrating remote access.
5. Auto-Lock & One-Touch Lock
The lock features an auto-lock function that secures your door automatically after closing. Alternatively, press the one-touch lock button for instant locking.

Image: A family leaving their home, illustrating the convenience of auto-lock and one-touch lock features.
6. Hääljuhtimine (Alexa ja Google Assistant)
Integrate your smart lock with Amazon Alexa or Google Assistant for hands-free control. Use simple voice commands to lock, unlock, or check the status of your door. (Requires Philips WiFi Gateway, included).

Image: A family interacting with a smart speaker to unlock their door via voice command, highlighting Alexa and Google Assistant compatibility.
App Features and Connectivity
The Philips Home Access app provides comprehensive control and monitoring capabilities:
- Kaugjuhtimispult: Lock/unlock your door from anywhere.
- Reaalajas teatised: Receive instant alerts on door activity.
- Sündmuste logimine: View a history of who accessed your door and when.
- Jaga seadet: Easily manage access for family, guests, or service providers.
- PIN Code Management: Create and manage various types of PIN codes (permanent, recurring, scheduled, one-time).
- Sõrmejälgede haldamine: Add, edit, or delete up to 50 fingerprints.

Image: A smartphone showing real-time notifications from the Philips Home Access app, indicating door auto-lock and unlock events.
WiFi Bridge Setup
The included Philips WiFi Gateway enables remote control and smart assistant integration. Plug the gateway into an outlet and follow the in-app instructions to pair it with your lock and home Wi-Fi network (2.4G Wi-Fi only).
Video: A step-by-step guide on how to set up and connect the Philips WiFi Gateway to your home network.
Hooldus
Patarei vahetus
The lock uses 4 AA batteries, providing approximately 10 months of battery life. The Philips Home Access app will send low battery alerts when replacement is needed.

Image: An illustration highlighting the 10-month battery life and the battery compartment of the Philips Smart Lock.
Veaotsing
If you encounter any issues with your Philips Smart Lock, please refer to the Philips Home Access app for diagnostic tools and helpful voice prompts during setup or use. For persistent problems, contact customer support.

Image: An elderly man interacting with the Philips Smart Lock, with voice prompts guiding him through the process.
Tehnilised andmed
| Funktsioon | Kirjeldus |
|---|---|
| Kaubamärk | Philips |
| Mudeli number | 1HBG-L-SN |
| Luku tüüp | Biometric, Deadbolt, Keypad, WiFi Smart Lock with Handle |
| Eriomadused | APP Remote Control, Fingerprint Unlock, PIN Code, Keys, Auto-Lock, Anti-Peeping, WiFi Gateway Included, Work with Alexa & Google Assistant |
| Materjal | Alumiinium, metall |
| Kauba mõõtmed (P x L x K) | 15.7 x 7 x 4.5 tolli |
| Ühenduvusprotokoll | Bluetooth, WiFi |
| Kontrolleri tüüp | APP, Amazon Alexa, Android, Google Assistant, Hand Control |
| Kontrollimeetod | Rakendus, pult, puudutus, hääl |
| Soovitatavad kasutusalad | Home, Apartment, Small Office, Front Door, Back Door, Garage Door |
| Kaasatud komponendid | 1 * Door Lever Handle Set, 1 * Philips Smart Door Lock, 1 * WiFi Gateway, 4 * Batteries |
| GTIN / UPC | 850071183078 |
Garantii ja tugi
Philips is committed to providing excellent customer service and support for your smart lock.
- 2-aastane kvaliteedikaitse: Enjoy peace of mind with a 2-year warranty.
- Eluaegne telefonitugi: Our support team is available Monday to Friday, 8 AM–8 PM EST, and Saturday, 9 AM–5 PM EST. Calls outside these hours will be returned the next business day.
- 24/7 e-posti tugi: For assistance anytime, email us at support@homeaccess.philips.

Image: A customer service representative at a desk, illustrating the available support options including phone and email.