Sissejuhatus
This manual provides comprehensive instructions for the safe and efficient operation, maintenance, and troubleshooting of your KITCHENARM 19-in-1 HANDY Bread Machine, Model 851011. Please read this manual thoroughly before first use and retain it for future reference.

Figure 1: KITCHENARM 19-in-1 HANDY Bread Machine (Model 851011).
Pakendi sisu
Verify that all items are present and in good condition upon opening the package. If any items are missing or damaged, contact customer service.
- 1 x KITCHENARM Bread Machine (Model KA8510)
- 1 x User Manual & Recipe Book
- 2 x Kneading Paddles (one for use, one spare)
- 1 x Metal Hook for paddle removal
- 1 x US Three-Prong Plug (integrated)
- 1 x Non-Stick Bread Pan (2LB Vertical Pan)
- 2 x Cup-Spoon Sets (measuring cups and spoons)
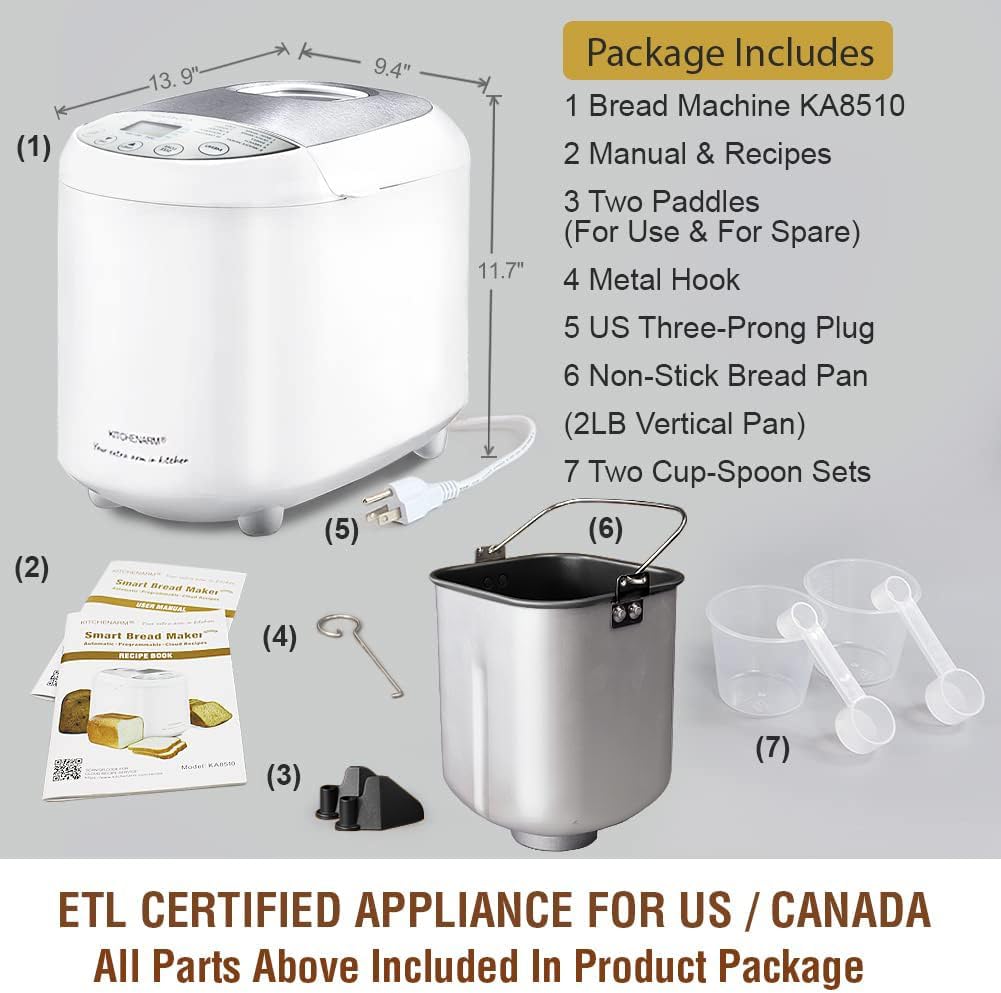
Joonis 2: Komplektis olevad tarvikud ja komponendid.
Olulised ohutusjuhised
Elektriseadmete kasutamisel tuleb alati järgida põhilisi ettevaatusabinõusid, sealhulgas järgmist:
- Lugege läbi kõik juhised.
- Ärge puudutage kuumi pindu. Kasutage käepidemeid või nuppe.
- Elektrilöögi eest kaitsmiseks ärge kastke juhet, pistikuid ega seadet vette või muusse vedelikku.
- Hoolikas järelevalve on vajalik, kui seadet kasutavad lapsed või nende läheduses.
- Eemaldage pistik pistikupesast, kui seda ei kasutata ja enne puhastamist. Enne osade peale panemist või eemaldamist laske jahtuda.
- Ärge kasutage ühtegi seadet kahjustatud juhtme või pistikuga või pärast seda, kui seade on tõrgeteta või on mingil viisil kahjustatud. Viige seade kontrollimiseks, parandamiseks või reguleerimiseks lähimasse volitatud teeninduskeskusse.
- Seadme tootja poolt soovitamata tarvikute kasutamine võib põhjustada vigastusi.
- Ärge kasutage õues.
- Ärge laske juhtmel üle laua või leti serva rippuda ega kuumade pindadega kokku puutuda.
- Ärge asetage kuuma gaasi- või elektripliidi peale ega lähedusse ega kuumutatud ahju.
- Kuuma õli või muid kuumi vedelikke sisaldava seadme teisaldamisel tuleb olla äärmiselt ettevaatlik.
- Lahtiühendamiseks lülitage ükskõik milline juhtnupp asendisse "väljas" ja seejärel eemaldage pistik seinakontaktist.
- Ärge kasutage seadet muul kui ettenähtud otstarbel.
- Sellel seadmel on polariseeritud pistik (üks tera on teisest laiem). Elektrilöögiohu vähendamiseks sobib see pistik polariseeritud pistikupessa ainult ühel viisil. Kui pistik ei sobi täielikult pistikupessa, keerake pistik ümber. Kui see ikka ei sobi, võtke ühendust kvalifitseeritud elektrikuga. Ärge püüdke pistikut mingil viisil muuta.
SALVESTA NEED JUHISED.
Seadistamine ja esmakordne kasutamine
Before First Use: Initial Burn-Off
Before using your bread machine for the first time, it is recommended to perform an initial burn-off cycle to eliminate any manufacturing odors or residues. This process takes approximately 10 minutes.
- Remove all packaging materials and accessories from the bread machine.
- Wipe the interior and exterior of the machine with a damp cloth. Ensure the bread pan and kneading paddle are clean and dry.
- Place the empty bread pan with the kneading paddle inserted into the machine. Close the lid.
- Plug the bread machine into a grounded electrical outlet.
- Select a short baking program (e.g., "Bake" or "Home Made" with a short duration if customizable, or simply run an empty cycle for 10 minutes).
- Allow the machine to run for approximately 10 minutes. A slight odor or smoke may be present; this is normal.
- Unplug the machine and allow it to cool completely for at least 2 hours before proceeding with actual bread making.
Komponentide identifitseerimine

Figure 3: Key components of the bread machine.
- Auru ventilatsiooniavad: Release steam during baking. Do not block.
- Suur Viewaken: Allows observation of the bread-making process.
- Roostevabast terasest kaas: Vastupidav ja kergesti puhastatav.
- LCD-ekraaniga juhtpaneel: For program selection, settings, and status display.
- Leivavorm: Non-stick pan where ingredients are mixed, kneaded, risen, and baked.
- Sõtkumislabid: Mixes and kneads the dough.
Kasutusjuhised
Leivaküpsetamise põhietapid
Follow these general steps for most bread recipes. Refer to the included recipe book for specific ingredient quantities and program recommendations.
- Sõtkumislabida sisestamine: Asetage sõtkumislabid leivavormi sees olevale võllile.
- Lisa koostisained: Add ingredients to the bread pan in the order specified by your recipe (typically liquids first, then dry ingredients, with yeast added last, often in a small well on top of the flour).
- Aseta leivavorm: Sisestage leivavorm leivaküpsetusmasinasse, veendudes, et see kindlalt klõpsuga oma kohale lukustub. Sulgege kaas.
- Valige programm: Plug in the machine. Use the "MENU" button to select the desired program (e.g., Basic White, French, Gluten Free).
- Valige pätsi suurus ja kooriku värv: Use the "LOAF SIZE" button to choose 1LB, 1.5LB, or 2LB. Use the "CRUST COLOR" button to select Light, Medium, or Dark.
- Alusta tsüklit: Press the "START/STOP" button to begin the bread-making cycle. The machine will automatically mix, knead, rise, and bake.
- Eemalda leib: Once the cycle is complete (indicated by a beep), unplug the machine. Carefully remove the hot bread pan using oven mitts. Invert the pan to release the bread onto a wire rack to cool. Use the metal hook to remove the kneading paddle from the loaf if it remains embedded.

Figure 4: Unique 1-Press Bread Making process.
Available Programs
Your KITCHENARM bread machine features 19 pre-programmed menus, including 12 bread menus and 7 non-bread menus. Each program is optimized for specific recipes.
| Ei. | Programmi nimi | Description / Typical Use |
|---|---|---|
| 1 | Põhiline valge | Valge ja segaleiva jaoks. |
| 2 | Ekspressvalge | Faster cycle for white bread. |
| 3 | Armas | Kõrge suhkrusisaldusega leibade jaoks. |
| 4 | prantsuse keel | Krõbeda koorikuga kergete leibade jaoks. |
| 5 | Gluteenivaba | Spetsiaalselt gluteenivabade retseptide jaoks. |
| 6 | Täistera | Täisteranisujahust leibade jaoks. |
| 7 | Tume rukis | For rye bread recipes. |
| 8 | Mitmeviljalised | Erinevate teraviljadega leibade jaoks. |
| 9 | SD Starter | For preparing sourdough starter. |
| 10 | juuretis | For baking sourdough bread. |
| 11 | Tainas | Prepares dough for manual shaping and baking. |
| 12 | Keto | For low-carb, ketogenic bread recipes. |
| 13 | Kiire leib | For quick breads using baking powder/soda. |
| 14 | Kook | Kookide küpsetamiseks. |
| 15 | Jam | Koduste moosi valmistamiseks. |
| 16 | Jogurt | For preparing yogurt. |
| 17 | Sõtku | Only performs kneading cycle. |
| 18 | Küpseta | Only performs baking cycle. |
| 19 | Home Made | Customizable program for advanced users. |
The machine supports 3 loaf sizes (1LB, 1.5LB, 2LB) and 3 crust colors (Dark, Medium, Light). It also features a 15-Hour Delay Timer and an ADD-NUTS Alarm for adding ingredients at the appropriate time.

Joonis 5: näitamples of items that can be prepared with the 19 programs.
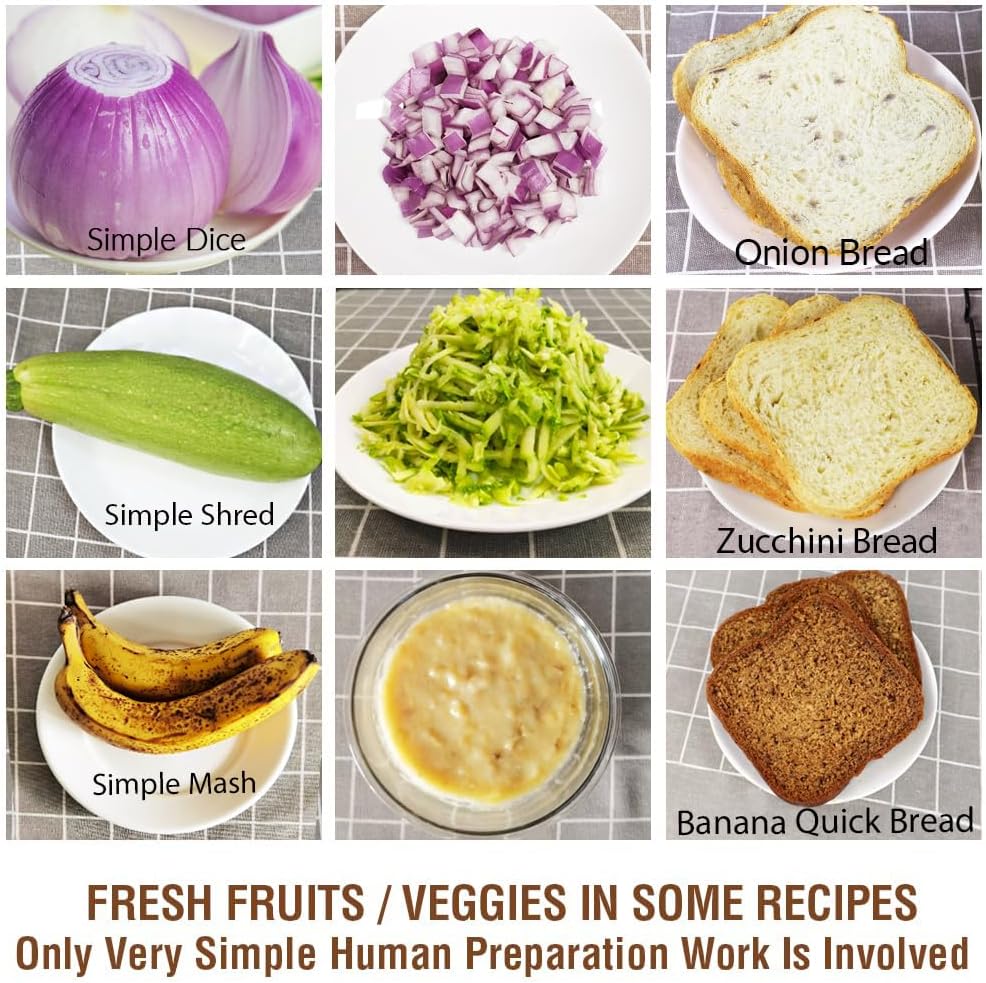
Figure 6: Preparation of fresh fruits and vegetables for recipes.
Hooldus ja hooldus
Puhastamine
Proper cleaning ensures the longevity and performance of your bread machine. Always unplug the machine and allow it to cool completely before cleaning.
- Leivavorm ja sõtkumislabid: The non-stick bread pan and kneading paddle should be hand washed only with warm, soapy water. Do not use abrasive cleaners or metal scouring pads, as this can damage the non-stick coating. Rinse thoroughly and dry completely.
- Välimus: Wipe the exterior body and control panel with a soft, damp lapiga. Ärge kastke põhiseadet vette ega muusse vedelikku.
- Interjöör: Kasutage pehmet, damp lapiga küpsetuskambri sisemust pühkida. Eemaldage puru või jäägid.
- Kaas: The stainless steel lid can be wiped clean with a damp riie. Veenduge, et viewing window is clear.
Säilitamine
Store the bread machine in a cool, dry place when not in use. Ensure all components are clean and dry before storage.
Veaotsing
Selles jaotises käsitletakse levinud probleeme, millega võite kokku puutuda. Probleemide korral, mida siin ei ole loetletud, võtke ühendust klienditeenindusega.
| Probleem | Võimalik põhjus | Lahendus |
|---|---|---|
| Leib ei kerki või kerkib liiga palju. | Incorrect yeast amount, expired yeast, incorrect water temperature, incorrect flour type, too much or too little liquid. | Ensure yeast is fresh and active. Use correct water temperature (lukewarm for active dry yeast). Measure ingredients precisely, preferably by weight. Refer to recipe book for correct flour type. |
| Leib on liiga tihe või raske. | Too much flour, too little liquid, old yeast, incorrect program. | Reduce flour slightly or increase liquid. Check yeast freshness. Ensure correct program is selected for the recipe. |
| Bread has a large hole at the bottom. | Kneading paddle left in bread during baking. | Some programs allow for removal of the kneading paddle before the final rise. Consult your recipe book or manual for specific program timings. Use the metal hook to remove the paddle after baking. |
| Machine does not start or respond. | Pole vooluvõrku ühendatud, toide välja lülitatudtage, pan not properly seated, lid not closed. | Ensure the machine is securely plugged into a working outlet. Check circuit breaker. Ensure bread pan is fully inserted and lid is closed. |
| Valju müra töö ajal. | Bread pan not seated correctly, foreign object in pan, machine on uneven surface. | Ensure bread pan is securely locked in place. Check for any foreign objects. Place machine on a stable, flat surface. |
Toote spetsifikatsioonid
- Kaubamärk: KÖÖK
- Mudeli number: 851011
- Värv: White Body - Stainless Steel Lid & Chamber
- Toote mõõtmed (S x L x K): 9.4" x 13.9" x 11.7"
- Kauba kaal: 11.97 naela
- Wattage: 550 vatti
- Programmide arv: 19
- Leiva suurused: 1 naela, 1.5 naela, 2 naela
- Kooriku värvid: Hele, keskmine, tume
- Viivitustaimer: Kuni 15 tundi
- Sertifikaadid: ETL Certified for US / Canada
- Tootja: Kitchenarm LLC
- Tootehooldus: Hand Wash Only (for bread pan and paddle)
Garantii ja klienditugi
KITCHENARM is committed to providing high-quality products and excellent customer service.
- Toote garantii: This product comes with a 2-YEAR Product Warranty.
- Klienditeenindus: LIFETIME Customer Service is provided, including access to Cloud Recipes and Recipe Customization assistance.
- Varuosad: Original replacement parts are available.
For warranty claims, technical support, or to inquire about replacement parts, please contact Kitchenarm LLC customer service through their official channels. Refer to the contact information provided in your product registration or on the official KITCHENARM websaidile.

Figure 7: KITCHENARM commitment to warranty and customer service.