1. Sissejuhatus
This manual provides detailed instructions for the installation, operation, and maintenance of your CNBINGO WF-WK Smart Flush-Mounted Thermostat. This digital room thermostat is designed to regulate the temperature of electric heating, hot water heating, and water/gas boilers, ensuring a comfortable indoor climate. It features smart connectivity, allowing control via a mobile application and voice commands through Alexa and Google Assistant.
2. Toote omadused
- Nutikas juhtimine: Regulates temperature for electric heating, hot water heating, and water/gas boilers. Supports maximum current 16A, voltagE 110-240V.
- APP kaugjuhtimispult: Connects to 2.4G WiFi for remote control via the Smart Life/Tuya app from anywhere.
- Hääljuhtimine: Ühildub Alexa ja Google Assistantiga käed-vabad kasutamiseks.
- Programmeeritavad ajakavad: Offers 5+2 days, 6+1 days, or 7 days programming modes with 6 time windows per day for energy saving.
- Täpne temperatuuri reguleerimine: Precise to 0.5°C, with a control range of 5-99°C. Includes a calibration function.
- Multifunktsionaalne: Features include group control, family sharing, high and low temperature protection, child lock, frost protection, power failure data backup/reset, backlight brightness adjustment, and temperature scale change (Celsius/Fahrenheit).

Joonis 2.1: Läbiview of the thermostat's multiple functions, including voice control, child lock, 2.4G WLAN, LED screen, programmable settings, touch buttons, app control, and sleep mode.
3. Seadistamine ja installimine
3.1 Ühendusskeem
Before installation, ensure the main power supply is turned off. The thermostat requires a 110-240V AC power source. Refer to the specific wiring diagram for your heating system type.
Joonis 3.1: Detailed wiring diagrams for different heating systems. The NTC floor temperature sensor cable is included in the package. In most cases, the heating system is not connected to the boiler.
Wiring for Electric Heating (Max. 16A)
- Connect the Live (L) wire to terminal 1.
- Connect the Neutral (N) wire to terminal 2.
- Connect the Load Live (L1) wire to terminal 3.
- Connect the Load Neutral (N1) wire to terminal 4.
- Connect the NTC sensor to terminals 5 and 6.
Wiring for Water Heating (Max. 5A)
- Connect the Live (L) wire to terminal 1.
- Connect the Neutral (N) wire to terminal 2.
- Connect the Open (Op) wire to terminal 3.
- Connect the Close (Cl) wire to terminal 4.
- Connect the NTC sensor to terminals 5 and 6.
Wiring for Water/Gas Boiler (Max. 16A)
- Connect the Live (L) wire to terminal 1.
- Connect the Neutral (N) wire to terminal 2.
- Connect the Dry Contact (NO) wire to terminal 3.
- Connect the Dry Contact (COM) wire to terminal 4.
- Connect the NTC sensor to terminals 5 and 6.
4. Kasutusjuhised
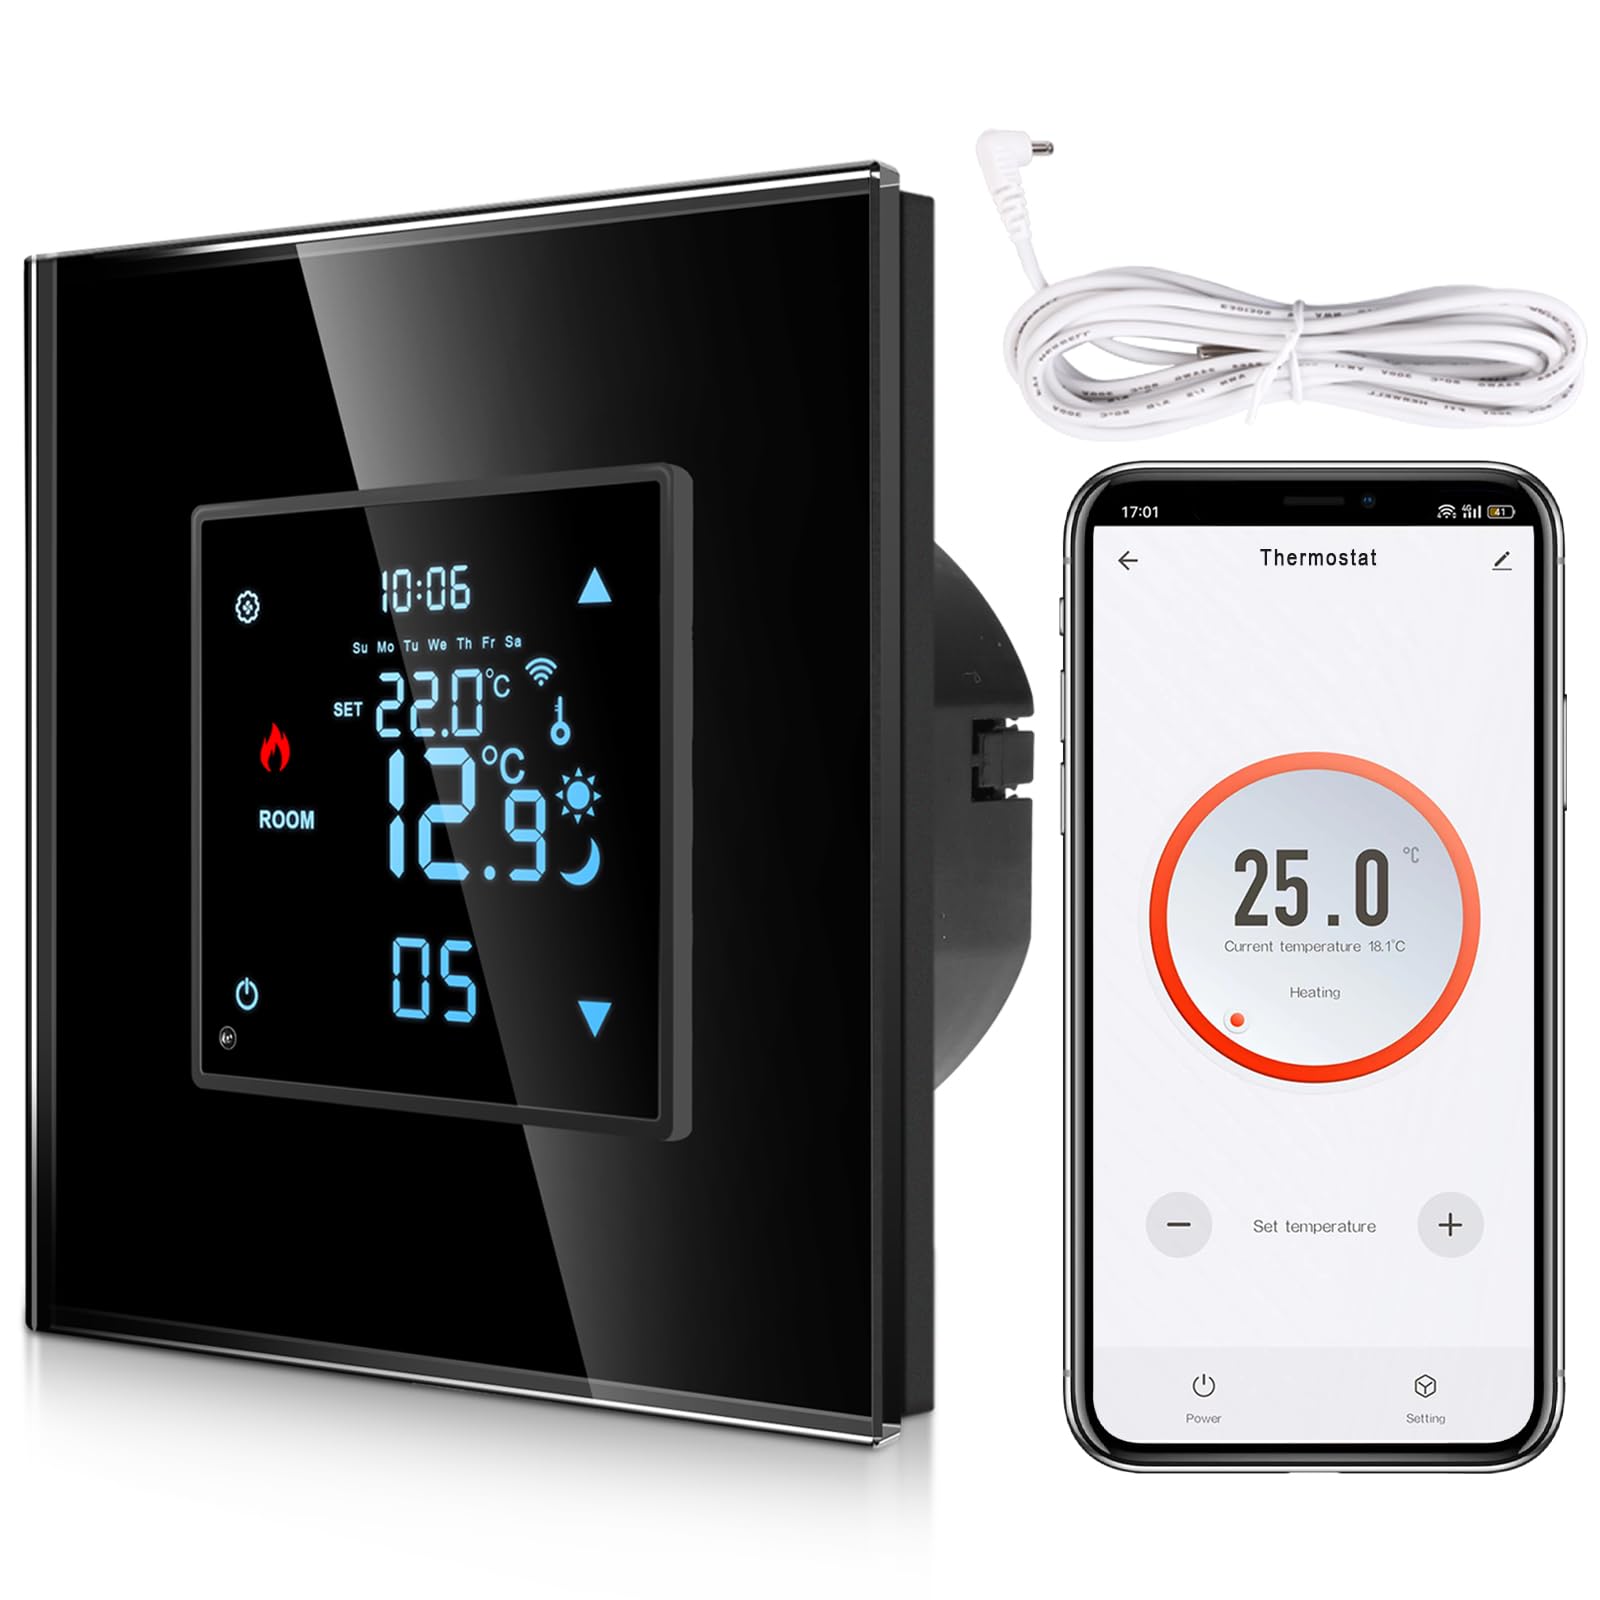
4.1 APP Remote Control and Voice Control
After connecting the thermostat to your 2.4G WiFi network, you can control it remotely using the Smart Life or Tuya app on your smartphone. The thermostat also integrates with Amazon Alexa and Google Assistant, allowing you to adjust settings using voice commands.

Joonis 4.1: The thermostat supports voice commands through Google Assistant and Amazon Alexa. For example, you can say, "Alexa, set the room temperature to 22 degrees."
4.2 Programmable Underfloor Heating Thermostat
The thermostat offers flexible programming options to optimize energy consumption. You can set a weekly schedule with up to 6 time windows per day using the mobile app. Choose between 5+2 days (weekdays + weekend), 6+1 days (Monday-Saturday + Sunday), or 7 days (individual daily programming).
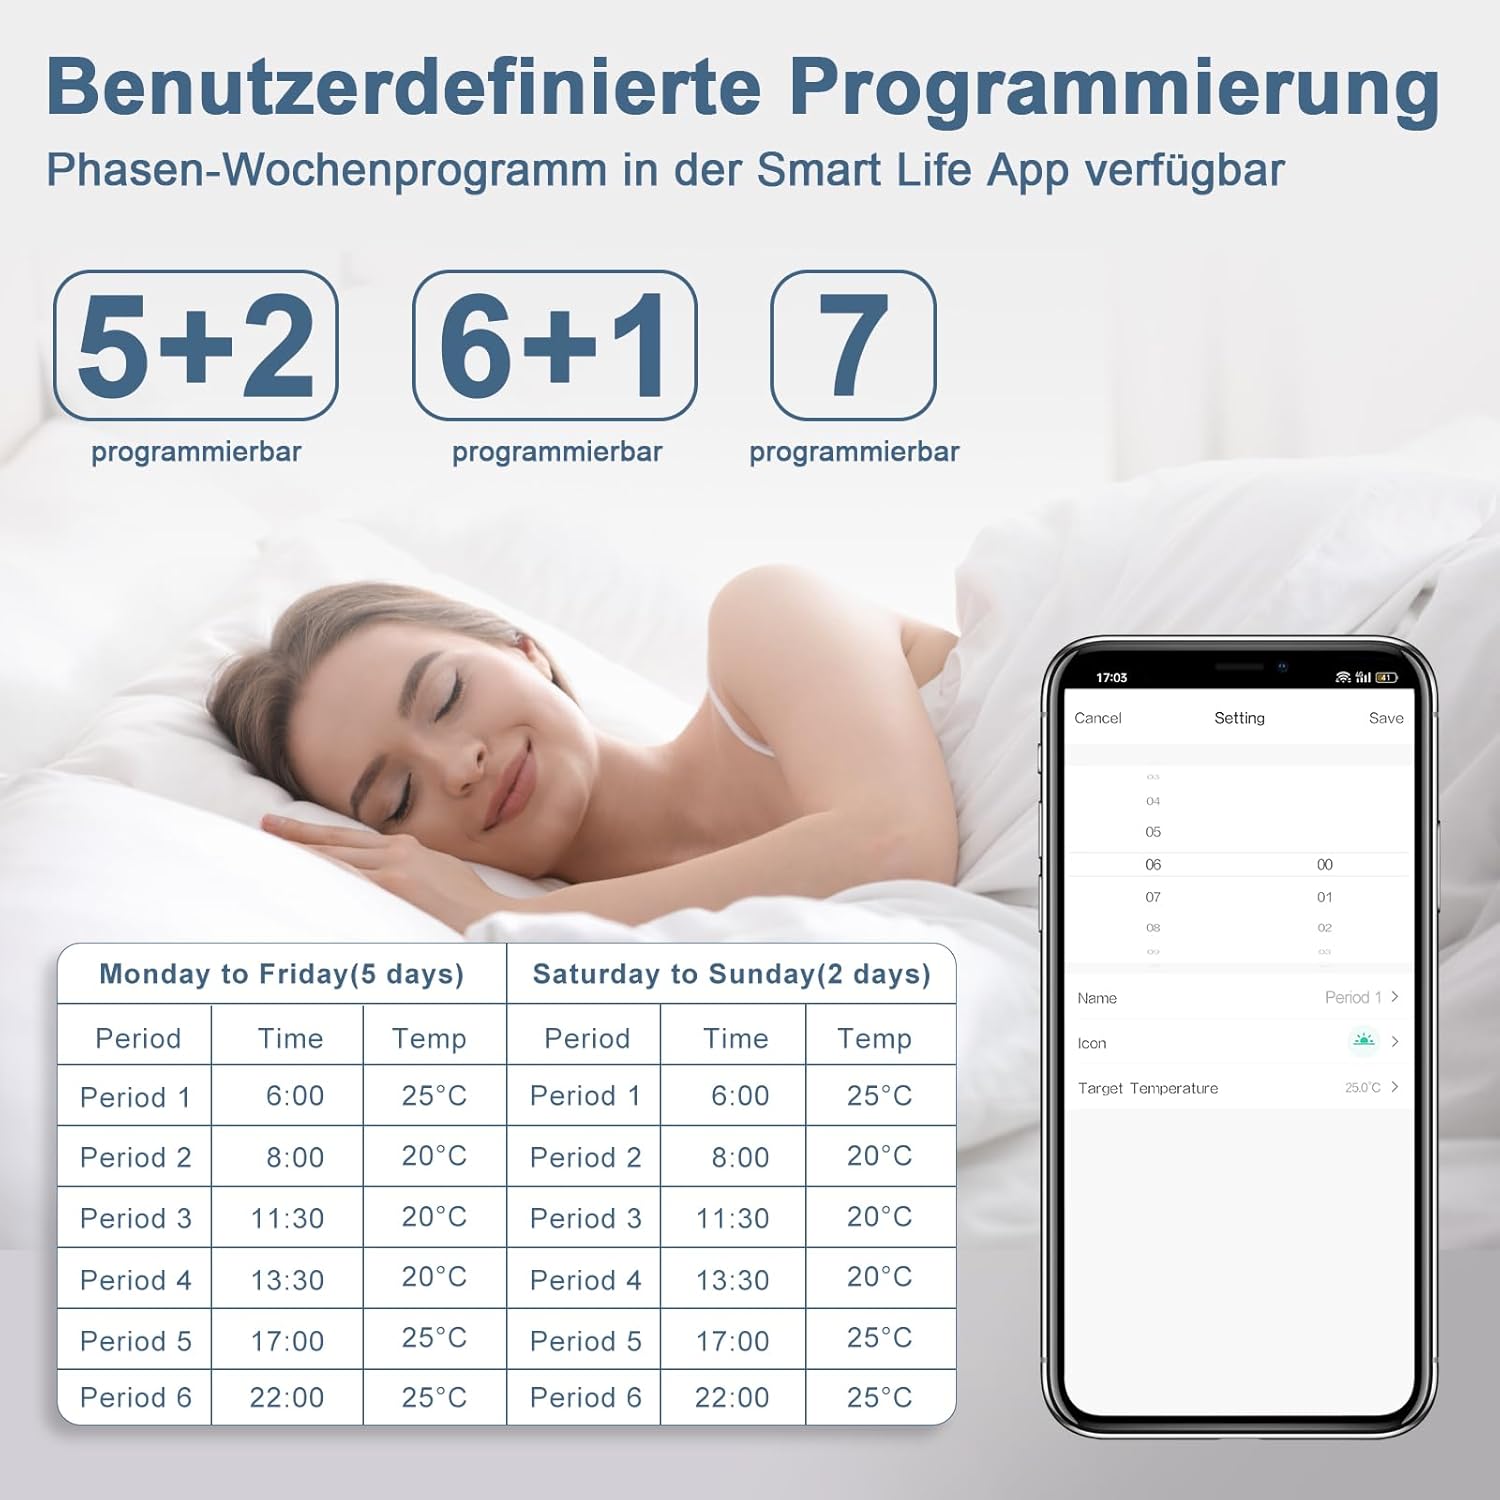
Joonis 4.2: Example of custom programming in the Smart Life App, showing 5+2, 6+1, and 7-day programmable modes with specific time and temperature settings for different periods.
4.3 Temperature Adjustment and Calibration
You can set the target temperature precisely to 0.5°C within a range of 5-99°C. If you notice a discrepancy between the thermostat's display and the actual room temperature, use the calibration function in the settings to adjust it.
5. Ekraan ja juhtnupud
The thermostat features a clear LED display and touch-sensitive buttons for easy operation. Below is an overview of the main display elements and controls.

Joonis 5.1: Ees ja külg view of the thermostat with labeled controls and display indicators. Key elements include Mode, Time, Up/Down buttons, Week indicator, WiFi status, Lock indicator, Floor Heating Mode, Sleeping Mode, Set Temperature, Heating On indicator, Room Temperature, and Power/Period settings.
6. Temperature Sensors
The CNBINGO thermostat supports two types of temperature sensors to ensure accurate temperature measurement based on your room size and heating setup.

Joonis 6.1: Illustration comparing the use of the built-in sensor for smaller rooms with uniform temperature distribution and the external 3-meter sensor cable for larger rooms or areas where the thermostat's location might not accurately reflect the overall room temperature.
6.1 Built-in Sensor
The thermostat includes an integrated sensor suitable for smaller rooms where temperature distribution is generally uniform. It measures the ambient air temperature directly from the device's location.
6.2 Väline andur
For larger rooms or specific underfloor heating applications, an external 3-meter NTC sensor cable is provided. This sensor allows for more accurate temperature readings in areas where the thermostat itself might not be optimally positioned, ensuring better temperature control and uniform heat distribution.
7. Hooldus
To ensure optimal performance and longevity of your CNBINGO Smart Thermostat, follow these general maintenance guidelines:
- Puhastamine: Gently wipe the thermostat's glass frame and screen with a soft, dry cloth. Avoid using abrasive cleaners or solvents, as these can damage the surface.
- Püsivara värskendused: Periodically check the Smart Life/Tuya app for any available firmware updates for your thermostat. Keeping the firmware updated ensures you have the latest features and bug fixes.
- Toiteallikas: Tagage termostaadile stabiilne toiteallikas. Voolukatkestuse korraltages, the thermostat has data backup to retain your settings.
- Anduri kontroll: If using an external sensor, ensure its cable is not damaged and is properly connected.
8. Veaotsing
If you encounter issues with your CNBINGO Smart Thermostat, refer to the following common troubleshooting steps:
- Termostaat ei lülitu sisse: Check the main power supply and ensure all wiring connections are secure according to the installation diagrams.
- Küte/jahutus puudub: Verify that the thermostat is in the correct operating mode (heating/cooling) and that the set temperature is above/below the current room temperature. Check the wiring to your heating/boiler system.
- WiFi-ühenduse probleemid: Ensure your WiFi network is 2.4GHz. Restart your router and the thermostat. Follow the pairing instructions in the Smart Life/Tuya app carefully.
- Ebatäpne temperatuurinäit: Use the temperature calibration function in the thermostat settings to adjust the displayed temperature if it differs from an accurate external thermometer. Ensure the sensor (internal or external) is not obstructed or exposed to direct drafts/heat sources.
- Hääljuhtimine ei tööta: Confirm that your thermostat is properly linked to your Alexa or Google Assistant account in the respective apps. Check your internet connection and ensure voice commands are clear.
- Lapselukk aktiivne: If the controls are unresponsive, check if the child lock feature is enabled. Refer to the app or thermostat interface for instructions on how to disable it.
Püsivate probleemide korral võtke ühendust klienditoega.
9. Tehnilised andmed
| Funktsioon | Spetsifikatsioon |
|---|---|
| Mudeli number | WF-WK |
| Tootja | CNBINGO |
| Voltage | 110–240 volti (vahelduvvool) |
| Maksimaalne vool | 16A (for Electric Heating/Boiler), 5A (for Water Heating) |
| Toiteallika tüüp | AC |
| Temperatuuri reguleerimise vahemik | 5-99°C |
| Temperatuuri täpsus | ±0.5°C |
| Ühenduvus | 2.4G WiFi |
| Ühilduvus | Alexa, Google'i assistent |
| Mõõdud (P x L x K) | 8.3 x 8.3 x 5.5 cm |
| Kaal | 0.2 kilogrammi |
| Värv | Must |
10. Garantii ja tugi
CNBINGO products are manufactured to high-quality standards. For information regarding warranty coverage, please refer to the warranty card included with your product or visit the official CNBINGO website. If you require technical assistance, troubleshooting, or have questions not covered in this manual, please contact CNBINGO customer support through their official channels.


