1. Sissejuhatus
The MININGEEK GM100 is a compact 4.3L Mini PC case designed for small form factor (SFF) builds, ideal for HTPC (Home Theater PC) or business applications. This chassis supports ITX motherboards and Flex power supplies, offering a sleek and efficient solution for your computing needs. This manual provides detailed instructions for assembly, operation, and maintenance.

Joonis 1: Esiosa view of the MININGEEK GM100 Mini PC Case.
2. Toote omadused
- Kompaktne disain: Smaller than A4 paper, with dimensions of 205 x 232 millimeters on the side and 90 millimeters wide for a slim profile.
- Emaplaadi ühilduvus: Supports ITX motherboards.
- Toiteallika tugi: Compatible with FLEX PSUs.
- Eesmine I/O: Features 2x USB 3.0 front ports for convenient connectivity.
- Graphics Card Support: Accommodates single-fan graphics cards up to 185mm in length and 25mm in thickness (when CPU cooler height is less than 45mm). PCIe riser not included.
- Protsessori jahuti kliirens: Supports CPU coolers up to 70mm in height.
- Optimeeritud õhuvool: Mesh panels with 0.8mm precision-machined holes facilitate air circulation for efficient component cooling.
3. Tehnilised andmed
| Funktsioon | Spetsifikatsioon |
|---|---|
| Mudeli nimi | GM100 |
| Mõõdud (PxLxK) | 3.54 x 8 x 9 tolli (90 x 203 x 229 mm) |
| Helitugevus | 4.3 liitrit |
| Materjal | Metallist |
| Emaplaadi ühilduvus | Mini ITX |
| Toiteallika tüüp | Flex ATX (Rear Mount) |
| Protsessori jahuti kõrguse piirang | Kuni 70 mm |
| Graafikakaardi pikkuse piirang | Up to 185mm (single fan, thickness up to 25mm, if CPU cooler < 45mm) |
| Eesmised I / O-pordid | 2x USB 3.0 |
| Salvestustugi | 1x 2.5" SSD or 1x 3.5" HDD (configuration dependent) |
| Jahutusmeetod | Air (Mesh panels for ventilation) |

Figure 2: GM100 Packing List and Specification Details.
4. Seadistamine ja installimine
Carefully follow these steps to assemble your MININGEEK GM100 Mini PC case. It is recommended to wear an anti-static wrist strap during installation to prevent damage to components.
4.1 Lahtipakkimine ja esmane ettevalmistus
Remove all components from the packaging. Verify that all parts listed in the packing list are present. Place the chassis on a stable, flat surface.

Joonis 3: Esiosa view of the GM100 case.
4.2 Külgpaneeli eemaldamine
Unscrew the retaining screws on the rear of the chassis to remove the side panels. This will provide access to the interior for component installation.

Joonis 4: sisemine view of the GM100 case with side panel removed.
4.3 Emaplaadi paigaldamine
Install your Mini ITX motherboard into the chassis. Ensure proper alignment with the standoffs and secure it with the provided screws. Connect the front panel I/O cables (USB 3.0, power button, power LED) to the corresponding headers on the motherboard.
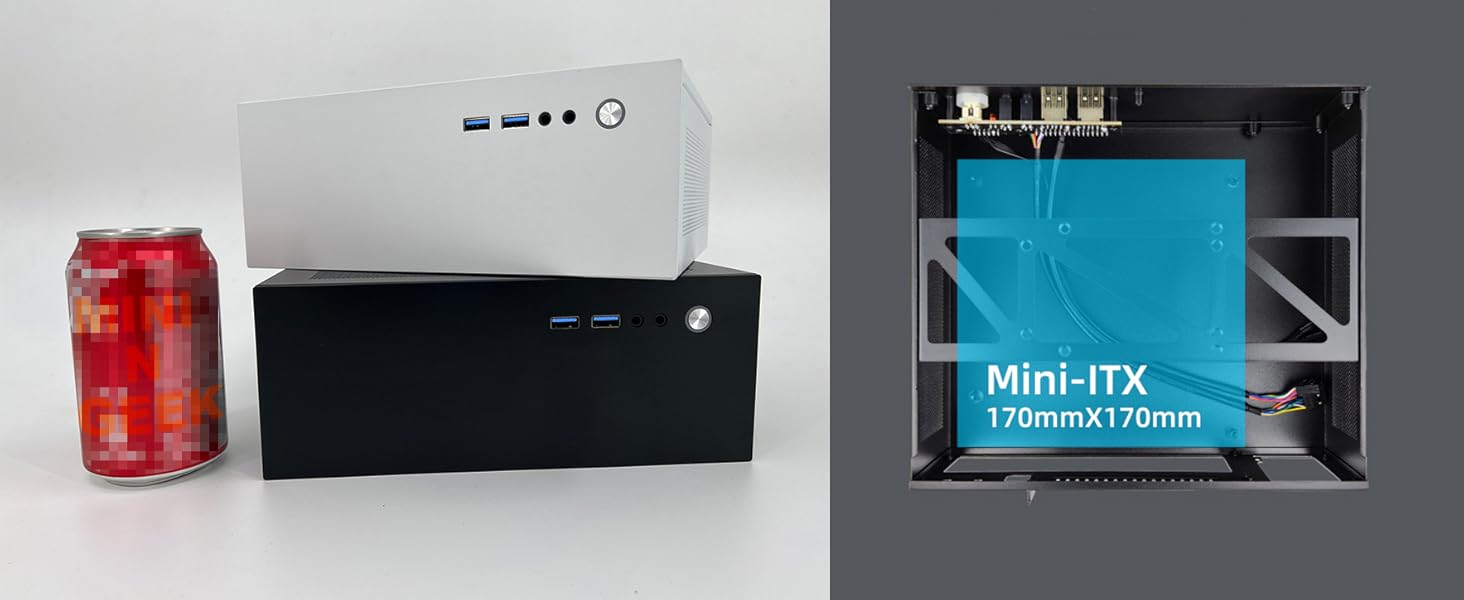
Figure 5: Illustrated guide for motherboard and power supply installation.
4.4 Toiteallika paigaldamine
Install the Flex ATX power supply into its designated rear-mount position. Secure it with screws. Connect the 24-pin ATX power connector and the 4/8-pin CPU power connector to the motherboard.
4.5 Salvestusseadme paigaldamine
Mount your 2.5-inch SSD or 3.5-inch HDD to the designated bracket within the chassis. Connect the SATA power and data cables to the drive and motherboard.

Joonis 6: Tagumine view of the GM100 case, illustrating power supply and I/O panel area.
4.6 Graphics Card Installation (Optional)
If installing a single-fan graphics card (up to 185mm length, 25mm thickness), carefully insert it into the PCIe slot. Ensure it is properly seated and secured. Note that a PCIe riser cable is not included and may be required depending on your motherboard and GPU configuration.
4.7 Kaablihaldus
Organize all internal cables to ensure optimal airflow and prevent interference with components. Use cable ties if necessary to secure loose cables.
4.8 Juhtumi lõpetamine
Once all components are installed and cables are managed, reattach the side panels and secure them with the retaining screws.
4.9 Paigaldusvideod
The following videos demonstrate general ITX case assembly principles that may be helpful during your MININGEEK GM100 installation:
SGPC K39 ITX Mini Case Installation
Video 1: Installation guide for a similar SGPC K39 ITX mini case, demonstrating general assembly steps.
L300 Installation Guide
Video 2: Installation guide for the L300 case, showcasing component installation in a compact chassis.
Mini PC Case Assembly Overview
Video 3: Lühiülevaadeview of mini PC case assembly, highlighting key steps.
Mini ITX Case Quick Look
Video 4: A quick demonstration of a mini ITX case, useful for visual reference.
5. Kasutusjuhised
Once assembled, connect your monitor, keyboard, mouse, and power cable to the appropriate ports. Press the power button on the front panel to start your system. Refer to your motherboard and operating system manuals for specific boot-up and software configuration instructions.
6. Hooldus
- Puhastamine: Regularly clean the exterior of the case with a soft, dry cloth. For mesh panels, use compressed air to remove dust buildup. Ensure the system is powered off and unplugged before cleaning.
- Õhuvool: Keep the mesh panels clear of obstructions to maintain optimal airflow and cooling performance.
- Komponentide kontrollid: Periodically check internal components for dust accumulation and ensure all connections are secure.
7. Veaotsing
- Süsteem ei lülitu sisse: Verify all power connections (24-pin ATX, 4/8-pin CPU, front panel power switch) are correctly seated. Ensure the power supply is switched on and connected to a working outlet.
- Ekraani väljund puudub: Check that the monitor is correctly connected to the graphics card or motherboard (if using integrated graphics) and that the monitor is powered on.
- Ülekuumenemine: Ensure proper cable management to avoid obstructing airflow. Verify that CPU cooler and any case fans are functioning correctly. Clean dust from mesh panels and heatsinks.
- Lahtised ühendused: If experiencing intermittent issues, power off the system and re-seat all internal cables (SATA, power, front panel).
8. Garantii ja tugi
The MININGEEK GM100 Mini PC Case comes with a standard manufacturer's warranty against defects in materials and workmanship. For specific warranty terms, technical support, or service inquiries, please refer to the MININGEEK official webveebisaidilt või võtke ühendust edasimüüjaga. Hoidke ostutõend garantiinõuete esitamiseks alles.


