Sissejuhatus
Thank you for choosing the RAINPOINT Digital Sprinkler Timer, Model ITV105. This programmable 1-outlet automatic hose water timer is designed to provide convenient and precise control over your watering schedule, ensuring optimal moisture levels for your lawn and garden. This manual provides detailed instructions for setup, operation, maintenance, and troubleshooting to help you get the most out of your new device.
Toode läbiview ja põhifunktsioonid
The RAINPOINT ITV105 Sprinkler Timer is engineered for durability and ease of use, offering a reliable solution for automated garden irrigation.
- Standardne ühilduvus: Features a 3/4" inlet and outlet thread, compatible with most standard garden hoses.
- Ilmastikukindlus: IP54 waterproof rating and heavy-duty weather-resistant ABS housing ensure durability for outdoor use.
- Kohandatav programmeerimine: Easy-to-use interface allows customization of start time, watering frequency, and duration for automated irrigation.
- Built-in Filter: Includes a built-in metal filter to improve water quality and protect plants from debris.
- Lekke vältimine: Upgraded strong and durable ABS material and water inlet thread, paired with Teflon tape and rubber washer to prevent water leakage.
- Suur LCD ekraan: Displays detailed information such as watering time, frequency, power, and battery life for easy readability.
- Aku tühjenemise teatis: Powered by 2 AAA batteries (not included), with a low battery notification and automatic valve shut-off to prevent water waste.
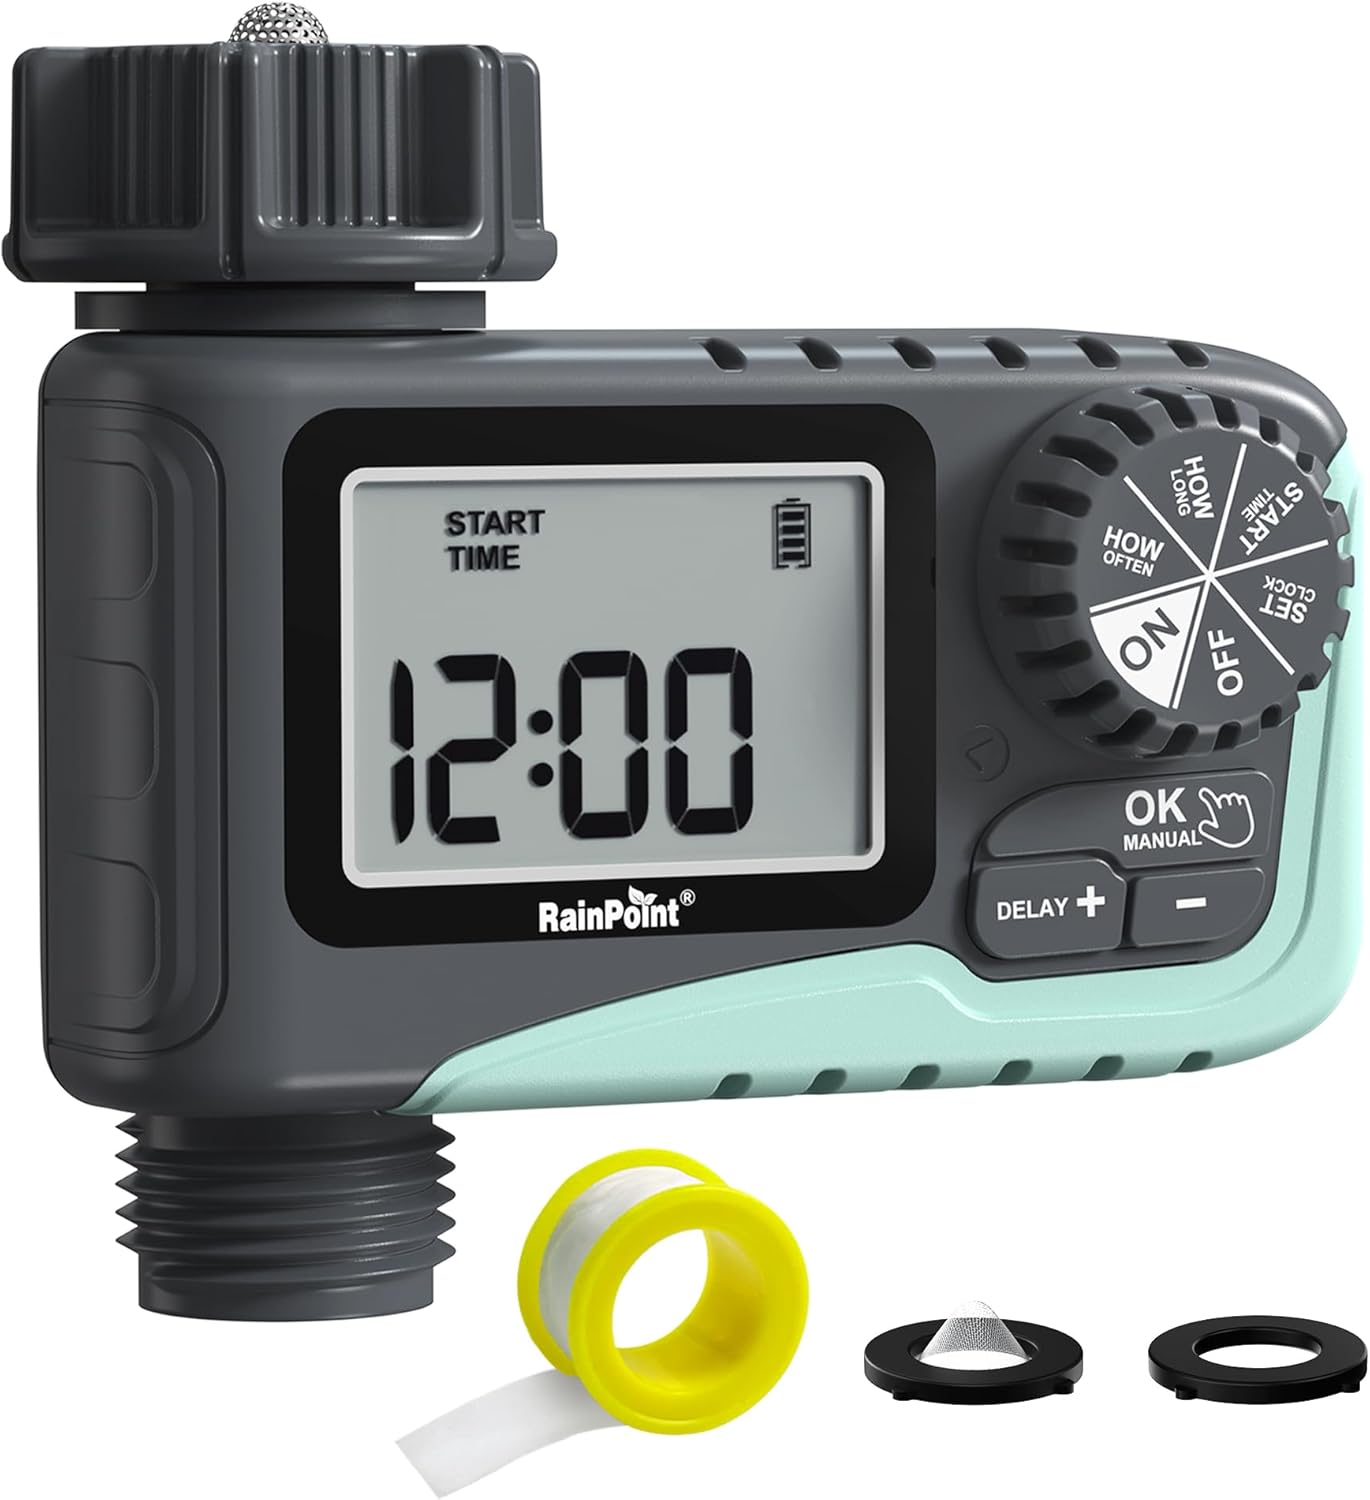
Joonis 1: Esiosa view of the RAINPOINT Digital Sprinkler Timer (ITV105) showing the large LCD screen, control dial, and buttons.
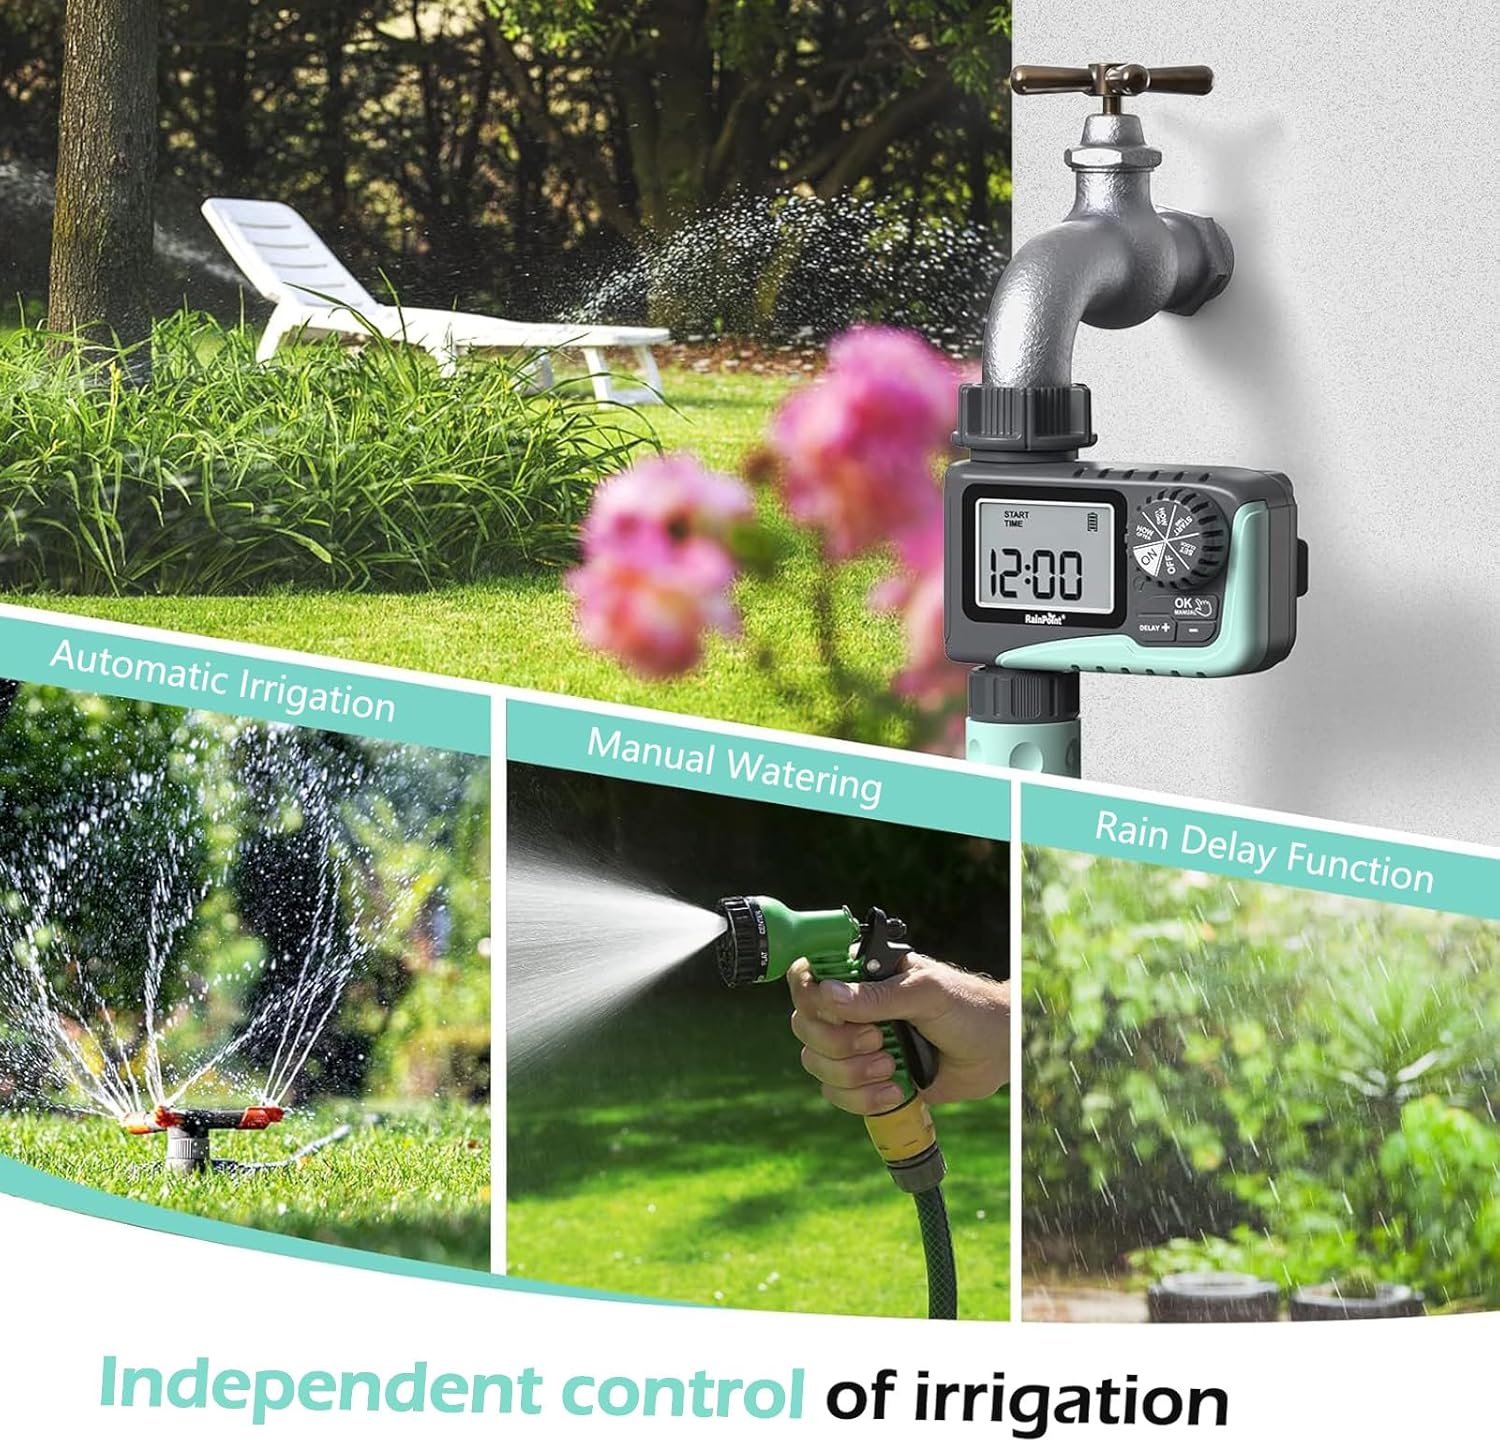
Figure 2: Illustration of the timer's three main functions: automatic irrigation, manual watering, and rain delay.
Pakendi sisu
Palun kontrollige paki avamisel sisu, et kõik osad oleksid olemas:
- 1 x RAINPOINT Digital Sprinkler Timer (ITV105)
- 1 x Kasutusjuhend (käesolev dokument)
- 1 x teflonteip
- 1 x Rubber washer
- 1 x Spare filter
Seadistamine ja installimine
Follow these steps to properly set up your sprinkler timer:
- Patareide paigaldamine:
Locate the battery compartment on the back of the timer. Insert 2 new AAA (1.5V) alkaline batteries, ensuring correct polarity. Close the battery compartment securely. The LCD screen will power on.
- Valmistage kraan ette:
Ensure your outdoor hose faucet is clean and free of debris. If necessary, apply the included Teflon tape to the faucet threads for a watertight seal.
- Kinnitage taimer kraani külge:
Screw the timer's inlet (top connector) onto your 3/4" outdoor hose faucet. Hand-tighten firmly. Ensure the rubber washer is properly seated inside the timer's inlet to prevent leaks. The timer features a 360° rotating connector for easy positioning.
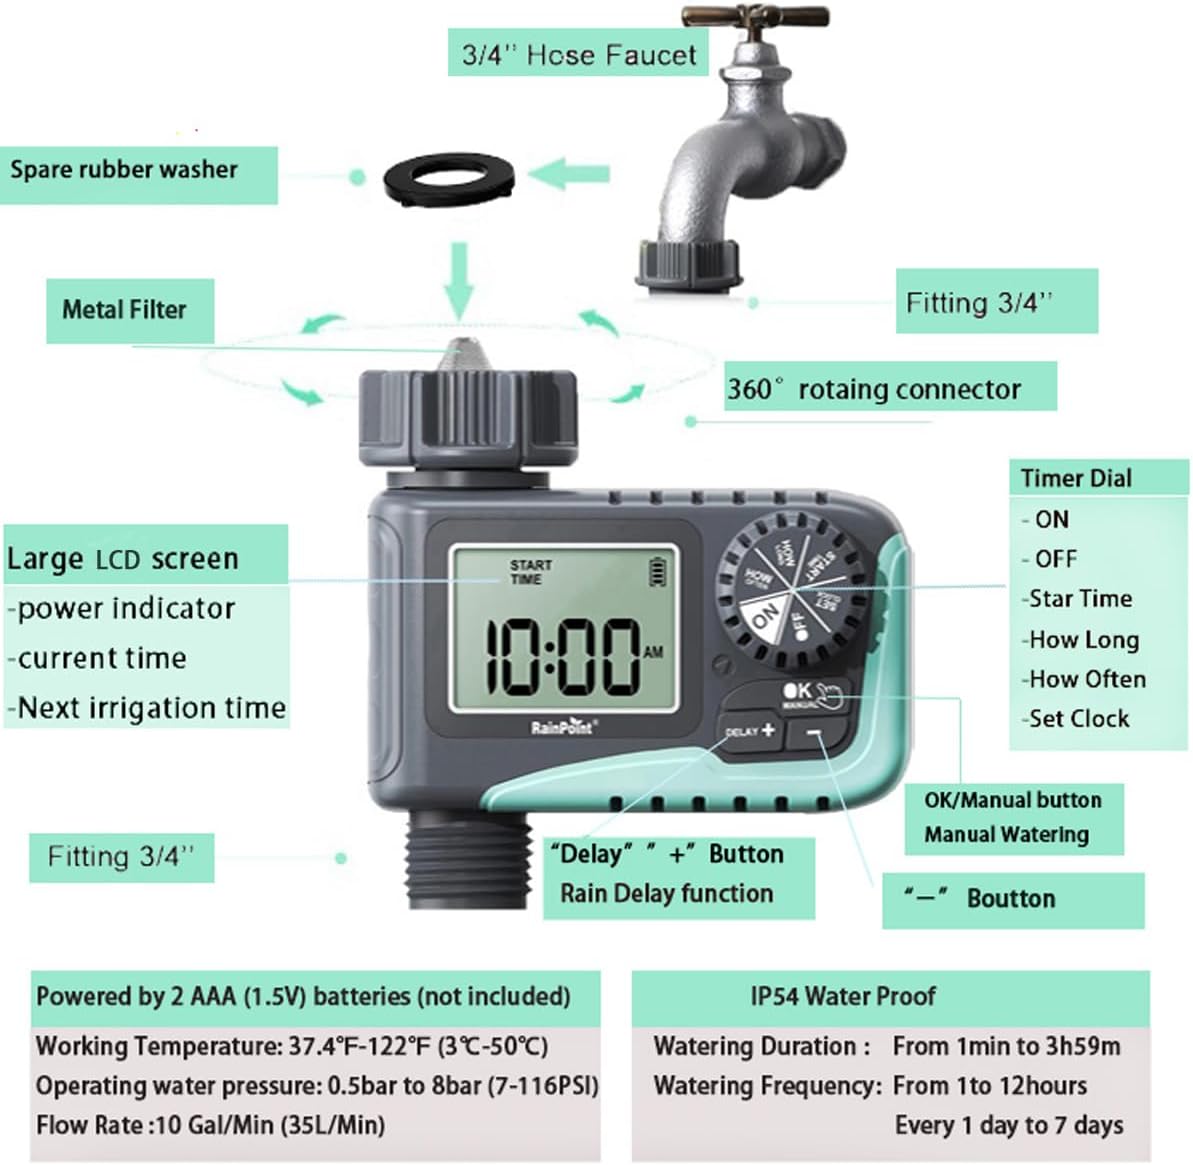
Figure 3: Diagram illustrating the components of the sprinkler timer, including the 3/4" hose faucet connection, metal filter, and LCD screen.
- Ühendage voolik:
Attach your garden hose to the timer's outlet (bottom connector). Hand-tighten securely. Ensure a proper washer is in place at the hose connection point.
- Open Faucet:
Fully open your outdoor hose faucet. The timer is designed to withstand water pressure from 0.5 bar to 8 bar (7-116 PSI). The timer will control the water flow, not the faucet.
Kasutusjuhised
The RAINPOINT ITV105 timer features a large dial and intuitive buttons for easy programming.
Juhtnupu asendid:
- PEAL: Activates the timer for automatic watering.
- VÄLJAS: Deactivates the timer, stopping all watering.
- SEADISTA KELL: Määrake praegune kellaaeg.
- ALGUSAEG: Set the desired start time for watering cycles.
- KUI KAUA: Set the duration of each watering cycle.
- KUI TIHTI: Set the frequency of watering cycles.
Nupud:
- OK/MANUAL: Confirms settings or initiates manual watering.
- DELAY +: Increases values during setting or activates/adjusts rain delay.
- -: Vähendab seadistamise ajal väärtusi.
Setting the Current Time (SET CLOCK):
- Pöörake valikuketas asendisse SEADISTA KELL.
- Kasutage + ja - Tunni muutmiseks vajutage nuppe. OK kinnitamiseks.
- Kasutage + ja - Minutite reguleerimiseks vajutage nuppe. OK kinnitamiseks.
- Pöörake valikuketas asendisse ON to save the time and return to normal operation.
Setting Automatic Watering Program:
This timer allows you to set a start time, duration, and frequency for automated watering.
- Set Start Time (START TIME):
Pöörake valikuketas asendisse ALGUSE AEG. Kasutage + ja - to set the desired watering start hour and minute. Press OK iga seadistuse kinnitamiseks.
- Set Watering Duration (HOW LONG):
Pöörake valikuketas asendisse KUI KAUA. Kasutage + ja - to set the watering duration from 1 minute to 3 hours and 59 minutes. Press OK kinnitamiseks.

Figure 4: Screen showing settings for "HOW OFTEN" (frequency) and "HOW LONG" (duration) for automatic watering.
- Set Watering Frequency (HOW OFTEN):
Pöörake valikuketas asendisse KUI TIHTI. Kasutage + ja - to set the frequency:
- Every 1 hour to 12 hours.
- Every 1 day to 7 days.
Vajutage OK kinnitamiseks.
- Programmi aktiveerimine:
Pöörake valikuketas asendisse ONTaimer töötab nüüd vastavalt teie programmeeritud ajakavale.
Käsitsi kastmine:
Kohese kastmise jaoks ilma programmeeritud ajakava mõjutamata:
- Ensure the dial is in the ON positsiooni.
- Vajutage nuppu OK/MANUAL button. The display will show the default manual watering duration (e.g., 10 minutes).
- Kasutage + ja - nupud käsitsi kastmise kestuse reguleerimiseks 1 minutist kuni 8 tunnini.
- Vajutage OK again to start manual watering. The timer will count down the set duration.
- Käsitsi kastmise enneaegseks peatamiseks vajutage OK/MANUAL uuesti.

Figure 5: Display showing the manual watering duration setting, adjustable from 1 minute to 8 hours.
Vihma viivitusfunktsioon:
The rain delay function allows you to pause your watering schedule for a set period due to rain or other reasons, preventing overwatering.
- Ensure the dial is in the ON positsiooni.
- Vajutage nuppu DELAY + button. The display will show a default delay time (e.g., 24H).
- Vajutage DELAY + repeatedly to cycle through delay options (e.g., 24H, 48H, 72H).
- Once you select the desired delay, the timer will enter rain delay mode. The display will show the remaining delay time.
- After the delay period ends, the timer will automatically resume its programmed watering schedule.
- To cancel the rain delay, press the DELAY + button until the delay time disappears, or rotate the dial to OFF and then back to ON.

Figure 6: The timer displaying the rain delay countdown, highlighting its IP54 waterproof rating.
Hooldus
Proper maintenance ensures the longevity and optimal performance of your RAINPOINT Sprinkler Timer.
- Puhas filter: Periodically check and clean the metal filter located at the timer's inlet. Remove the timer from the faucet, unscrew the filter, rinse it under running water to remove any debris, and reinsert it.
- Patarei vahetus: When the low battery indicator appears on the LCD screen, replace the 2 AAA batteries promptly. Always use new alkaline batteries.
- Talvitumine: Before the first frost, remove the timer from the faucet and store it indoors in a dry, frost-free location. Remove the batteries before storage.
- Kontrollige lekkeid: Regularly inspect all connections (faucet to timer, timer to hose) for any signs of leakage. Ensure all connections are hand-tightened and that rubber washers are properly seated.

Figure 7: Visual representation of the built-in metal filter and durable plastic material designed for anti-leakage and longer service life.
Veaotsing
If you encounter issues with your RAINPOINT Sprinkler Timer, refer to the following common problems and solutions:
| Probleem | Võimalik põhjus | Lahendus |
|---|---|---|
| Timer not turning on / LCD blank. | Tühjad või valesti paigaldatud patareid. | Replace with 2 new AAA alkaline batteries, ensuring correct polarity. |
| Veevool puudub. |
|
|
| Vee leke ühendustest. |
|
|
| Taimer ei järgi ajakava. |
|
|
Tehnilised andmed
| Funktsioon | Spetsifikatsioon |
|---|---|
| Mudel | ITV105 |
| Toote mõõtmed | 10.5 x 10.3 x 5 cm (4 x 4 x 2 tolli) |
| Materjal | Akrüülnitriilbutadieenstüreen (ABS) |
| Watering Duration (Automatic) | 1 minutit kuni 3 tundi 59 minutit |
| Watering Frequency (Automatic) | Every 1 hour to 12 hours, or every 1 day to 7 days |
| Watering Duration (Manual) | 1 minute to 8 hours (Default: 10 minutes) |
| Maksimaalne voolukiirus | 10 Gal/Min (35 L/Min) |
| Veesurve vahemik | 0.5 bar to 8 bar (7-116 PSI) |
| Töötemperatuur | 3 ℃–50 ℃ (37.4 ℉–122 ℉) |
| Toiteallikas | 2 x AAA (1.5V) batteries (not included) |
| Veekindluse reiting | IP54 |
Garantii ja tugi
RAINPOINT products are manufactured to high-quality standards. For specific warranty details, please refer to the warranty card included with your product or visit the official RAINPOINT website. If you encounter any issues or have questions not covered in this manual, please contact RAINPOINT customer support through their official websaidilt või jaemüüjalt, kellelt te toote ostsite.
Lisateabe ja toe saamiseks võite külastada veebilehte RAINPOINTi pood Amazonis.


