1. Sissejuhatus
Tänan ostu eestasing the Singer SN777αIII Computerized Sewing Machine. This machine is designed for ease of use and versatility, offering 100 stitch patterns, including alphanumeric characters, to support a wide range of sewing projects. Please read this manual thoroughly before operating your machine to ensure safe and efficient use.

Image: The Singer SN777αIII sewing machine is available in white, pink, and a white and pink combination, allowing users to choose a color that suits their preference or room decor.
2. Seadistamine
2.1 Lahtipakkimine ja paigutamine
- Võtke masin ja kõik lisatarvikud ettevaatlikult pakendist välja.
- Place the machine on a stable, flat surface. Ensure there is adequate space around the machine for comfortable operation.
2.2 Toiteühendus
- Veenduge, et toitelüliti on asendis „OFF”.
- Ühendage toitejuhe masinaga ja seejärel sobiva pistikupessa.
2.3 Pooli kerimine
- Asetage niidipool tihvti külge.
- Järgige masinal näidatud kerimisrada.
- Asetage tühi pool poolimisvõllile ja lükake seda paremale.
- Start winding by pressing the foot controller or start/stop button. Stop when the bobbin is full.
2.4 Ülemise niidi läbistamine
- Tõstke pressijala hoob üles.
- Follow the numbered threading path on the machine, ensuring the thread is correctly seated in all guides and the tension discs.
- Use the automatic needle threader for easy threading of the needle eye.
2.5 Setting the Lower Thread (Bobbin)
- Avage pooli kaas.
- Sisestage keritud pool pooliümbrisesse, veendudes, et niit kerib lahti õiges suunas.
- Guide the bobbin thread through the tension spring and out the bobbin case opening.
- Close the bobbin cover. The easy bobbin setting feature allows you to start sewing without pulling up the bobbin thread manually.
2.6 Tarvikute kinnitamine
- Lai laud: Attach the wide table to the machine to expand your work area, especially useful for larger projects.
- Jalakontroller: Connect the foot controller to the designated port on the machine for hands-free speed control.
3. Kasutusjuhised
3.1 Juhtpaneel üleview
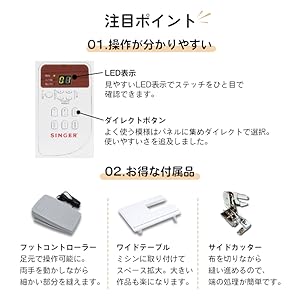
Image: The control panel features a clear LED display to show the selected stitch and direct buttons for frequently used patterns, simplifying operation.
- LED-ekraan: Shows the selected stitch pattern number and other relevant settings.
- Direct Buttons: Allows quick selection of commonly used stitch patterns.
- Pistevaliku nupud: Use these to navigate and select from the 100 available stitch patterns.
3.2 Pistemustrite valimine

Image: The machine offers 100 stitch patterns, including utility stitches, decorative stitches, buttonholes, satin stitches, cross stitches, patchwork quilt stitches, and alphanumeric characters (numbers and alphabets).
- Refer to the stitch chart on the machine or in the manual.
- Use the stitch selection buttons to choose the desired pattern. The selected pattern number will appear on the LED display.
- For alphanumeric stitches, select the corresponding pattern and then use the adjustment buttons to choose specific letters or numbers.
3.3 Õmblemise põhitoimingud

Image: This illustration highlights key operational features such as hand-focused controls for start/stop, automatic buttonhole creation, the free arm for cylindrical sewing, stepless speed adjustment, drop feed for free-motion quilting, and the presser foot lifter button for smooth sewing over varying fabric thicknesses.
- Start/Stop nupp: Õmblemise alustamiseks ja peatamiseks vajutage .
- Kiiruse reguleerimine: Use the slide control for stepless speed adjustment from low to high.
- Pöördpiste nupp: Press and hold to sew in reverse for securing stitches.
- Nõela üles/alla nupp: Positions the needle up or down.
- Presser Foot Lifter Button: Automatically keeps the presser foot horizontal, making it easy to start sewing thick fabrics.
3.4 Erifunktsioonid
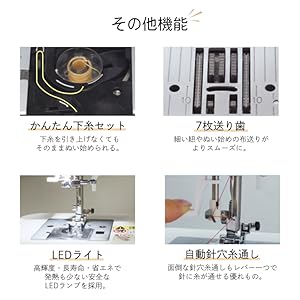
Image: This illustration details the easy bobbin setting for quick starts, the 7-point feed dog for smooth fabric feeding, the bright LED light for clear visibility, and the automatic needle threader for effortless threading.
- Automaatne nõelakeere: A lever-operated system that threads the needle automatically.
- 7-punktiline söödakoer: Ensures smooth and consistent fabric feeding, especially for delicate or thick materials.
- LED valgus: Provides bright, long-lasting, and energy-efficient illumination of the sewing area.
- Vaba käsi: Remove the accessory box to reveal the free arm, ideal for sewing cuffs, sleeves, and other cylindrical items.
- Fully Automatic Buttonhole: Simply set the button, and the machine automatically creates a perfectly sized buttonhole.
- Tilkvoog: Lower the feed dogs for free-motion quilting or darning.
4. Hooldus
4.1 Puhastamine
- Enne puhastamist lülitage masin alati välja ja eemaldage pistik vooluvõrgust.
- Regularly clean lint and dust from the bobbin case area and under the needle plate using the brush provided.
- Pühkige masina välispind pehme ja kuiva lapiga. Ärge kasutage tugevatoimelisi kemikaale.
4.2 Nõela vahetamine
- Lülitage masin välja ja eemaldage see vooluvõrgust.
- Keerake nõel lahtiamp keerake kinni ja eemaldage vana nõel.
- Insert a new needle with the flat side facing the back, pushing it up as far as it will go.
- Pingutage nõela clamp keerake kindlalt kinni.
5. Veaotsing
This section addresses common issues you might encounter. For problems not listed here, please consult the full instruction DVD or contact customer support.
| Probleem | Võimalik põhjus | Lahendus |
|---|---|---|
| Masin ei käivitu | Power cord not connected; Power switch off; Foot controller not connected. | Check power connections; Turn on power switch; Ensure foot controller is plugged in. |
| Õmblused vahele jäetud | Incorrect needle; Bent needle; Incorrect threading. | Use correct needle type for fabric; Replace bent needle; Re-thread machine carefully. |
| Lõng katkeb | Incorrect tension; Poor quality thread; Improper threading; Needle bent or dull. | Adjust tension; Use good quality thread; Re-thread machine; Replace needle. |
| Kangas ei söötnud | Feed dogs lowered; Presser foot pressure too low. | Raise feed dogs; Adjust presser foot pressure. |
6. Tehnilised andmed

Image: The Singer SN777αIII machine's dimensions are 404mm width x 188mm depth x 298mm height, with a weight of 5.8 kg.
- Mudel: SN777αIII
- Tootja: Laulja
- Mõõdud (toode): 40.4 cm (laius) x 18.8 cm (sügavus) x 29.8 cm (kõrgus)
- Kaal (toode): 5.8 kg
- Materjal: Akrüülnitriilbutadieenstüreen (ABS)
- Õmblusmustrid: 100 types (including numbers and alphabets)
6.1 Kaasasolevad tarvikud

Image: A comprehensive diagram illustrating all standard accessories, including various presser feet, bobbins, screwdrivers, a seam ripper, needle set, seam guide, spool caps, auxiliary spool pin, spool pin felt, soft cover, power cord, instruction manual, and instruction DVD.
- Siksakiline jalg
- Tõmblukuga jalg
- Nööpaugu jalg
- Nööbiõmblusjalg
- Ülekoormamise jalg
- Pimeõmblusjalg
- Satiinist õmblusjalg
- Poolid
- Triangular Screwdriver
- Väike kruvikeeraja
- Seam Ripper with Brush
- Nõelte komplekt
- Õmbluste juhend
- Spool Cap (Large)
- Spool Cap (Small)
- Lisapooltihvt
- Viltrulli nööpnõel
- Pehme kate
- Toitejuhe
- Kasutusjuhend
- Juhend DVD
- Jalakontroller
- Lai laud
- Külglõikur
7. Garantii ja tugi
For warranty information, please refer to the warranty card included with your product or contact your retailer. For technical support or service inquiries, please refer to the contact information provided in your purchase documentation or visit the official Singer websaidile.


