1. Sissejuhatus
This manual provides comprehensive instructions for the installation, operation, and maintenance of your Vivotek ND9426P Network Video Recorder (NVR). The ND9426P is a 16-channel, 2-bay embedded NVR with Power over Ethernet (PoE) capabilities and integrated Artificial Intelligence (AI) features, designed for robust surveillance applications. Please read this manual thoroughly before using the device to ensure proper setup and functionality.
2. Ohutusalane teave
- Ensure the NVR is installed in a well-ventilated area to prevent overheating.
- Kasutage ainult seadmega kaasas olevat toiteadapterit.
- Do not expose the NVR to water, moisture, or extreme temperatures.
- Avoid placing heavy objects on top of the NVR.
- Enne hooldus- või paigaldustööde tegemist ühendage seade vooluvõrgust lahti.
- Andke kõik hooldustööd kvalifitseeritud personalile.
3. Pakendi sisu
Veenduge, et kõik allpool loetletud esemed on teie pakendis. Kui mõni ese puudub või on kahjustatud, võtke viivitamatult ühendust oma müüjaga.
- Vivotek ND9426P NVR Unit
- Toiteadapter
- USB-hiir
- Kiirpaigaldusjuhend
- HDD Mounting Screws
4. Füüsiline üleview
Familiarize yourself with the front and rear panels of the Vivotek ND9426P NVR.
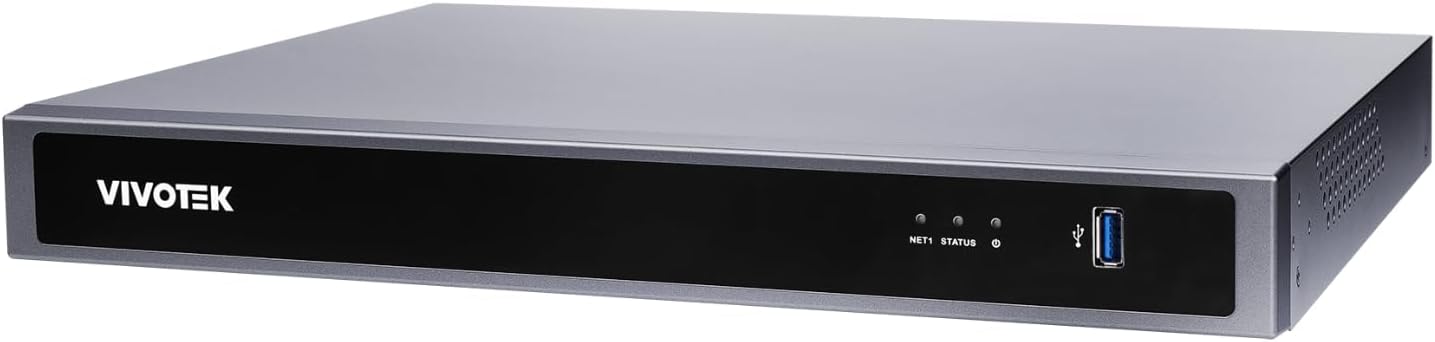
Figure 1: Front Panel of Vivotek ND9426P NVR. This image displays the front of the NVR unit, featuring the VIVOTEK brand logo on the left, two small indicator LEDs labeled "NET1" and "STATUS" in the center, and a blue USB 3.0 port on the right. The overall casing is a dark gray metallic finish.
4.1 Esipaneel
- VIVOTEK Logo: Näitab kaubamärki.
- NET1 LED: Network activity indicator for LAN port 1.
- STATUS LED: Süsteemi oleku indikaator.
- USB 3.0 port: For connecting a USB mouse, keyboard, or external storage devices.
4.2 Tagapaneel (tüüpiline konfiguratsioon)
While not pictured, the rear panel typically includes the following ports:
- PoE Ports (x16): RJ-45 ports for connecting IP cameras and providing power.
- LAN-port: RJ-45 port for connecting the NVR to your local network.
- HDMI väljund: Monitori või kuvariga ühendamiseks.
- VGA väljund: Monitori või kuvariga ühendamiseks.
- Heli sisend/väljund: Väliste heliseadmete ühendamiseks.
- USB 2.0 pordid: Täiendavad USB-pordid välisseadmete jaoks.
- Toite sisend: Toiteadapteri ühendamiseks.
- Maandusterminal: Ohutusmaanduse jaoks.
5. Seadistamine
5.1 Riistvara paigaldamine
- Kõvaketta paigaldamine:
Unscrew the NVR casing to access the internal bays. Mount up to two 3.5-inch SATA hard drives using the provided screws. Reattach the casing kindlalt.
- IP-kaamerate ühendamine:
Connect your PoE-enabled IP cameras to the NVR's PoE ports using Ethernet cables. The NVR will provide power and data connectivity.
- Connect Display and Mouse:
Connect a monitor to the NVR's HDMI or VGA output port. Connect the USB mouse to one of the NVR's USB ports.
- Võrguühendus:
Ühendage NVR-i LAN-port Etherneti kaabli abil oma võrguruuteri või kommutaatoriga.
- Toide sisse:
Ühendage toiteadapter NVR-i toitesisendisse ja seejärel pistikupessa. NVR lülitub automaatselt sisse.
5.2 Esialgne konfiguratsioon
- Upon first boot, the NVR will guide you through a setup wizard. Follow the on-screen instructions.
- Set a strong password for the administrator account. This is crucial for security.
- Konfigureerige võrguseaded (DHCP või staatiline IP).
- Scan for and add connected IP cameras.
- Määrake kuupäev, kellaaeg ja ajavöönd.
6. NVR-i kasutamine
6.1 Kasutajaliidese navigeerimine
- Otse View: Access real-time video feeds from all connected cameras. Use the mouse to select camera views and layouts.
- Taasesitus: Review salvestatud footage. Navigate through timelines, search by date/time, and export video clips.
- Salvestusseaded: Configure recording schedules (continuous, motion-triggered, event-based) and video quality for each camera.
- Ürituste korraldamine: Set up alerts for motion detection, tampering, or AI-triggered events. Configure notification methods (e.g., email, push notifications).
- Süsteemi seaded: Manage user accounts, network configurations, storage, and system logs.
6.2 Tehisintellekti funktsioonid
The Vivotek ND9426P integrates advanced AI capabilities to enhance surveillance efficiency. These features may include:
- Nutikas liikumistuvastus: Differentiates between human/vehicle movement and environmental factors to reduce false alarms.
- Sissetungimise tuvastamine: Defines specific areas for monitoring and triggers alerts upon unauthorized entry.
- Joone ületamise tuvastamine: Detects when an object crosses a predefined virtual line.
- Refer to the NVR's on-screen interface or the detailed software manual for specific AI feature configuration.
7. Hooldus
- Püsivara värskendused: Regularly check the VIVOTEK website for firmware updates to ensure optimal performance and security. Follow the provided instructions carefully for updating.
- Andmete varundamine: Periodically back up important recorded footage välistele salvestusseadmetele (nt USB-draiv, võrgusalvestusseade), et vältida andmete kadumist.
- Süsteemi logid: Review system logs regularly for any error messages or unusual activity that may indicate a problem.
- Puhastamine: Keep the NVR unit clean and free from dust. Use a soft, dry cloth. Do not use liquid cleaners or aerosols. Ensure ventilation openings are not obstructed.
8. Veaotsing
| Probleem | Võimalik põhjus | Lahendus |
|---|---|---|
| Monitoril puudub videoväljund | Loose cable connection, incorrect input source on monitor, NVR not powered on. | Check HDMI/VGA cable connections. Ensure monitor is set to correct input. Verify NVR power. |
| Kaamerad ei kuva | Camera not powered, network issue, incorrect camera settings. | Check camera power and Ethernet cables. Verify network connectivity. Ensure cameras are added and configured correctly in NVR settings. |
| Cannot access NVR over network | Network cable disconnected, incorrect IP address, firewall blocking access. | Check LAN cable. Verify NVR's IP address and network settings. Adjust firewall rules if necessary. |
| Salvestamine ei tööta | Hard drive not installed/initialized, recording schedule not set, insufficient storage. | Ensure HDD is installed and formatted. Check recording schedules. Verify available storage space. |
9. Tehnilised andmed
| Mudel | ND9426P |
| Kaubamärk | VIVOTEK |
| Kanalite arv | 16 |
| HDD pesad | 2 (3.5" SATA) |
| PoE pordid | 16 |
| Ühenduvustehnoloogia | Ethernet, USB |
| Kauba kaal | 1 kilogrammi (2.2 naela) |
| Pakendi mõõtmed | 0.39 x 0.39 x 0.39 tolli (P x L x K) |
Note: Specifications are subject to change without notice. For the most current information, please refer to the official VIVOTEK product page.
10. Garantii ja tugi
VIVOTEKi toodetele kehtib piiratud garantii. Täpsemate garantiitingimustega saate tutvuda tootega kaasasoleval garantiikaardil või VIVOTEKi ametlikul veebilehel. websaidile.
For technical support, product inquiries, or service requests, please contact your local VIVOTEK dealer or visit the VIVOTEK support portal online. Have your product model and serial number ready when contacting support.
- VIVOTEKi ametlik Websait: www.vivotek.com
- Tugiportaal: Vaadake webpiirkondlike tugikontaktide sait.


