1. Sissejuhatus
This user manual provides comprehensive instructions for the installation, operation, and maintenance of your HDWR videoCAR-L300 Dash Cam. Please read this manual thoroughly before using the device to ensure proper functionality and to maximize its lifespan. Keep this manual for future reference.
2. Toote lõppview
The HDWR videoCAR-L300 is a versatile dash camera designed to enhance your driving safety and record your journeys. It functions as both a front and rear recording device, integrated into a rearview mirror with a touchscreen display.
Peamised omadused:
- Full HD videosalvestus: The front camera records in Full HD (1920x1080) resolution, providing clear and detailed video footage.
- Rear Camera Functionality: The rear camera offers VGA (640x480) recording resolution and can also serve as a reverse camera for parking assistance.
- Integrated 4.7-inch Touchscreen Display: The wide mirror, approximately 30 cm, features a built-in 4.7-inch touchscreen for easy operation and increased rear visibility.
- 120-Degree Wide-Angle Lens: The front camera's lens offers a 120-degree viewing angle, capturing a broad area in front of your vehicle.
- Automaatne töö: Features include automatic camera start and stop, motion detection, and adjustable sensitivity.
- G-Sensor for Impact Detection: Automatically protects recordings from being overwritten in the event of sudden braking or a collision.
- MicroSD-kaardi tugi: Supports microSD memory cards up to 32GB for storing recorded video and audio files.

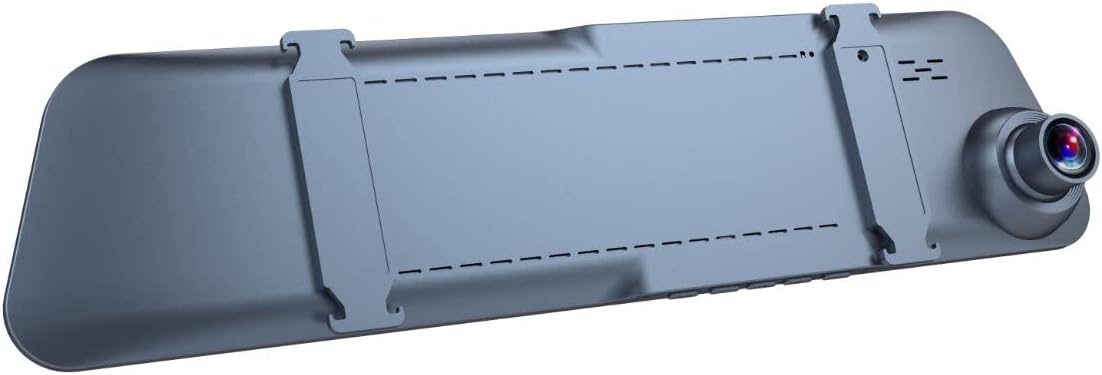
Joonis 2.1: Esiosa view of the HDWR videoCAR-L300 Dash Cam, showing the mirror display with a car image.
Joonis 2.2: Tagumine view of the HDWR videoCAR-L300 Dash Cam, highlighting the mounting clips for installation.
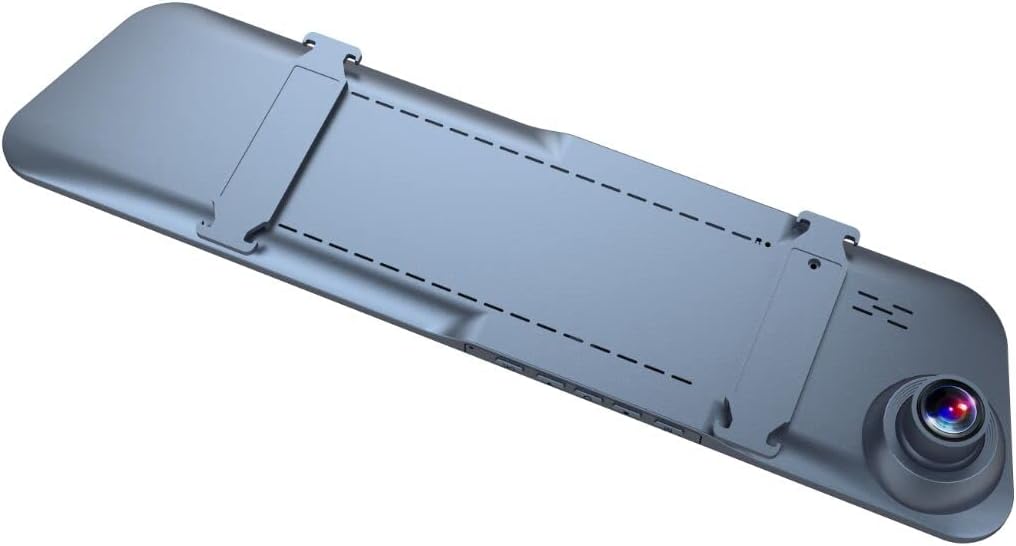
Joonis 2.3: Nurga all olev tagaosa view of the HDWR videoCAR-L300 Dash Cam, showing the camera lens and mounting clips.

Joonis 2.4: Plahvatus view illustrating the various perspectives of the HDWR videoCAR-L300 Dash Cam.
3. Seadistamine ja installimine
3.1 Mis on karbis
Enne paigaldamise alustamist veenduge, et kõik komponendid on olemas:
- HDWR videoCAR-L300 Dash Cam Unit
- Laadimiskaabel
- Paigaldustööriist
- Kasutusjuhend (see dokument)
3.2 Installation Steps (Windshield Mount)
The videoCAR-L300 is designed for windshield mounting, typically over your existing rearview peegel.
- Valmistage seade ette: Gently unbox the dash cam and ensure the protective film is removed from the screen and lens.
- Paigaldamine: Securely attach the dash cam to your vehicle's rearview mirror using the integrated clips. Ensure it is firmly in place and does not obstruct your view.
- Ühendage toide: Use the provided charging cable to connect the dash cam to your vehicle's 12V power outlet (cigarette lighter socket). Route the cable neatly to avoid interference with driving.
- Tagumise kaamera paigaldamine (valikuline): If using the rear camera, connect it to the main unit and route its cable to the rear of the vehicle. Mount the rear camera in a suitable location, typically near the license plate or inside the rear window, ensuring a clear view.
- Sisestage MicroSD-kaart: Insert a compatible microSD card (up to 32GB, not included) into the designated slot on the dash cam. Ensure it is inserted correctly until it clicks into place.
- Esialgne sisselülitamine: Start your vehicle. The dash cam should automatically power on. If not, press the power button.
- Reguleerige nurka: Adjust the angle of the front camera lens to ensure it captures the road ahead clearly. Use the live view on the touchscreen display for precise alignment.

Figure 3.1: The dash cam installed on the vehicle's rearview mirror, showing its integration into the car's interior.
4. Kasutusjuhised
4.1 Toide sisse/välja
- Automaatne töö: The device is designed to automatically power on and begin recording when your vehicle's ignition is turned on, and power is supplied. It will automatically power off when the ignition is turned off.
- Käsitsi töötamine: To manually power on or off, press and hold the power button located on the device.
4.2 Puutetundliku ekraaniga navigeerimine
The 4.7-inch touchscreen display allows for intuitive navigation through menus and settings.
- Peamine liides: Kuvab reaalajas view from the front and/or rear cameras.
- Menüüdele juurdepääs: Tap the screen to reveal menu icons. Swipe left/right or up/down to navigate through options.
- Suvandite valimine: Selle valimiseks puudutage ikooni või valikut.

Figure 4.1: The dash cam's screen showing a live road view, indicating active recording.
4.3 Salvestusrežiimid
- Loop salvestamine: The dash cam continuously records video in segments (e.g., 1, 3, or 5 minutes). When the memory card is full, the oldest unlocked filed kirjutatakse automaatselt üle.
- G-andur (hädaolukorra salvestamine): In the event of sudden braking or a collision, the built-in G-Sensor detects the impact and automatically locks the current video segment, preventing it from being overwritten by loop recording.
- Liikumistuvastus: When enabled, the camera will automatically start recording if it detects movement in front of the vehicle while parked. This feature requires continuous power supply.
4.4 Taasesitus
Et uuestiview salvestatud footage:
- From the main screen, tap to access the menu.
- Select the "Playback" or "Gallery" option.
- Browse through the recorded video and audio files. Lukustatud files (from G-Sensor events) will typically be in a separate folder.
- Puudutage a file to play it back on the screen.
4.5 Seadete kohandamine
Access the settings menu to customize various parameters:
- Video eraldusvõime: Adjust recording quality (e.g., Full HD, VGA).
- Loopi salvestamise kestus: Set the length of video segments.
- G-anduri tundlikkus: Adjust the sensitivity of the impact detection.
- Liikumistuvastus: Lubage või keelake see funktsioon.
- Kuupäev/kellaaeg Stamp: Ensure the correct date and time are set for accurate recording timestamps.
- Heli salvestamine: Mikrofoni salvestamise lubamine või keelamine.
- Ekraanisäästja: Set the display to turn off after a period of inactivity to avoid distraction while driving.
5. Hooldus
Regular maintenance ensures optimal performance and longevity of your dash cam.
- Objektiivi puhastamine: Kaamera objektiivide õrnalt pühkimiseks kasutage pehmet ja ebemevaba lappi. Vältige abrasiivseid materjale või karme kemikaale, mis võivad objektiivi kriimustada.
- Ekraani puhastamine: Wipe the touchscreen display with a soft, dry cloth. For stubborn smudges, slightly dampet lappi veega.
- MicroSD-kaardi hooldus: Format the microSD card regularly (e.g., once a month) within the camera's settings to prevent data corruption and ensure smooth recording. Back up any important footage enne vormindamist.
- Temperatuur: Avoid exposing the device to extreme temperatures (very hot or very cold) for extended periods, as this can affect battery life and component performance.
- Turvaline paigaldus: Periodically check that the dash cam is securely mounted to prevent vibrations from affecting video quality or causing the device to fall.
6. Veaotsing
If you encounter issues with your HDWR videoCAR-L300, refer to the following common problems and solutions:
| Probleem | Võimalik põhjus | Lahendus |
|---|---|---|
| Seade ei lülitu sisse. | No power supply; loose cable connection; faulty power adapter. | Check the charging cable connection to the device and the vehicle's power outlet. Ensure the vehicle's ignition is on. Try a different power outlet or cable if available. |
| Salvestamine peatub või hangub. | Full or corrupted microSD card; slow microSD card; G-Sensor triggered too often. | Format the microSD card (back up data first). Use a high-speed (Class 10 or U1/U3) microSD card. Adjust G-Sensor sensitivity in settings. |
| Video footage on udune või ebaselge. | Dirty lens; protective film still on lens; improper camera angle. | Clean the camera lens with a soft cloth. Remove any protective film. Adjust the camera angle to ensure a clear view teelt. |
| Ekraan ei reageeri. | Ajutine tarkvaratõrge. | Perform a soft reset by pressing and holding the power button until the device restarts. If unresponsive, disconnect power and reconnect. |
| Tagumine kaamera ei tööta. | Loose connection; faulty cable or camera. | Kontrollige tagakaamera kaabli ühendust põhiseadmega. Veenduge, et kaabel pole kahjustatud. |
If the problem persists after trying these solutions, please contact HDWR customer support for further assistance.
7. Tehnilised andmed
| Funktsioon | Detail |
|---|---|
| Kaubamärk | HDWR |
| Mudeli nimi | videoCAR |
| Kauba mudeli number | L300 |
| Toote mõõtmed | 3.5D x 29.7W x 7H cm; 180 grams |
| Ekraani suurus | 4.7 tolli |
| Video Resolution (Front) | Full HD (1920x1080p) |
| Video Resolution (Rear) | VGA (640x480) |
| Viewing | 120 kraadi |
| Välkmälu tüüp | microSD (kuni 32 GB) |
| Ühenduvustehnoloogia | AUX |
| Eriomadused | Motion Sensor, G-Sensor |
| Kontrollimeetod | Puudutage |
| Paigaldustüüp | Esiklaasimägi |
| Kaasas patareid | Ei |
| Ühilduvad seadmed | Nutitelefon |
8. Garantii ja tugi
For warranty information and technical support, please refer to the official HDWR website or contact their customer service directly. Details regarding warranty periods and service procedures are typically provided with your purchase documentation or on the manufacturer's websaidile.
Täiendava abi saamiseks külastage: www.hdwr.eu


