1. Sissejuhatus
This manual provides essential information for the safe installation, operation, and maintenance of your Philips LED Slim Flood Light, model PTF150-NW-G1-Y-FL-8-BZ. Please read this manual thoroughly before installation and retain it for future reference.
The Philips LED Slim Flood Light is designed for outdoor applications such as sign lighting, building facades, security lighting, and general area illumination. Its robust construction and efficient LED technology ensure reliable performance.
2. Ohutusalane teave
WARNING: Risk of electric shock. Installation should be performed by a qualified electrician or trained personnel in accordance with all applicable electrical codes.
- Enne paigaldamist või hooldamist ühendage toide lahti kaitselülitist või kaitsmekarbist.
- Veenduge, et toite mahttage on ühilduv valgusti nõuetega (120 V vahelduvvool).
- Ärge kasutage seadet kahjustatud juhtmestiku või komponentidega.
- Vältige valgusallika otsest kokkupuudet silmadega.
- The fixture's housing acts as a heat sink and may become hot during operation. Allow adequate cooling time before handling.
- Ensure all connections are secure and properly sealed, especially the IP66 liquid-tight connector for the power cord, to maintain water resistance.
- Ärge muutke seadet. Igasugused muudatused võivad tühistada garantii ja tekitada ohutusriske.
3. Pakendi sisu
Enne paigaldamise alustamist veenduge, et kõik komponendid on olemas:
- Philips LED Slim Flood Light (1 unit)
- Integrated Yoke Mount (pre-attached)
- Power Cord (3-foot, STW 16 gauge)
- IP66 Liquid Tight Connector (pre-attached to cord exit)

1. pilt: Philips LED Slim Flood Light. This image shows the front view of the flood light with its integrated yoke mount and power cord connection point.
4. Tehnilised andmed
| Spetsifikatsioon | Detail |
|---|---|
| Mudeli number | PTF150-NW-G1-Y-FL-8-BZ |
| Kaubamärk | Signify (Philips) |
| Wattage | 150 vatti |
| Lumeni väljund | 18600 XNUMX luumenit |
| Värvi temperatuur | 4000K lahe valge |
| Tõhusus | 124 luumenit vati kohta |
| Voltage | 120 volti (AC) |
| Paigaldustüüp | Yoke Mount (Surface Mount) |
| Lõpeta | Pronks |
| Materjal | Die-cast aluminum housing, tempered glass lens |
| Sissepääsukaitse (IP) reiting | IP65 (fixture), IP66 (connector) |
| Kauba kaal | 4 naela |
| Mõõdud (umbes) | 16.93" H x 11.41" W x 2.36" D (430mm H x 289.8mm W x 59.9mm D) |
5. Seadistamine ja installimine
The Philips LED Slim Flood Light is designed for surface mounting using its integrated yoke. Follow these steps for proper installation:
- Ettevalmistus: Ensure power is disconnected at the main circuit breaker. Gather necessary tools (drill, screwdriver, wire strippers, electrical tape, mounting hardware suitable for your surface).
- Paigalduskoht: Select a sturdy surface (wall, pole, ground) capable of supporting the fixture's weight and providing adequate clearance for light distribution.
- Märgistamine ja puurimine: Use the yoke mount as a template to mark the drilling points on the mounting surface. Drill appropriate pilot holes for your chosen mounting hardware. Refer to the dimension diagram for precise measurements.
- Kinnitage kinnitus: Attach the yoke mount securely to the prepared surface using appropriate screws or bolts (not included). Ensure the fixture is stable and cannot vibrate loose. The yoke includes a bolt to lock in the aiming angle after adjustment.
- Elektriühendus:
- The fixture comes with a 3-foot watertight STW 16 gauge cord exiting the housing via an IP66 liquid-tight connector.
- Connect the fixture's power cord to your main power supply wiring. This connection must be made by a qualified electrician and comply with all local and national electrical codes.
- Ensure all wire connections are properly insulated and protected from moisture.
- Aiming Adjustment: Loosen the bolt on the yoke mount, adjust the flood light to the desired aiming angle, and then securely tighten the bolt to lock the position.
- Toite taastamine: Kui paigaldamine on lõppenud ja kõik ühendused on kindlad, taastage voolukatkesti vool.
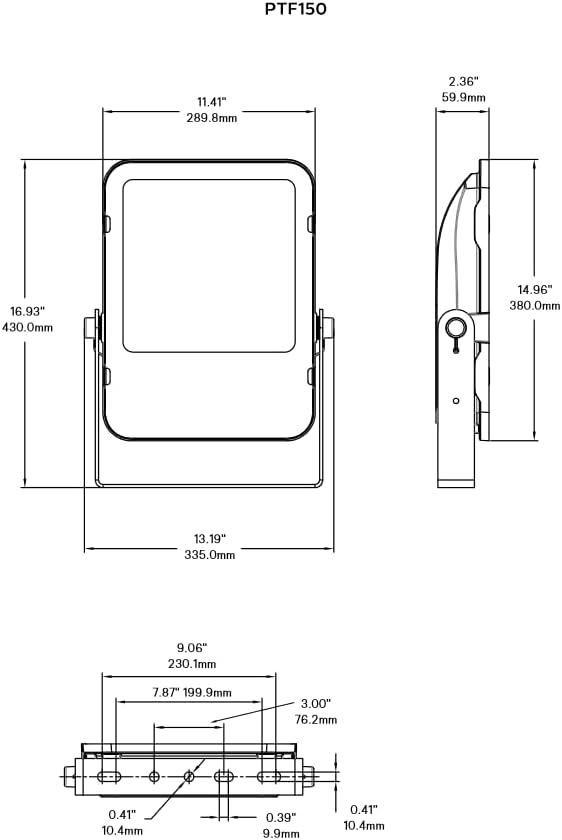
2. pilt: Philips LED Slim Flood Light Dimension Diagram. This diagram provides detailed measurements for the flood light, including height, width, depth, and mounting hole spacing, crucial for accurate installation.
6. Kasutusjuhised
The Philips LED Slim Flood Light operates upon receiving power. There are no user-adjustable controls on the fixture itself.
- Toide sisse/välja: Control the light by switching the connected power circuit on or off. This can be done via a wall switch, timer, or photocell (not included).
- Automaatne töö: For automated operation, connect the flood light to an external timer, motion sensor, or photocell switch (purchased separately) according to their respective installation instructions.
7. Hooldus
The Philips LED Slim Flood Light is designed for minimal maintenance. Regular inspection and cleaning will ensure optimal performance and longevity.
- Puhastamine: Puhastage objektiivi ja korpust regulaarselt pehme lapigaamp cloth to remove dirt, dust, and debris. Do not use abrasive cleaners or solvents, as these can damage the finish or lens. Ensure power is off before cleaning.
- Ülevaatus: Annually inspect the fixture for any signs of damage, loose connections, or wear on the power cord. Address any issues promptly.
- Komponentide vahetus: The LED light source is integrated and not user-replaceable. If the fixture malfunctions, contact customer support.
8. Veaotsing
If your Philips LED Slim Flood Light is not functioning as expected, refer to the following common issues and solutions:
| Probleem | Võimalik põhjus | Lahendus |
|---|---|---|
| Valgus ei lülitu sisse. | Seadmel puudub toide. Lahtine juhtmeühendus. Faulty circuit breaker/fuse. | Kontrollige toiteallikat. Veenduge, et kõik juhtmestiku ühendused on kindlad (konsulteerige kvalifitseeritud elektrikuga). Lähtestage kaitselüliti või vahetage kaitse välja. |
| Valgus väreleb või on hämar. | Inconsistent power supply. Lahtine juhtmestik. Kinnitusdetaili kahjustused. | Tagage stabiilne toide. Kontrollige juhtmestiku ühendusi. If damage is suspected, discontinue use and contact support. |
| Vesi armatuuri sees. | Improperly sealed connections. Kahjustatud korpus/objektiiv. | Immediately disconnect power. Inspect and re-seal all connections, especially the IP66 connector. If housing or lens is damaged, the IP rating may be compromised; contact support. |
Kui tõrkeotsingu juhised probleemi ei lahenda, võtke ühendust klienditoega.
9. Garantii ja tugi
For warranty information and technical support, please refer to the official Signify (Philips) webveebisaidilt või võtke ühendust nende klienditeenindusega. Hoidke ostutšekk ostutõendina alles.
Tootja: Tähista
Mudeli number: PTF150-NW-G1-Y-FL-8-BZ
Kontaktandmed: Please visit the official Signify websait kõige ajakohasemate kontaktandmete ja tugiressursside saamiseks.


