1. Sissejuhatus
This manual provides detailed instructions for the assembly, operation, and maintenance of your tectake metal garden shed. Please read this manual thoroughly before beginning assembly or use to ensure safe and correct installation and to maximize the lifespan of your product. Keep this manual for future reference.
2. Ohutusalane teave
Olulised ohutusjuhised:
- Always follow the provided installation instructions.
- Use appropriate tools and safety equipment when handling components. This includes gloves, safety glasses, and sturdy footwear.
- Assembly often requires two or more people due to the size and weight of components.
- Keep the shed locked when not in use to prevent unauthorized access, especially by children.
- Do not exceed the weight limit of the garden shed. Distribute weight evenly.
- Ensure the shed is installed on a level, stable surface to prevent structural instability.
- Be aware of sharp edges on metal components during assembly.
- In strong winds, ensure the shed is securely anchored to its foundation.
3. Toote lõppview
The tectake metal garden shed is designed for outdoor storage of tools, gardening equipment, bicycles, and other items. It features a durable lacquered steel sheet construction, a monoslope roof for efficient water drainage, and integrated ventilation for air circulation.
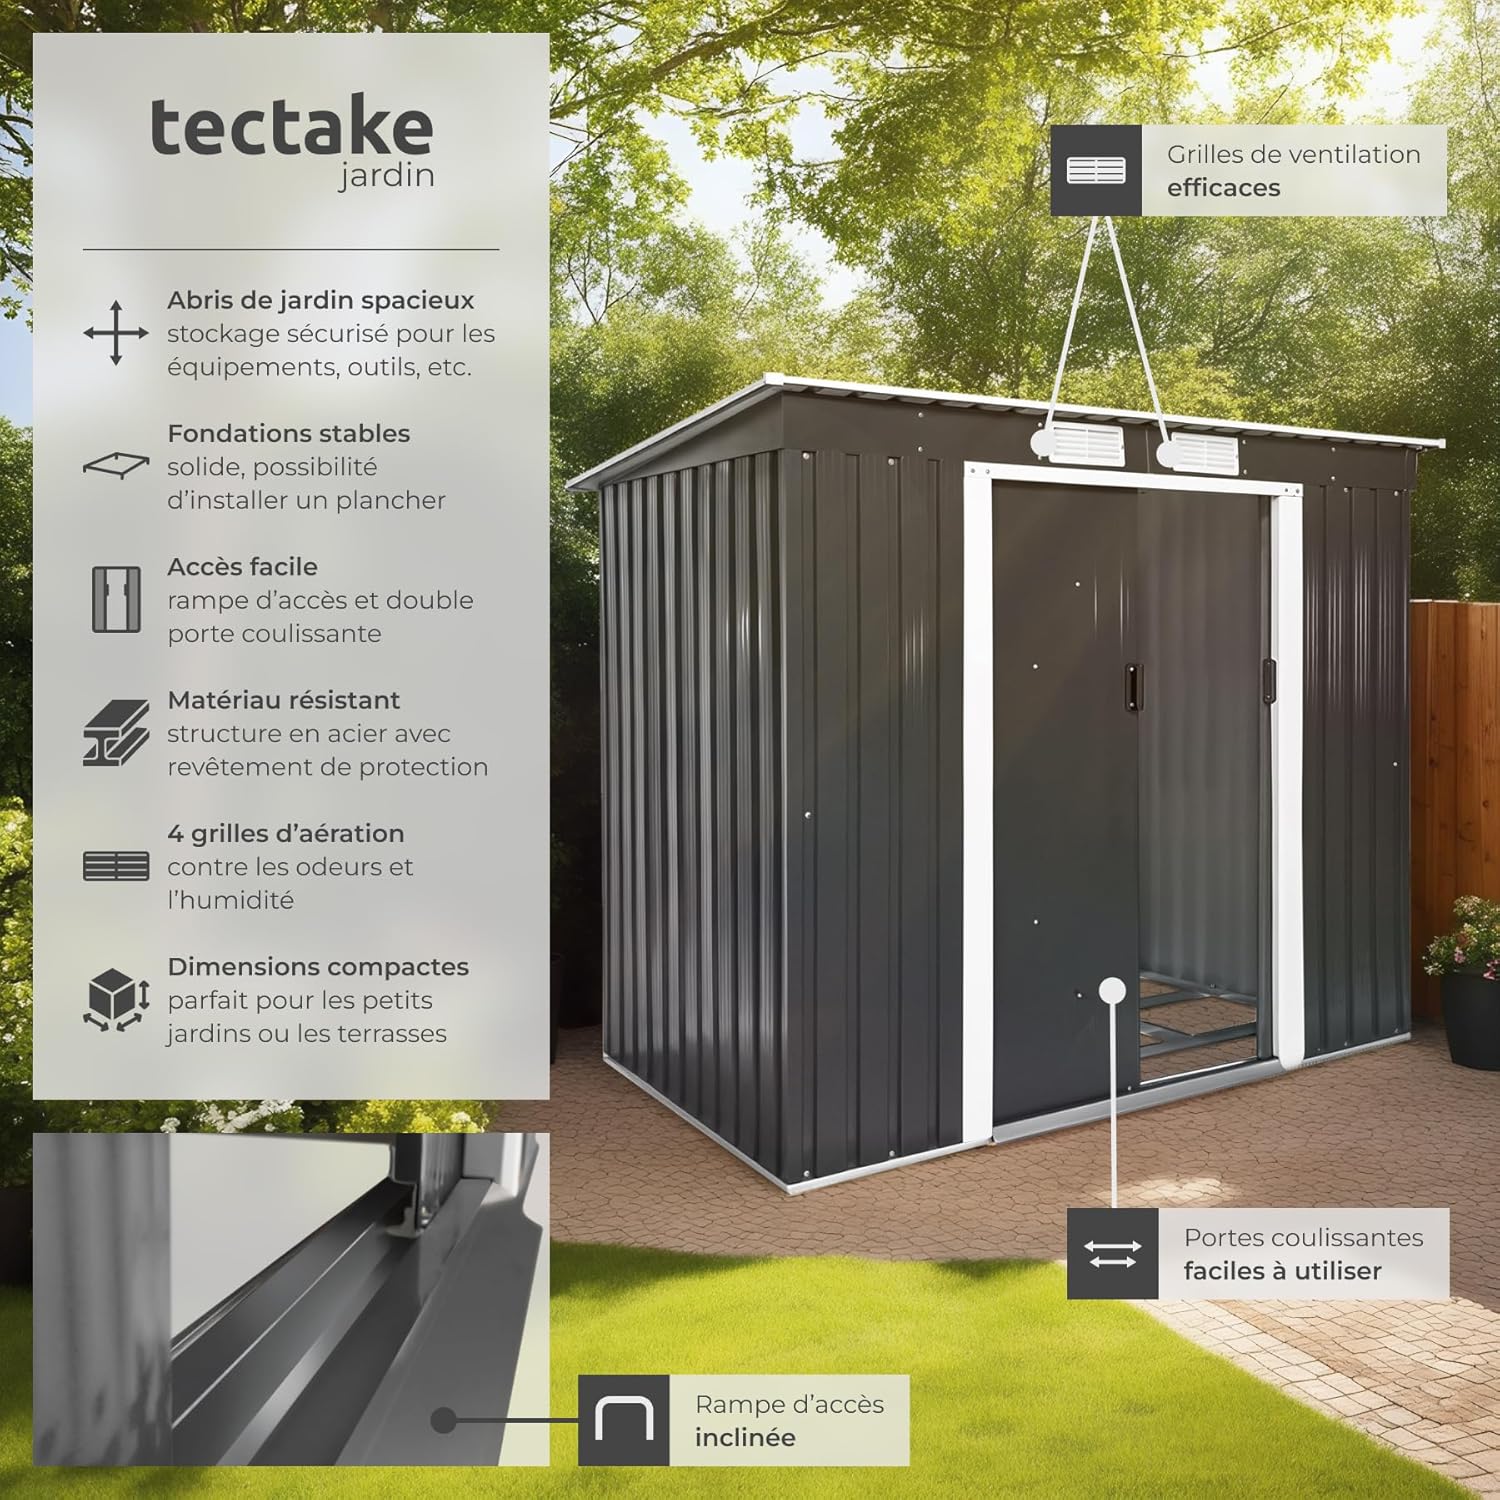
3.1. pilt: Läbiview of the tectake metal garden shed, highlighting key features such as effective ventilation grilles, secure storage, stable foundations, easy access with a sliding door and ramp, resistant steel material, and compact dimensions. The image also shows the inclined access ramp and easy-to-use sliding doors.

3.2. pilt: The shed's lacquered steel sheet construction provides robust protection against various weather conditions, including sun, rain, and wind.
Peamised omadused:
- Vastupidav konstruktsioon: Made from lacquered steel sheet for weather resistance and longevity.
- Stabiilne alus: Includes a metal foundation for enhanced stability.
- Ventilatsioon: Two ventilation openings ensure optimal air circulation, preventing humidity and condensation.
- Lükanduksed: Double sliding doors provide easy access, even in confined spaces, and can be secured with a padlock (padlock not included).
- Monoslope Roof: Designed for efficient rainwater runoff.
- Integreeritud Ramp: A low-level ramp facilitates entry and exit for wheeled items like wheelbarrows.
4. Komponendid
Before assembly, verify that all components listed in the packaging are present and undamaged. Refer to the assembly diagram provided with your product for a complete list of parts and hardware.
Tüüpilised komponendid on järgmised:
- Steel wall panels
- Katusepaneelid
- Door panels and sliding mechanisms
- Metal foundation frame
- Ventilatsioonirestid
- Juurdepääs ramp
- Kinnitusdetailid (kruvid, mutrid, seibid)
- Montaažijuhised

4.1. pilt: Interjöör view of the shed, illustrating the solid foundation structure and the provision for a padlock on the door mechanism for security.
5. Tehnilised andmed
| Funktsioon | Detail |
|---|---|
| Mudel | 213x130x173 cm |
| Kogumõõtmed (P x L x K) | 213 cm x 130 cm x 173 cm |
| Sisemõõtmed (P x L x K) | 200 cm x 115 cm x 169 cm |
| Door Opening (W x H) | 93 cm x 150 cm |
| Harja kõrgus | 173 cm |
| Räästa kõrgus | 151 cm |
| Materjal | Lacquered Steel, Polypropylene |
| Kaal | u. 52 kg |
| Värv | Hall |
| Veekindlus | Veekindel |

5.1. pilt: Diagram showing the total and interior dimensions, door opening, ridge height, and eave height of the tectake metal garden shed.
6. Paigaldamine ja kokkupanek
Assembly of the tectake garden shed requires patience and attention to detail. It is highly recommended to have at least two people for assembly to ensure stability and ease of handling components.
6.1. Ettevalmistus:
- Valige asukoht: Select a flat, level, and stable surface for installation. Ensure adequate clearance around the shed for assembly and future access.
- Pakkige komponendid lahti: Carefully unpack all parts and check against the parts list in your instruction manual. Identify each component before starting.
- Koguge tööriistu: You will need basic tools such as screwdrivers, wrenches, a measuring tape, and potentially a drill. Wear appropriate safety gear (gloves, safety glasses).
6.2. Assembly Steps (General Guidance):
- Assemble the Foundation: Begin by constructing the metal foundation frame on your chosen level surface. Ensure it is square and secure.
- Seinapaneelide paigaldamine: Attach the wall panels to the foundation frame, following the numerical sequence in your specific instruction manual. Pay close attention to the orientation of each panel.
- Install Door Frame and Sliding Mechanism: Carefully assemble the door frame and integrate the sliding door tracks (sliders) early in the process, as they can be difficult to adjust later.
- Kinnitage katusekonstruktsioon: Construct and attach the roof support beams and then the roof panels. Ensure the monoslope roof is correctly oriented for water drainage.
- Install Doors and Ramp: Hang the sliding doors onto their tracks. Install the access ramp at the entrance.
- Secure Ventilation Grilles: Attach the ventilation grilles to the designated openings.
- Lõplikud kontrollid: Tighten all fasteners. Ensure doors slide smoothly and lock properly. Verify the shed is stable and securely anchored.
Note: Refer to the detailed, step-by-step assembly instructions included in your product packaging for precise diagrams and fastener usage. Some users have reported that holes may not always align perfectly, requiring careful adjustment during assembly.

6.1. pilt: Lähivõte views demonstrating the inclined roof for optimal rain runoff, effective ventilation grilles to prevent odors and humidity, the ramp at the threshold for easy entry/exit, and the wind-resistant double sliding door with lockable handles for security.
7. Operatsioon
7.1. Opening and Closing Doors:
The shed features double sliding doors. To open, gently slide the doors along their tracks. To close, slide them back until they meet. Ensure they are fully closed before locking.
7.2. Locking the Shed:
The door handles are designed to accommodate a padlock (not included). Insert a suitable padlock through the designated holes on the handles to secure the shed. Always lock the shed when not in use to protect your stored items.
7.3. Ventilatsioon:
The integrated ventilation grilles allow for continuous air circulation. Do not block these grilles, as proper airflow helps prevent condensation and maintains a suitable environment for your stored items.

7.1. pilt: A person easily accessing the shed with a wheelbarrow, demonstrating the wide opening of the sliding doors and the ample interior storage space.
8. Hooldus
Regular maintenance will help preserve the appearance and functionality of your tectake garden shed.
- Puhastamine: Clean the exterior surfaces periodically with a mild soap solution and water. Avoid abrasive cleaners or harsh chemicals that could damage the lacquered finish. Rinse thoroughly with clean water.
- Ukse siinid: Keep the sliding door tracks free from dirt, debris, and leaves to ensure smooth operation. Lubricate the tracks annually with a silicone-based spray if needed.
- Kinnitusvahendid: Periodically check all screws and bolts for tightness. Re-tighten any loose fasteners to maintain structural integrity.
- Ventilatsioon: Ensure ventilation grilles remain clear of obstructions to allow proper airflow.
- Sihtasutus: Inspect the foundation for any signs of shifting or damage. Ensure the shed remains level.
9. Veaotsing
| Probleem | Võimalik põhjus | Lahendus |
|---|---|---|
| Doors do not slide smoothly | Debris in tracks, misaligned doors, lack of lubrication. | Puhastage rööpad hoolikalt. Kontrollige ukse joondust ja vajadusel reguleerige. Kandke rööbastele silikoonmäärdeainet. |
| Vee leke kuuri sees | Improperly sealed seams, damaged roof/panels, uneven foundation. | Inspect all seams and joints; apply silicone sealant if gaps are found. Check roof panels for damage. Ensure the shed is on a level foundation. |
| Kuur tundub ebastabiilne või kõikuv | Loose fasteners, uneven foundation, inadequate anchoring. | Tighten all screws and bolts. Verify the foundation is level. Ensure the shed is securely anchored to the ground. |
| Condensation inside the shed | Blocked ventilation, high humidity, lack of airflow. | Ensure ventilation grilles are clear. Avoid storing wet items. Consider adding a moisture absorber if humidity is consistently high. |
10. Garantii ja tugi
For warranty information, please refer to the documentation provided with your purchase or contact tectake customer service directly. Keep your proof of purchase for any warranty claims.
If you require assistance with assembly, parts, or have any questions not covered in this manual, please contact tectake customer support. Contact details can typically be found on the product packaging or the official tectake websaidile.


