Sissejuhatus
This manual provides essential instructions for the safe and effective operation, setup, maintenance, and troubleshooting of your ESAB EMP 210 Multi-Process Welder. Please read this manual thoroughly before using the equipment to ensure proper function and safety.

Joonis 1: The ESAB EMP 210 Multi-Process Welder shown with its complete set of accessories, including MIG gun, TIG torch, electrode holder, ground clamp, gas regulator, and welding wire spool. This image illustrates the comprehensive package provided for various welding applications.
Ohutusmeetmed
Always prioritize safety when operating welding equipment. Failure to follow safety guidelines can result in serious injury or death. Refer to relevant safety standards and regulations in your region.
- Kandke sobivaid isikukaitsevahendeid (IKV), sealhulgas keevituskiivrit, kindaid, kaitseriietust ja turvajalatseid.
- Keevitusaurude sissehingamise vältimiseks tagage piisav ventilatsioon.
- Kaitske kõrvalseisjaid kaarleegikiirte ja sädemete eest.
- Ärge kunagi keevitage tuleohtlike materjalide läheduses.
- Ensure proper grounding of the welding machine.
- Enne hooldustööde tegemist või kulumaterjalide vahetamist ühendage seade vooluvõrgust lahti.
Seadistamine
1. Lahtipakkimine ja ülevaatus
Eemaldage keevitusaparaat ja kõik lisatarvikud ettevaatlikult pakendist. Kontrollige, kas on tekkinud transpordikahjustusi. Teatage kõikidest kahjustustest viivitamatult oma tarnijale.
2. Toiteühendus
The ESAB EMP 210 operates on both 120V and 230V AC power. The machine automatically detects the input voltage. Ensure the power source is properly rated for the welder's requirements.
- 120V töö: Use a dedicated 20A circuit.
- 230V töö: Use a dedicated 30A circuit.
3. Gas Connection (MIG/TIG)
For MIG and TIG welding, connect the appropriate shielding gas cylinder (e.g., Argon, C25) to the regulator provided. Attach the gas hose from the regulator to the gas inlet on the rear of the welder.
4. Welding Lead Connections
Ühendage maandus clamp to the appropriate terminal on the welder and secure it to the workpiece. Connect the MIG gun, TIG torch, or electrode holder to their respective terminals as required for the chosen welding process.

Joonis 2: Ülevalt alla view of the ESAB EMP 210 welder, highlighting its compact design and integrated handle for portability. This perspective shows the overall form factor of the unit, which is designed for easy transport and setup.
Kasutusjuhised
The ESAB EMP 210 offers MIG, Stick (MMA), and TIG (Lift TIG) welding capabilities. Select the desired process using the control panel.
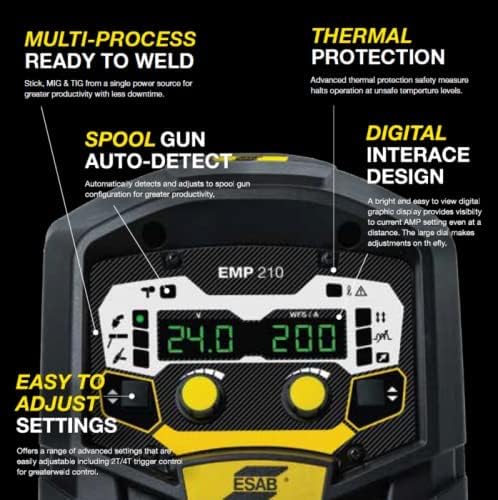
Joonis 3: Üksikasjalik view of the ESAB EMP 210's digital control panel. This image shows the clear display for voltage ja amperage, along with the intuitive adjustment knobs and process selection buttons, emphasizing the "Digital Interface Design" and "Easy to Adjust Settings" features.
1. Juhtpaneel üleview
The digital interface allows for precise control over welding parameters. Use the large dial and buttons to navigate menus and adjust settings such as amperage, kdtage ja traadi etteandekiirus.
2. MIG Welding (GMAW)
- Install the appropriate welding wire spool and feed it through the MIG gun.
- Valige juhtpaneelil MIG-režiim.
- Reguleeri voltage and wire feed speed according to the material thickness and wire type.
- Ensure gas flow is set correctly (typically 15-25 CFH for solid wire).
3. Stick Welding (MMA/SMAW)
- Ühendage elektroodihoidik ja maandusjuheamp.
- Select Stick mode.
- Sisestage sobiv elektrood hoidikusse.
- Kohandage amperage based on electrode type and diameter.
4. TIG Welding (GTAW - Lift TIG)
- Ühendage TIG-põleti ja maandusjuheamp.
- Valige TIG-režiim.
- Ensure pure argon shielding gas is connected and flowing.
- Kohandage amperage for the material and tungsten electrode size.
- Initiate arc using the Lift TIG method.

Joonis 4: An individual performing welding operations with the ESAB EMP 210 Multi-Process Welder. The welder is visible in the background, and the operator is focused on the workpiece, demonstrating the machine in an active work environment.
Hooldus
Regular maintenance ensures the longevity and optimal performance of your ESAB EMP 210 welder.
- Iga päev: Clean the MIG gun nozzle, contact tip, and diffuser. Check ground clamp and cable connections.
- Nädala/kuu: Inspect all cables for damage. Clean the wire feed mechanism. Check gas hose for leaks.
- Perioodiliselt: Use compressed air to blow dust and debris from inside the machine (ensure power is disconnected). Inspect cooling fan for obstructions.
- Replace worn consumables (contact tips, nozzles, electrodes, tungsten) as needed.
Veaotsing
Refer to the following table for common issues and their potential solutions. If a problem persists, contact ESAB customer support.
| Probleem | Võimalik põhjus | Lahendus |
|---|---|---|
| Arc puudub | No power, poor ground connection, incorrect settings, faulty torch/electrode holder. | Check power supply, ensure solid ground, verify settings, inspect connections. |
| Kehv keevituskvaliteet | Incorrect settings, contaminated material, improper technique, worn consumables. | Adjust parameters, clean workpiece, review technique, replace consumables. |
| Traadi etteande probleemid (MIG) | Incorrect tension, clogged liner, wrong contact tip, tangled wire. | Adjust drive roll tension, clean/replace liner, use correct contact tip, untangle wire. |
| Overheating (Thermal Protection) | Exceeding duty cycle, poor ventilation. | Allow machine to cool, ensure adequate airflow around the unit. |
Tehnilised andmed
| Funktsioon | Detail |
|---|---|
| Kaubamärk | ESAB |
| Mudeli number | 0324-0075 (EMP 210) |
| Sisend Voltage | 120V / 230V DC (Auto-sensing) |
| Keevitusprotsessid | MIG (GMAW), Stick (MMA/SMAW), TIG (GTAW - Lift TIG) |
| Max väljundvool | 200A |
| Kauba kaal | 43 naela |
| Toote mõõtmed | 23 x 18.5 x 18 tolli |
| Esmakordselt saadaval olev kuupäev | 28. oktoober 2021 |
Garantii ja tugi
Garantii teave
For detailed warranty terms and conditions, please refer to the official ESAB warranty statement included with your product or visit the official ESAB webGarantii hõlmab tavaliselt materjali- ja tootmisdefekte kindlaksmääratud aja jooksul alates ostukuupäevast.
Klienditugi
If you encounter any issues or have questions regarding your ESAB EMP 210 welder, please contact ESAB customer support. You can find contact information on the official ESAB webveebisaidilt või oma volitatud edasimüüja kaudu.
ESAB Official Websait: www.esab.com


