Sissejuhatus
Thank you for choosing the HOMIDEC 10-Tier Plastic Shoe Rack. This manual provides essential information for the safe assembly, operation, and maintenance of your new shoe storage solution. Please read these instructions carefully before beginning assembly and retain them for future reference.
Ohutusteave
- Ensure all connectors are firmly attached during assembly to prevent instability.
- Do not exceed the maximum load capacity of 5 kg (11 lbs) per cube.
- Use the provided anti-toppling fittings to secure the rack to a wall, especially if children or pets are present, to prevent accidental tipping.
- Lämbumisohu vältimiseks hoidke väikesed osad lastele kättesaamatus kohas.
- Assemble on a soft, clean surface to prevent scratching the panels.
Pakendi sisu
Please verify that all components listed below are present before starting assembly. If any parts are missing or damaged, contact customer support.
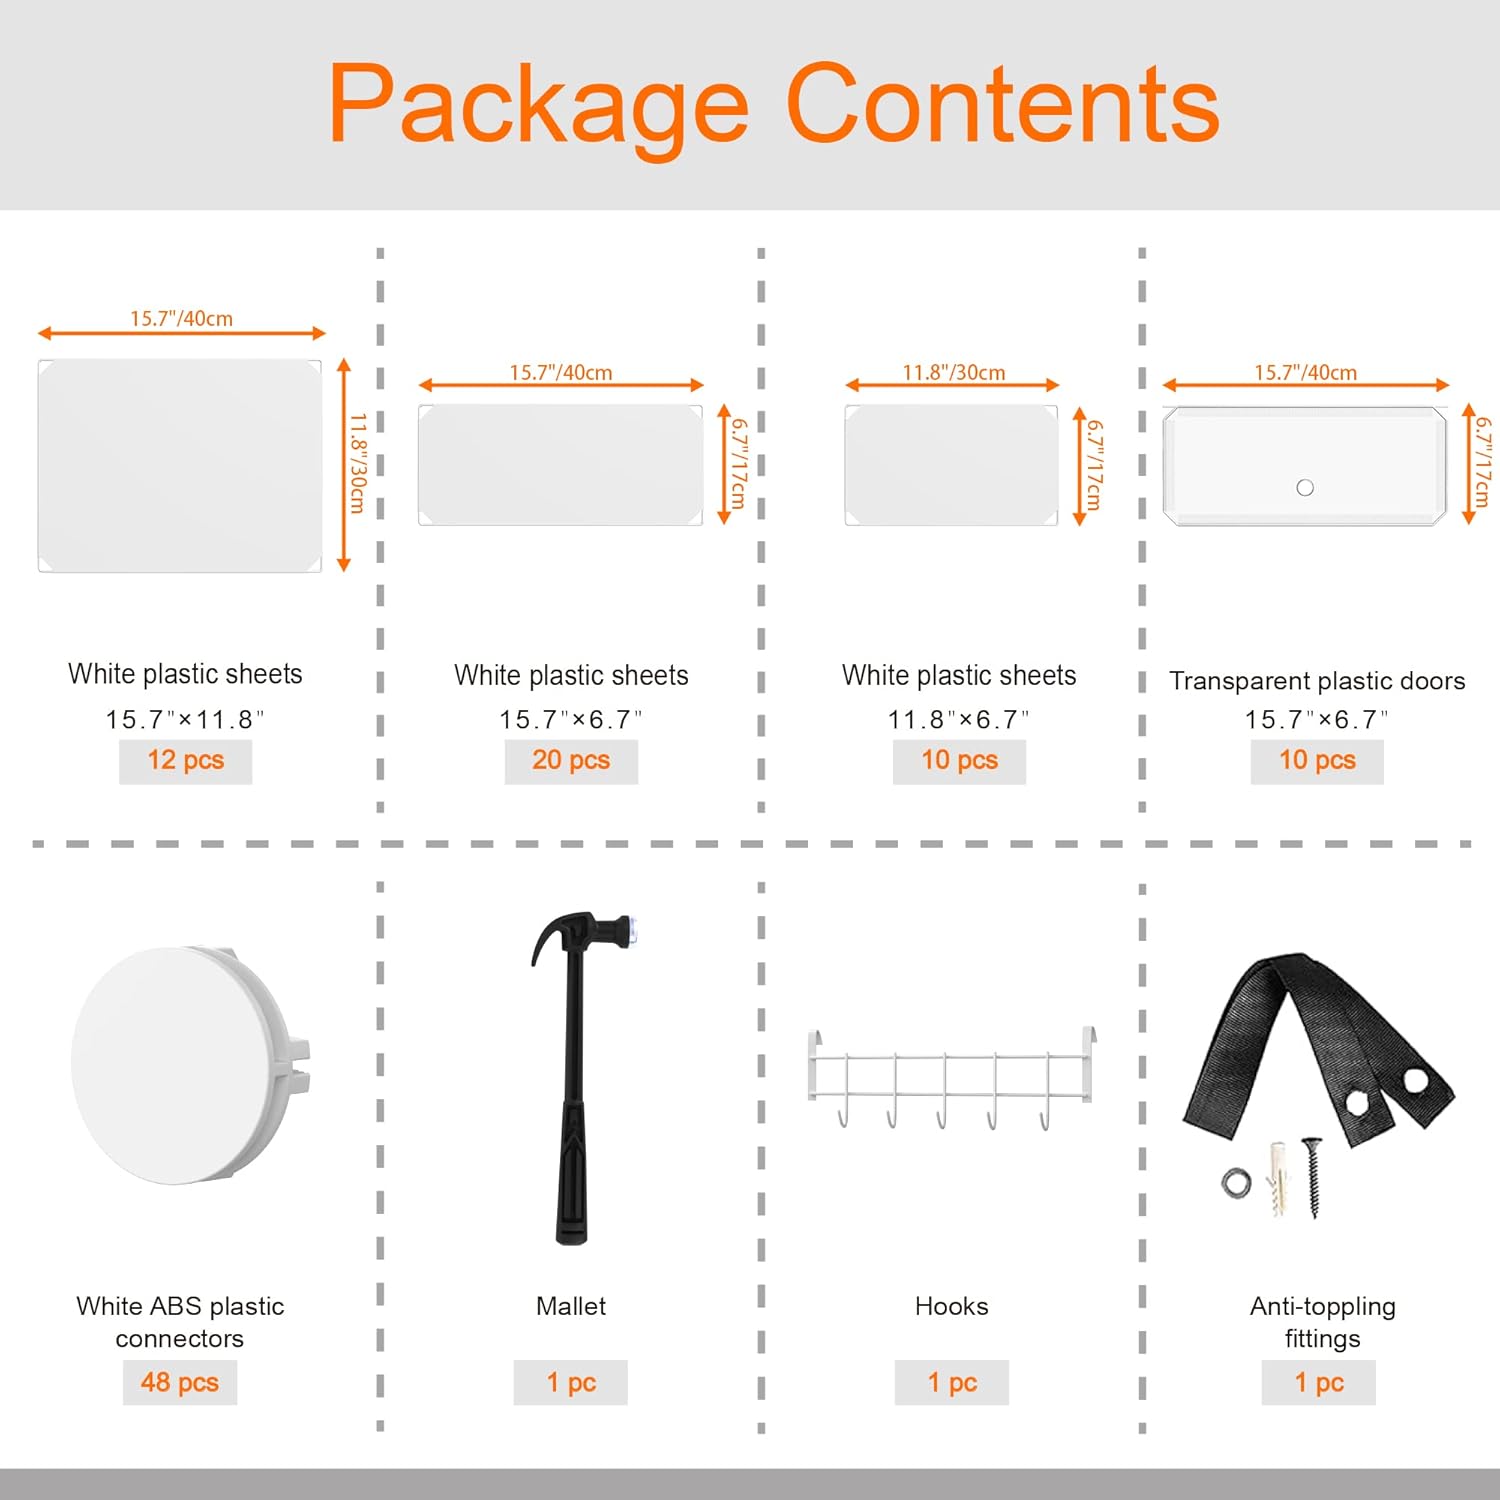
This diagram details all the components provided in the package, including various sizes of plastic sheets, transparent doors, ABS connectors, a mallet, hooks, and anti-toppling fittings, along with their respective quantities.
| Komponent | Mõõtmed | Kogus |
|---|---|---|
| White Plastic Sheets | 15.7" x 11.8" (40 cm x 30 cm) | 12 tk |
| White Plastic Sheets | 15.7" x 6.7" (40 cm x 17 cm) | 20 tk |
| White Plastic Sheets | 11.8" x 6.7" (30 cm x 17 cm) | 10 tk |
| Transparent Plastic Doors | 15.7" x 6.7" (40 cm x 17 cm) | 10 tk |
| White ABS Plastic Connectors | Ei kehti | 48 tk |
| Mallet | Ei kehti | 1 tk |
| Konksud | Ei kehti | 1 tk |
| Anti-toppling Fittings | Ei kehti | 1 tk |
Paigaldus- ja kokkupanekujuhised
The HOMIDEC shoe rack features a modular design for easy assembly. Follow these steps carefully:
- Plan Your Configuration: Decide on the desired height and width of your shoe rack. The modular design allows for various arrangements, such as a single tall unit or multiple shorter units.
- Ühendage paneelid: Insert the edges of the plastic sheets into the slots of the ABS plastic connectors. Ensure the panels are fully seated and secured.
- Use the Mallet: Firmly tap the connectors with the provided mallet to ensure a tight and stable connection between all panels. This step is crucial for the rack's overall stability.
- Ehita kiht kihi haaval: Start from the bottom layer and build upwards, connecting panels and doors as you go. For each cube, ensure all four side panels and the bottom panel are securely connected before adding the top panel.
- Attach Doors (Optional): If using, attach the transparent plastic doors to the front of each cube using the designated slots on the connectors.
- Install Anti-Toppling Fittings: For added safety, especially with taller configurations, attach the anti-toppling fittings to the top of the rack and secure them to a wall using appropriate hardware.

This image displays two fully assembled HOMIDEC shoe racks. The taller unit on the right shows 10 tiers, while the unit on the left is configured as a 6-tier and a 4-tier unit, demonstrating modularity. Both are filled with shoes, showcasing their storage capacity.
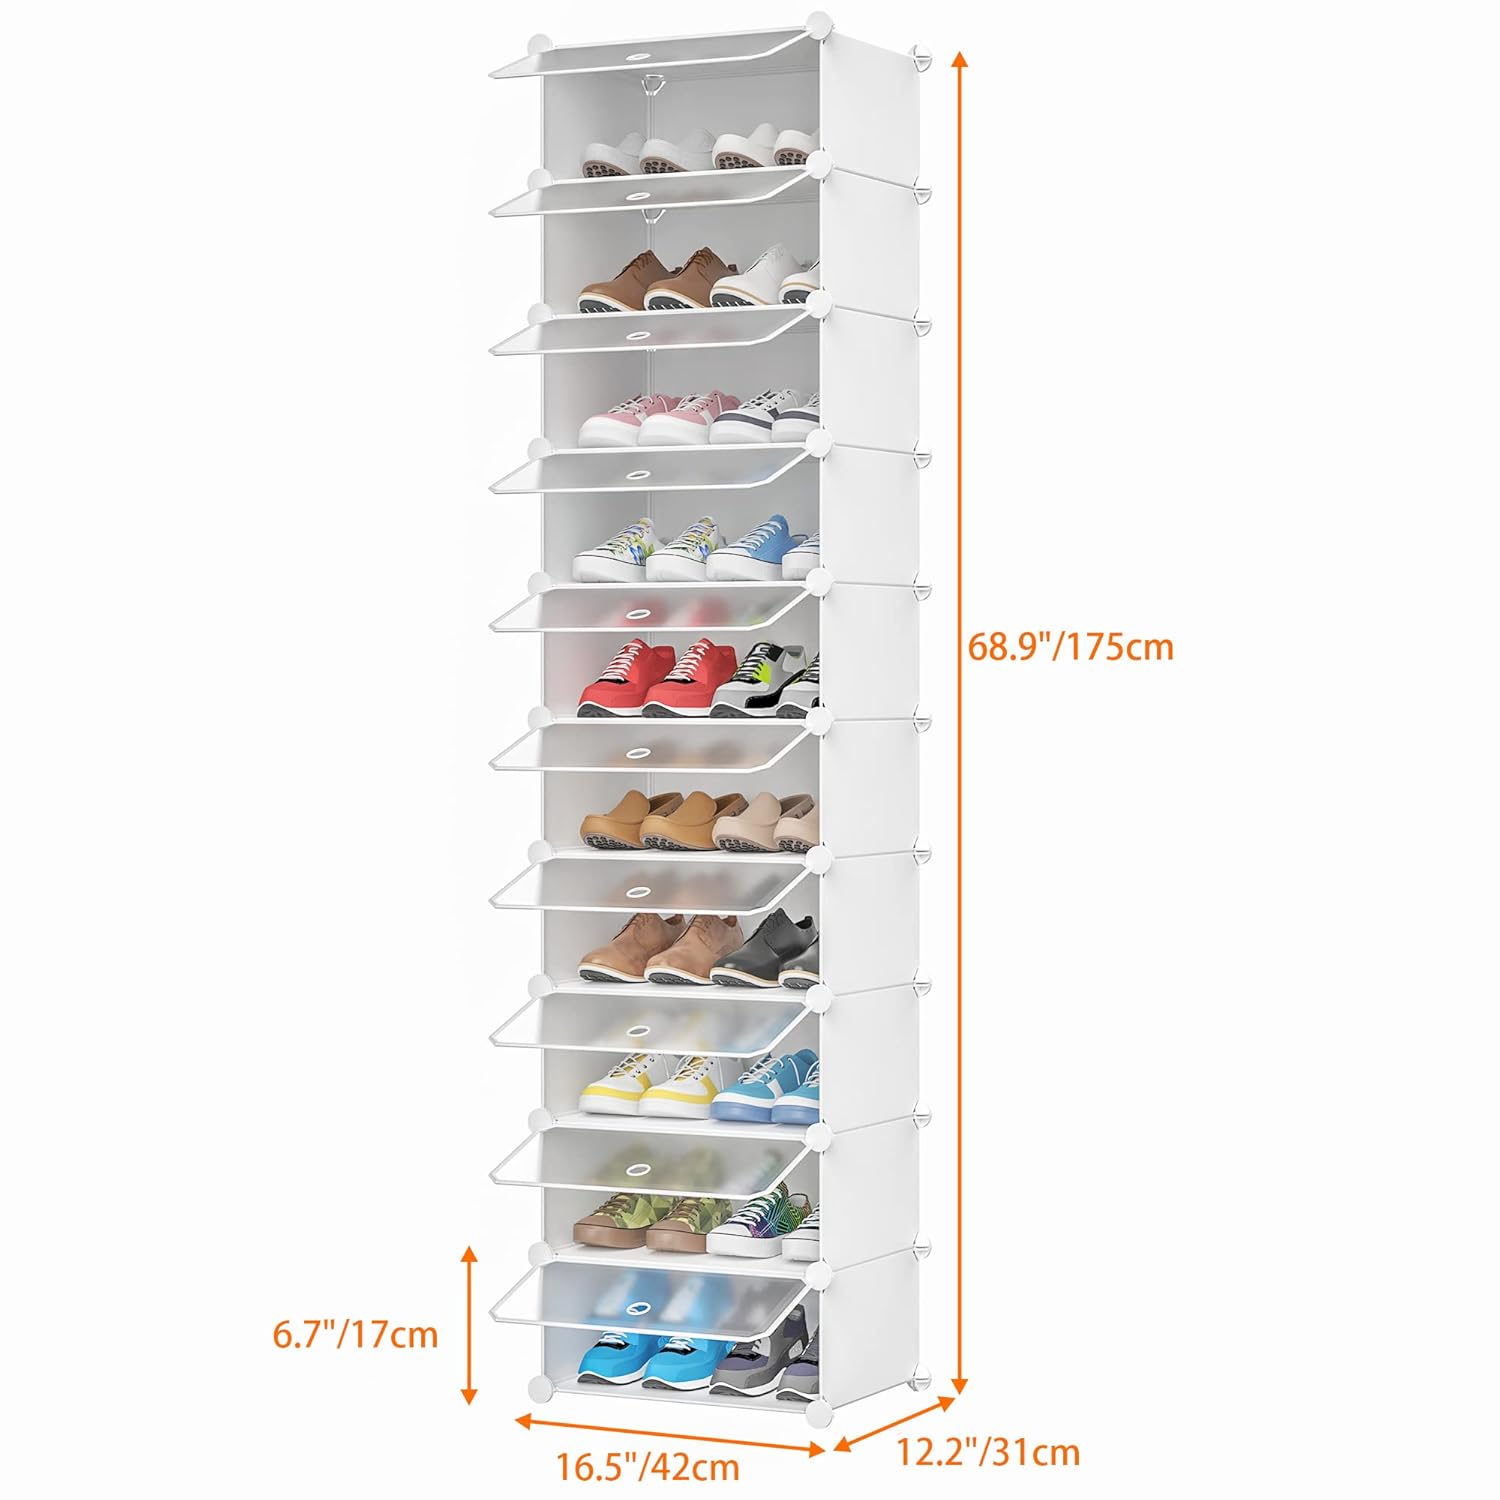
This diagram illustrates the key dimensions of the shoe rack: 16.5 inches (42cm) width, 12.2 inches (31cm) depth, and 68.9 inches (175cm) height. Each cube has a height of 6.7 inches (17cm).

This image shows the HOMIDEC shoe rack configured into two separate, shorter units, each with five tiers. This demonstrates the product's modularity, allowing for different arrangements to fit various spaces.
Kasutusjuhised
The HOMIDEC shoe rack is designed for versatile storage in various home environments.
- Kingade hoiustamine: Each cube is designed to comfortably hold one pair of adult shoes, accommodating up to 20 pairs in a 10-tier configuration. Suitable for trainers, high-heeled shoes, boots, stilettos, ballet shoes, flats, and children's shoes.
- Multifunktsionaalne kasutamine: Beyond shoes, the cubes can be used to store various items such as toys, handbags, clothes, accessories, bedding, and books.
- Paigutus: Ideal for closets, hallways, bedrooms, and entrances to help keep your home tidy.

This image shows the versatility of the HOMIDEC cubes, used here to store various handbags and accessories, demonstrating its utility beyond just shoes.
Hooldus
To ensure the longevity and appearance of your HOMIDEC shoe rack, follow these simple maintenance guidelines:
- Puhastamine: The polypropylene panels are water-resistant and easy to clean. Wipe surfaces with a damp cloth and mild detergent if necessary. Avoid abrasive cleaners.
- Tolmutamine: Regularly dust the panels to prevent accumulation.
- Ülevaatus: Periodically check all connectors to ensure they remain firmly attached. Re-tap with the mallet if any connections feel loose.

Lähivõte view of the shoe rack's polypropylene panel with water droplets on its surface, highlighting its water-resistant and easy-to-clean properties.
Veaotsing
If you encounter any issues with your shoe rack, refer to the following common solutions:
- Rack feels wobbly or unstable: Ensure all plastic sheets are fully inserted into the connectors and that each connector has been firmly tapped with the mallet. Uneven weight distribution can also cause instability; redistribute items evenly.
- Uksed ei sulgu korralikult: Check that the panels forming the cube are correctly aligned and fully seated in their connectors. Sometimes, a slight adjustment or re-tapping with the mallet can resolve this.
- Puuduvad või kahjustatud osad: If you find any parts missing or damaged upon unboxing, please contact HOMIDEC customer support for assistance.
Tehnilised andmed
| Funktsioon | Detail |
|---|---|
| Kaubamärk | HOMIDEK |
| Mudeli nimi | Korraldaja |
| Mudeli number | DE1X10TR |
| Materjal | Polüpropüleen |
| Värv | White and Transparent |
| Toote mõõtmed (P x L x K) | 32D x 42W x 175H Centimeters (12.6D x 16.5W x 68.9H Inches) |
| Riiulite/tasapindade arv | 10 |
| Max. Load Capacity per Cube | 5 kg (11 naela) |
| Kauba kaal | 7.5 kilogrammi (16.5 naela) |
| Ruumi tüüp | Hallway, Closet, Bedroom, Entrance |
| Paigaldustüüp | Floor Mount (with optional wall-anchoring) |
Garantii ja tugi
For warranty information or technical support, please refer to the documentation included with your purchase or contact HOMIDEC customer service directly. Keep your purchase receipt as proof of purchase.


