1. Sissejuhatus
Thank you for choosing the ETA Falco Smart Robot Vacuum Cleaner with Mopping Function. This manual provides essential information for the safe and efficient operation, maintenance, and troubleshooting of your device. Please read this manual thoroughly before using the product and keep it for future reference.
Oluline ohutusteave
- Always ensure the robot is placed on a stable, level surface.
- Hoidke seadet veest ja niiskusest eemal.
- Ärge lubage lastel ega volitamata isikutel robotit kasutada.
- Use only the original charging adapter and accessories provided.
- Before cleaning or maintenance, ensure the robot is powered off and unplugged from the charging station.
- Avoid operating the robot near open flames or flammable materials.
2. Toote lõppview
Komponendid ja juhtseadised
Familiarize yourself with the main parts and controls of your ETA Falco Smart robot vacuum cleaner.
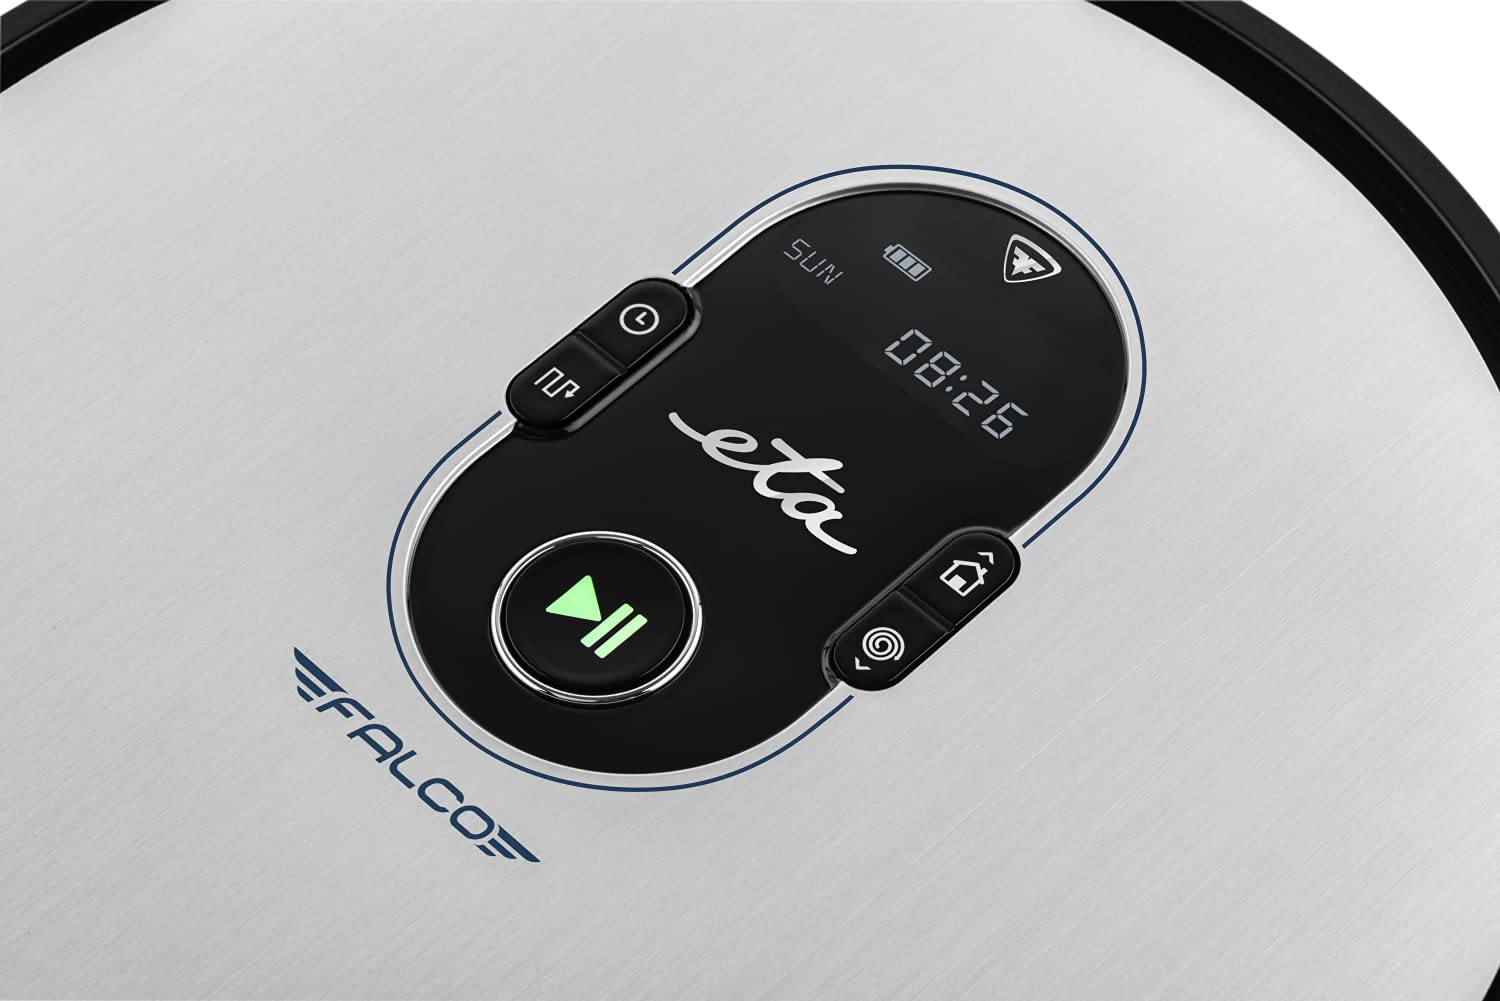
2.1. pilt: Top panel controls. This image shows the main control panel on the top of the robot, including buttons for power, scheduling, and return to charging station, along with a digital display.

2.2. pilt: Alumine view. This image displays the bottom of the robot, highlighting the main brush, two side brushes, and the mop attachment.

2.3. pilt: Underside diagram. This diagram labels the key components on the robot's underside, including the side brushes, main brush, and mop attachment.
3. Pakendi sisu
Lahtipakkimisel veenduge, et kõik järgmised esemed on olemas:
- ETA Falco Smart Robot Vacuum Cleaner
- Laadimisjaam
- Laadimisadapter
- Kaugjuhtimispult
- 2x Spare Side Brushes
- Special Rotary and Lamella Brush
- 2x Cleaning Cloths (Mop Pads)
- Varu HEPA-filter
- Mop Attachment with 300 ml Water Tank
- Virtuaalne sein
4. Seadistamine
4.1 Esmane laadimine
- Asetage laadimisjaam avatud alale seina äärde, veendudes, et külgedel 1 meetri ja ees 2 meetri raadiuses ei oleks takistusi.
- Connect the charging adapter to the charging station and plug it into a power outlet.
- Place the robot vacuum cleaner on the charging station. Ensure the charging contacts align. The robot will begin charging automatically. A full charge takes approximately 5 hours.
4.2 Külgharjade paigaldamine
Attach the side brushes to the designated posts on the underside of the robot by pressing them down until they click into place. Ensure the 'L' and 'R' markings on the brushes match the corresponding markings on the robot.
4.3 Connecting to the ETA SMART App
The ETA SMART app enhances the functionality of your robot. Download the app from your smartphone's app store. Follow the in-app instructions to connect your robot to your home Wi-Fi network and pair it with the app.
4.4 Setting up the Virtual Wall
The virtual wall creates an invisible barrier to restrict the robot's access to certain areas. Place the virtual wall device on the floor where you want to create a boundary. Ensure the infrared beam is directed towards the area you wish to block. The robot will detect this beam and avoid crossing it.

4.1. pilt: Robot with charging station and virtual wall. This image shows the robot positioned near its charging station, with a virtual wall device placed nearby to illustrate its function.
5. Kasutusjuhised
5.1 Puhastusrežiimid
The ETA Falco Smart offers four distinct cleaning modes:
- Nutikas: General cleaning mode for optimal coverage.
- KLASSIKA: Standard cleaning pattern.
- EDGE: Puhastab mööda seinu ja mööbli servi.
- TÄHT: Kontsentreeritud puhastus kindlas piirkonnas.
You can select these modes via the ETA SMART app or the remote control.
5.2 Puhastamise ajastamine
Use the ETA SMART app to set a cleaning schedule for your robot. You can program specific times and days for the robot to automatically start cleaning.
5.3 Käsijuhtimine
You can manually control the robot's movement and functions using the remote control or the ETA SMART app. The app also allows you to monitor cleaning activity, battery charge, and view cleaning routes.

5.1. pilt: ETA Smart App features. This image displays the ETA Smart App interface on a smartphone, highlighting features such as remote control, cleaning history, activity monitoring, battery status, cleaning modes (SMART, CLASSIC, EDGE, SPOT), cleaning schedule, mopping intensity control, and suction power adjustment.
5.4 Puhastusfunktsioon
- Fill the 300 ml water tank with clean water. Do not use detergents or cleaning solutions that are not approved for robot vacuums.
- Attach a clean mop pad to the mop attachment.
- Slide the mop attachment into the designated slot on the underside of the robot.
- Käivitage puhastustsükkel. Robot imeb ja peseb samaaegselt.
6. Hooldus
Regulaarne hooldus tagab optimaalse jõudluse ja pikendab robottolmuimeja eluiga.
6.1 Tolmukonteineri ja filtri puhastamine
- Vajutage prügikasti vabastusnuppu ja eemaldage prügikast.
- Open the dust bin and empty its contents into a trash can.
- Remove the HEPA filter and primary filter. Tap them gently to remove dust. If washable, rinse under running water and allow to air dry completely before reinserting.
- Wipe the inside of the dust bin with a dry cloth.
- Reassemble the filters and dust bin, then reinsert into the robot.
6.2 Põhiharja puhastamine
- Pöörake robot ümber.
- Eemaldage põhiharja kate, vajutades vabastusklambreid.
- Tõstke põhihari välja.
- Use the cleaning tool (if provided) or scissors to remove hair and debris tangled around the brush.
- Clean the brush compartment.
- Pange põhihari tagasi ja kinnitage kaas.
6.3 Külgharjade puhastamine
Periodically check the side brushes for tangled hair or debris. If necessary, remove them by gently pulling upwards and clean them. Replace worn or damaged brushes with the spare ones provided.
6.4 Mopipadja ja veepaagi puhastamine
After each mopping session, remove the mop pad and wash it thoroughly. Empty any remaining water from the water tank and rinse it. Allow both to air dry completely before storing or reusing.
6.5 Andurite puhastamine
Wipe the anti-drop sensors, bumper sensors, and charging contacts on the robot and charging station with a clean, dry cloth to ensure proper function.
7. Veaotsing
Kui teie robottolmuimejaga tekib probleem, vaadake järgmisi levinud probleeme ja lahendusi:
| Probleem | Võimalik põhjus | Lahendus |
|---|---|---|
| Robot ei lülitu sisse | Aku tühjenemas; Toide välja lülitatud | Laadige robotit; veenduge, et toitelüliti on sisse lülitatud |
| Robot ei lae | Laadimiskontaktid määrdunud; laadimisjaam on lahti ühendatud | Clean charging contacts; Ensure charging station is plugged in |
| Kehv puhastusjõudlus | Tolmukonteiner täis; Harjad sassis; Filter ummistunud | Empty dust bin; Clean brushes; Clean/replace filter |
| Robot jääb sageli kinni | Põrandal on takistusi; andurid on määrdunud | Clear floor of cables/small items; Clean sensors |
| Virtual wall not working | Virtual wall batteries low; Incorrect placement | Replace batteries; Adjust virtual wall position |
Kui probleem püsib ka pärast nende lahenduste proovimist, võtke ühendust klienditoega.
8. Tehnilised andmed
Technical specifications for the ETA Falco Smart Robot Vacuum Cleaner (Model ETA251590000):
| Funktsioon | Detail |
|---|---|
| Tootja | ETA |
| Toote mõõtmed (P x L x K) | 32.5 x 33.5 x 7.5 cm |
| Kaal | 250 grammi |
| Kauba mudeli number | ETA251590000 (T2261) |
| Mudeli värv | Sinine |
| Materjal | Plastikust |
| Võimsuse tüüp | Akutoitel |
| Voltage | 3 Volts (14.4V Li-ion battery, 2400 mAh) |
| Pakis olevate esemete arv | 1 |
| Eriomadused | Pet brush compatibility, Smart App control, Floating brush system, HEPA filter, Virtual wall |
| Kaasatud komponendid | Battery, Filter, Charging station, Adapter, Remote control, Side brushes, Rotary brush, Cleaning cloths, Mop attachment, Virtual wall |
| Aku koostis | Liitium-ioon |
| Aku tööiga | Kuni 120 minutit |
| Laadimisaeg | u. 5 tundi |
| Pinna soovitus | Laminaat |
| Kontrolleri tüüp | Rakenduse juhtimine |
| Varuosade saadavus | Varuosade kohta pole teavet saadaval |
9. Garantii ja tugi
For warranty information, product support, or to inquire about spare parts, please refer to the warranty card included with your purchase or visit the official ETA webveebisait. Hoidke ostutõendit garantiinõuete esitamiseks.


