1. Sissejuhatus
This manual provides detailed instructions for the installation, operation, and maintenance of the SINOTIMER TM919A-2 LCD Digital Programmable Timer Switch. This device is designed for automatic control of electrical appliances based on programmed time schedules, offering daily and weekly programming options.
2. Toote omadused
- Weekly 7-day programmable digital time switch.
- Mitu voltage options (5V, 12V, 24V, 110V, 220V, 85-265V). This specific model is 220V.
- Detachable battery design for backup power.
- 35mm DIN rail mounting for easy installation.
- LCD display for clear time and program viewing.
- 16 ON/OFF programs per day or week.
- Manual override function.
- High capacity 16A switching contact.
3. Ohutusalane teave
WARNING: Risk of electric shock. Installation should only be performed by a qualified electrician or competent person.
- Enne paigaldamist või hooldust veenduge, et toide oleks lahti ühendatud.
- Do not exceed the maximum load capacity of 16A.
- Kontrollige õiget voltage supply for the specific model (220V for TM919A-2).
- Hoidke seadet niiskuse ja äärmuslike temperatuuride eest kaitstult.
4. Toote lõppview ja komponendid
The SINOTIMER TM919A-2 features an LCD display, control buttons, and wiring terminals for power input and load control.

Joonis 4.1: Esiosa view of the SINOTIMER TM919A-2 Digital Timer Switch, showing the LCD display, control buttons (P, D+, H+, M+, RESET, MANUAL), and wiring terminals.

Joonis 4.2: The timer switch with its transparent protective cover opened, revealing the control buttons for programming and manual operation.
Juhtnupud:
- P (programm): Siseneb programmi seadistamise režiimi.
- P+ (päev): Adjusts day of the week or program day.
- H+ (tund): Adjusts hour or program hour.
- M+ (minut): Adjusts minute or program minute.
- Lähtesta: Taastab kõik seaded tehase vaikeseadetele.
- MANUAAL: Toggles output ON/AUTO/OFF.
5. Seadistamine ja installimine
5.1 Ühendusskeem
Refer to the wiring diagram on the side of the device and the illustration below for correct connection. Ensure all connections are secure.

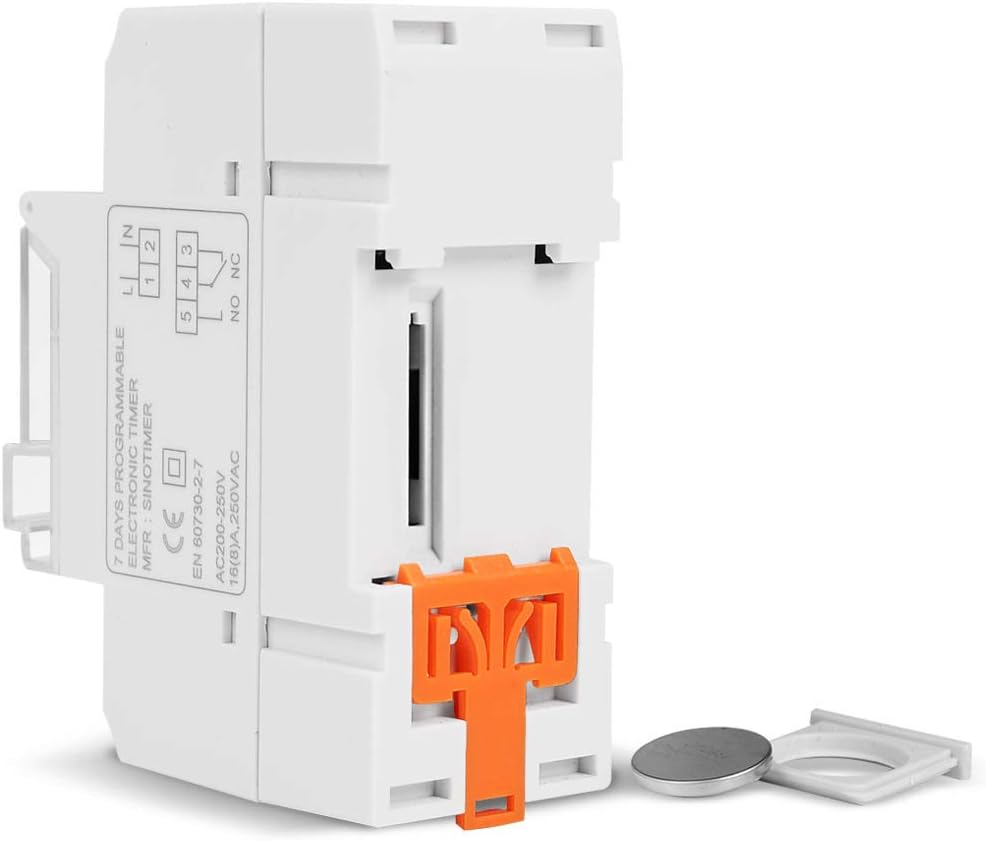
Joonis 5.1: Külg view of the timer switch displaying the wiring diagram. Terminals 1 and 2 are for power input (L and N). Terminals 3, 4, and 5 are for the relay output (Common, Normally Open, Normally Closed).
- Terminalid 1 ja 2 (L, N): Connect to the main power supply (220V AC for this model).
- Terminal 3 (NO - Normally Open): Connects to the load when the timer is ON.
- Terminal 4 (COM - Common): Connects to one side of the load and the power supply.
- Terminal 5 (NC - Normally Closed): Connects to the load when the timer is OFF (less common for typical applications).
5.2 Initial Power-up and Reset
Upon first power-up or after a long period without power, the LCD display may be blank. The internal battery provides backup for settings. If the display is unresponsive or shows garbled characters, press the RESET button using a pointed object (e.g., a pen tip). This will clear all settings and restore the timer to its default state.
5.3 Praeguse kellaaja ja päeva määramine
- Vajutage nuppu P nuppu üks kord. Ekraanile kuvatakse praegune ajaseadistus.
- Vajutage D+ praeguse nädalapäeva määramiseks.
- Vajutage H+ praeguse tunni määramiseks.
- Vajutage M+ praeguse minuti määramiseks.
- Vajutage nuppu P button again to exit time setting mode and return to normal operation.
6. Kasutusjuhised
6.1 Sisse-/väljalülitustsüklite programmeerimine
Taimer toetab kuni 16 sisse-/väljalülitusprogrammi. Iga programm koosneb sisselülitusajast ja väljalülitusajast.
- Vajutage nuppu P button repeatedly until "1 ON" appears on the display. This is the first ON program.
- Vajutage D+ selle programmi päeva(de) valimiseks. Valikud hõlmavad üksikuid päevi, nädalapäevi, nädalavahetusi või kõiki 7 päeva.
- Vajutage H+ to set the desired hour for the "ON" event.
- Vajutage M+ to set the desired minute for the "ON" event.
- Vajutage P again. "1 OFF" will appear. This is the first OFF program.
- Repeat steps 2-4 to set the day(s), hour, and minute for the "OFF" event.
- Jätkake vajutamist P to cycle through "2 ON", "2 OFF", up to "16 ON", "16 OFF". If you do not need all 16 programs, simply press P until the display returns to the current time.
- To save and exit programming mode, press the P nuppu, kuni kuvatakse praegune kellaaeg.
6.2 Käsitsi tühistamine
The MANUAAL button allows you to override the programmed settings temporarily or permanently.
- Vajutage MANUAAL once: Toggles between ON/AUTO/OFF modes.
- PEAL: The output is continuously ON, ignoring programs.
- VÄLJAS: The output is continuously OFF, ignoring programs.
- AUTOMAATNE: The timer operates according to the programmed ON/OFF cycles. This is the standard operating mode.
7. Hooldus
7.1 Aku vahetamine
The timer includes a detachable CR2032 lithium battery to maintain time and program settings during power outages. If the display becomes dim or resets frequently, the battery may need replacement.

Joonis 7.1: The timer switch shown with its battery compartment open and a CR2032 lithium battery, indicating the detachable battery design.
- Disconnect power to the timer before attempting battery replacement.
- Locate the battery compartment, typically on the side or back of the unit.
- Eemaldage ettevaatlikult vana CR2032 patarei.
- Sisestage uus CR2032 patarei, jälgides õiget polaarsust (+ poolus ülespoole).
- Sulgege patareipesa.
- Reconnect power and reset the current time and day if necessary.
8. Veaotsing
- Ekraan on tühi:
- Check power supply connections (Terminals 1 & 2).
- Ensure the internal battery is charged or replaced if old.
- Vajutage nuppu RESET nuppu.
- Programmid ei tööta:
- Veenduge, et taimer on sisse lülitatud AUTO mode (check the display for "AUTO"). Press MANUAAL režiimide ümberlülitamiseks.
- Veenduge, et praegune kellaaeg ja päev on õigesti seadistatud.
- Check that the ON/OFF programs are correctly entered and enabled for the desired days.
- Confirm wiring to the load (Terminals 3, 4, 5) is correct.
- Taimer lähtestub ootamatult:
- The internal battery may be low or depleted. Replace the CR2032 battery.
- Ensure stable power supply to the unit.
9. Tehnilised andmed
| Funktsioon | Spetsifikatsioon |
|---|---|
| Mudel | TM919A-2 |
| Toiteallikas | 220V AC (as per model) |
| Energiatarve | 4.5 VA (MAX) |
| Temperatuurivahemik | -20°C kuni +50°C |
| Ekraan | LCD |
| Switching Contact | 1 ümberlülituslüliti |
| Programmid | 16 ON/OFF per day or week |
| Hüsterees | 2 sec/day (at 25°C) |
| Mahutavus | 16A |
| Taimeri vahemik | 1 minut kuni 168 tundi |
| Minimaalne intervall | 1 minut |
| Black-out Memory | 60 days (with internal battery) |
| Kauba kaal | 0.15 kg (5.3 untsi) |
| Paigaldamine | 35 mm DIN-rööp |
| Ekraani suurus | 1.2 tolli |
Joonis 9.1: Dimensional drawing of the SINOTIMER TM919A-2, showing measurements in centimeters for height, width, and depth.
10. Garantii ja tugi
Specific warranty information for the SINOTIMER TM919A-2 is not provided in the product details. For warranty claims or technical support, please contact your retailer or the manufacturer directly. Keep your purchase receipt as proof of purchase.


