1. Sissejuhatus
Thank you for choosing the OSD Black 300W Subwoofer Amplifier, Model BK-SAM300. This amplifier is designed to provide powerful and precise low-frequency amplification for passive subwoofers, enhancing your home theater or audio system experience. With its robust Class AB output stage and versatile connectivity options, the BK-SAM300 delivers deep, impactful bass for movies, music, and games.
This manual provides detailed instructions for the proper installation, operation, and maintenance of your subwoofer ampelutõrjuja. Palun lugege see enne kasutamist hoolikalt läbi ja hoidke alles edaspidiseks kasutamiseks.
2. Ohutusalane teave
HOIATUS: Tulekahju või elektrilöögi ohu vähendamiseks ärge jätke seda seadet vihma või niiskuse kätte.
- Enne seadme kasutamist lugege läbi kõik juhised ampelujõulisem.
- Hoidke see juhend edaspidiseks kasutamiseks alles.
- Heed all warnings on the amplifier and in this manual.
- Järgige kõiki juhiseid.
- Ärge kasutage seda seadet vee lähedal.
- Puhastage ainult kuiva lapiga.
- Ärge blokeerige ühtegi ventilatsiooniava. Paigaldage vastavalt tootja juhistele.
- Ärge paigaldage soojusallikate, näiteks radiaatorite, küttekehade, ahjude või muude seadmete (sh amptõsteseadmed), mis toodavad soojust.
- Ärge kahjustage polariseeritud või maandatud pistiku ohutust. Polariseeritud pistikul on kaks laba, millest üks on laiem kui teine. Maandustüüpi pistikul on kaks laba ja kolmas maandushark. Lai tera või kolmas haru on teie ohutuse tagamiseks. Kui kaasas olev pistik teie pistikupessa ei sobi, pöörduge vananenud pistikupesa väljavahetamiseks elektriku poole.
- Kaitske toitejuhet selle peale kõndimise või muljumise eest, eriti pistikute, pistikupesade ja nende seadmest väljumise kohta.
- Kasutage ainult tootja poolt määratud lisaseadmeid/tarvikuid.
- Ühendage seade vooluvõrgust lahti äikesetormide ajal või siis, kui seda pikka aega ei kasutata.
- Andke kõik hooldustööd kvalifitseeritud teeninduspersonalile. Hooldus on vajalik, kui seade on mingil viisil kahjustatud, nt toitejuhe või pistik on kahjustatud, vedelikku või seadmesse on kukkunud esemeid, seade on sattunud vihma või niiskuse kätte, ei tööta normaalselt või on maha kukkunud.
3. Pakendi sisu
Palun märkige järgmiste üksuste ruut:
- OSD must 300W subwoofer Amplifier (BK-SAM300)
- Toitejuhe
- Kasutusjuhend (see dokument)
4. Toote lõppview
4.1 Esipaneeli juhtnupud
The front panel of the BK-SAM300 features essential controls for power and audio adjustments.

Joonis 4.1: Esi- ja tagakülg View of the BK-SAM300 Amplifier. This image displays both the front panel with its controls and the rear panel with all input/output connections.
- Toitenupp: Lülitab ampelupäästja toide sisse või välja.
- Phase Control (0° - 180°): Adjusts the phase of the subwoofer output relative to the main speakers. This helps to ensure that the subwoofer's sound waves align correctly with those of the main speakers, preventing cancellation or reinforcement issues at the crossover frequency.
- FREQ (Crossover Frequency) Control: Sets the upper frequency limit for the subwoofer. Frequencies above this setting will be filtered out. Adjustable from approximately 40Hz to 120Hz.
- GAIN (Volume) Control: Adjusts the overall output level of the subwoofer amplifier. Use this to balance the subwoofer's volume with the rest of your audio system.
4.2 Tagapaneeli ühendused ja juhtnupud
The rear panel houses all the input and output connections, along with additional settings for advanced configuration.
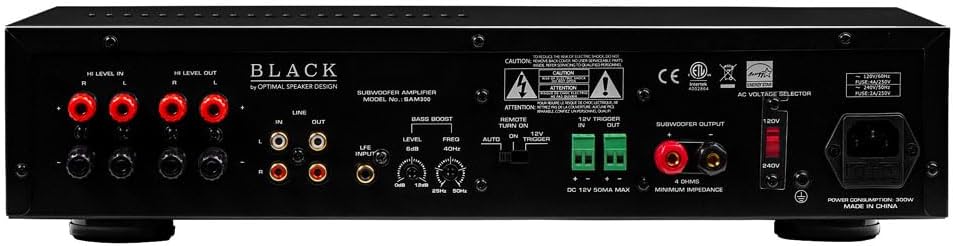
Figure 4.2: Rear Panel of the BK-SAM300 Amplifier. This image provides a detailed view of all input and output terminals, including Hi Level, Line, LFE, Bass Boost, 12V Trigger, and Subwoofer Output.
- HI LEVEL IN (Speaker Level Input): Connects directly to the speaker outputs of your receiver or amplifier. Use this if your receiver does not have a dedicated subwoofer output or LFE output.
- HI LEVEL OUT (Speaker Level Output): Passes the full-range audio signal from the HI LEVEL IN to your main speakers.
- LINE IN (RCA Input): Standard RCA stereo inputs for connecting to the pre-out or line-out of your receiver or audio source.
- LINE OUT (RCA Output): Passes the audio signal from the LINE IN to another amptõsteseade või heliseade.
- LFE INPUT (RCA Input): Dedicated input for connecting to the LFE (Low-Frequency Effects) output of an AV receiver. This bypasses the amplifier's internal crossover, relying on the receiver's bass management.
- BASS BOOST (Level & Freq):
- Level (0dB to 12dB): Adjusts the intensity of the bass boost.
- Freq (25Hz to 50Hz): Selects the center frequency at which the bass boost is applied.

Figure 4.3: Detail of Bass Boost Controls. This image highlights the Level and Freq knobs for fine-tuning the bass boost.
- REMOTE TURN ON (Manual, Auto, 12V Trigger): Valib amplifier's power-on mode.
- Käsiraamat: Amplifier is turned on/off manually via the front panel power button.
- Automaatne: Amplifier automatically turns on when an audio signal is detected and enters standby mode when no signal is present for a period.
- 12 V päästiku sisend/väljund: Võimaldab amplifier to be turned on/off by a 12V DC trigger signal from a compatible receiver or control system.
- SUBWOOFER OUTPUT (Binding Posts): Connects to your passive subwoofer using speaker wire. Ensure correct polarity (+ to + and - to -). The amptõsteseade on stabiilne kuni 4 oomi impedantsini.

Figure 4.4: Detail of Subwoofer Output and 12V Trigger. This image shows the binding posts for subwoofer connection and the 12V trigger terminals.
- AC VOLTAGE SELECTOR (120V/240V): Valib sobiva sisendi voltage teie piirkonna jaoks. Ensure this is set correctly before plugging in the ampelujõulisem.
- Vahelduvvoolu sisend: Ühendab kaasasoleva toitejuhtme.
5. Seadistamine
5.1 Paigutus
Asetage amplifier in a location that allows for adequate ventilation. Avoid enclosed spaces or stacking other components directly on top of the amplifier. Keep it away from direct sunlight, heat sources, and moisture. Ensure it is placed on a stable, level surface.
5.2 Ühendamine Ampelujõulisem
Choose one of the following connection methods based on your audio system's capabilities:
Method A: Using LFE Input (Recommended for AV Receivers with Subwoofer Output)
- Connect an RCA cable from the LFE or Subwoofer Pre-Out jack on your AV receiver to the LFE SISEND jack on the BK-SAM300.
- Ühendage passiivne subwoofer seadmega SUBWOOFERI VÄLJUND binding posts on the BK-SAM300 using appropriate gauge speaker wire. Ensure correct polarity (+ to + and - to -).
- Proceed to Section 5.3 for power connection.
Method B: Using Line Level Inputs (for Stereo Receivers or Pre-Outs)
- Connect RCA cables from the Pre-Out or Line-Out jacks of your receiver/pre-ampelujõulisemaks JOON SISSE (Left and Right) jacks on the BK-SAM300.
- Ühendage passiivne subwoofer seadmega SUBWOOFERI VÄLJUND binding posts on the BK-SAM300 using appropriate gauge speaker wire. Ensure correct polarity (+ to + and - to -).
- Proceed to Section 5.3 for power connection.
Method C: Using High Level Inputs (for Receivers without Dedicated Subwoofer/Pre-Outs)
- Connect speaker wires from the main speaker outputs of your receiver/ampelujõulisemaks TER LEVEL IN (Left and Right) binding posts on the BK-SAM300. Ensure correct polarity.
- (Optional) If you wish to pass the signal through to your main speakers, connect speaker wires from the TERE LEVEL OUT binding posts on the BK-SAM300 to your main speakers.
- Ühendage passiivne subwoofer seadmega SUBWOOFERI VÄLJUND binding posts on the BK-SAM300 using appropriate gauge speaker wire. Ensure correct polarity (+ to + and - to -).
- Proceed to Section 5.3 for power connection.
5.3 Toiteühendus
- Before connecting the power cord, ensure the AC VOLTAGE VALIK tagapaneelil olev lüliti on õigele helitugevusele seatudtage for your region (120V or 240V). Incorrect setting can damage the unit.
- Ühendage kaasasolev toitejuhe Vahelduvvoolu pistikupesa on the rear panel of the ampelujõulisem.
- Ühendage toitejuhtme teine ots sobivasse seinakontakti.
6. Kasutusjuhised
6.1 Sisse-/väljalülitamine
The BK-SAM300 offers three power-on modes:
- Käsitsi režiim: Määrake KAUGJUHT SISSE switch to "Manual". Press the front panel Toitenupp keerata ampeluiga sisse või välja.
- Automaatrežiim: Määrake KAUGJUHT SISSE switch to "Auto". The amplifier will automatically turn on when an audio signal is detected at the inputs and will enter standby mode after approximately 15-20 minutes of no audio signal.
- 12V Trigger Mode: Connect a 12V DC trigger cable from your source component (e.g., AV receiver) to the 12V TRIGGER IN terminal. Set the KAUGJUHT SISSE switch to "12V Trigger". The amplifier will power on/off with the source component.
6.2 Juhtseadmete reguleerimine
Optimal sound quality depends on proper adjustment of the amplifier's controls to match your subwoofer and listening environment.
- GAIN (Volume): Start with the GAIN control at its minimum setting. Play some audio with significant bass content. Slowly increase the GAIN until the subwoofer's output blends seamlessly with your main speakers. Avoid setting the gain too high, as this can lead to distortion.
- FREQ (Crossover Frequency):
- Kui kasutate LFE SISEND, this control is bypassed. Set your AV receiver's subwoofer crossover frequency.
- Kui kasutate JOON SISSE or TER LEVEL IN, adjust the FREQ control to blend the subwoofer's output with your main speakers. A good starting point is typically 80Hz-100Hz, but this may vary depending on the size and frequency response of your main speakers. Smaller main speakers usually require a higher crossover frequency.
- PHASE (0° - 180°): The phase control helps to ensure that the subwoofer's sound waves are in sync with your main speakers.
- Play music with a consistent bass line.
- While listening from your primary listening position, slowly adjust the PHASE control from 0° to 180°.
- Stop at the position where the bass sounds the loudest and most impactful. If the bass sounds weak or hollow, try adjusting the phase.
- BASSIVÕIM: Use the BASS BOOST controls (Level and Freq) to fine-tune the low-frequency response.
- Sagedus: Select the specific low frequency (25Hz to 50Hz) you wish to boost.
- Tase: Adjust the amount of boost (0dB to 12dB) at the selected frequency. Use sparingly to avoid muddy or boomy bass.
7. Hooldus
- Puhastamine: Ühendage lahti amplifier from power before cleaning. Use a soft, dry cloth to wipe down the exterior. Do not use liquid cleaners or aerosol sprays.
- Ventilatsioon: Ensure that the ventilation openings are not blocked by dust or debris. Periodically check and clean if necessary to maintain proper airflow.
- Hoiustamine: Kui säilitate amppikemat aega kasutamata, eemaldage see vooluvõrgust ja hoidke jahedas, kuivas kohas, eemal otsesest päikesevalgusest ja äärmuslikest temperatuuridest.
8. Veaotsing
| Probleem | Võimalik põhjus | Lahendus |
|---|---|---|
| Toide puudub / Amptõsteseade ei lülitu sisse. |
|
|
| Subwooferist pole heli. |
|
|
| Distorted or muddy bass. |
|
|
| Sumin või sumin. |
|
|
9. Tehnilised andmed
| Funktsioon | Detail |
|---|---|
| Mudel | BK-SAM300 |
| Väljundvõimsus | 300 vatti (RMS) |
| Impedance Stability | 4-ohm Stable |
| Ampeluklass | Klass AB |
| Sagedusvastus | 20 Hz - 160 XNUMX Hz |
| Crossoveri sagedus | Adjustable 40Hz - 120Hz |
| Faasi juhtimine | 0° - 180° Variable |
| Bassivõim | 25Hz - 50Hz, up to 12dB |
| Sisendid | Low-level (RCA), High-level (Speaker), LFE (RCA), 12V Trigger |
| Väljundid | Subwoofer Output (Binding Posts), High-level Pass-through, 12V Trigger |
| Toiterežiimid | Manual, Auto-Sensing, 12V Trigger |
| Ooterežiimi energiatarve | Vähem kui 1 vatti |
| Mõõdud (L x K x S) | 17.25 x 3.75 x 13.88 tolli (43.8 x 9.5 x 35.2 cm) |
| Kaal | 20 naela (9.07 kg) |
| Šassii materjal | Heavy-duty steel with brushed aluminum faceplate |
| Voltage | Switchable 120V/240V |
10. Garantii ja tugi
OSD Audio products are designed and manufactured to the highest quality standards. For specific warranty information regarding your BK-SAM300 Subwoofer Amplifier, please refer to the warranty card included with your product or visit the official OSD Audio webGarantiitingimused hõlmavad tavaliselt materjali- ja tootmisdefekte normaalse kasutamise korral.
For technical support, troubleshooting assistance, or service inquiries, please contact OSD Audio customer support through their official website or the contact information provided with your purchase. Please have your model number (BK-SAM300) and purchase date ready when contacting support.
Interneti-ressursid: For the latest information, FAQs, and additional support, please visit the OSD heli websaidile.


