1. Sissejuhatus
This manual provides detailed instructions for the installation, operation, and maintenance of your Suuwer S701 Non-Programmable Thermostat. This thermostat is designed for use with 1 Heat/1 Cool conventional single-stage heating and cooling systems. Please read this manual thoroughly before installation and operation to ensure proper function and safety.

Pilt 1.1: esikülg view of the Suuwer S701 Non-Programmable Thermostat, displaying room temperature and set temperature on a blue backlit screen.
2. Ohutusalane teave
- Enne termostaadi paigaldamist või hooldamist lülitage kütte-/jahutussüsteemi toide alati peakaitsme või kaitselüliti paneelist välja.
- This thermostat operates on 24VAC power or 2 AAA batteries. Do not connect to line voltage (120-240V) systems.
- If you are inexperienced with electrical wiring, it is recommended to seek professional assistance for installation.
- Ensure all wiring connections are secure to prevent short circuits or damage to the system.
3. Pakendi sisu
Veenduge, et pakis on kõik esemed olemas:
- Suuwer S701 Thermostat Unit
- Paigaldusjuhend
- Kaablite sildid
- Kinnituskruvid (2)
- Seina ankrud (2)

Image 3.1: Illustration of the Suuwer S701 thermostat and its included accessories.
4. Süsteemi ühilduvus
Suuwer S701 termostaat on loodud spetsiifiliste HVAC-süsteemide jaoks. Palun vaadakeview enne paigaldamist hoolikalt ühilduvusteavet.
4.1 Ühilduvad süsteemid
- Tavaline Single-Stage Heating & Cooling (with C-wire or without C-wire)
- Gaasikamin (24 volti)
- Gas / Oil / Electric Furnace (Heating only)
- Ainult boileriga kiirgusküte
- Ainult ahju sundõhuga küte
- Cooling Only (with C-wire or without C-wire)
Märkus. Verify your existing thermostat base is wired with 2 to 5 wires. Systems with 6 to 8 wires are generally not supported by this model.
4.2 Ühildumatud süsteemid
- Multidtage Heating & Cooling (e.g., 1H/2C, 2H/2C)
- HVAC Heat Pump Systems (e.g., 2H/1C, 4H/2C)
- PTACs (Packaged Terminal Air Conditioners)
- 3-wire Hydronic (Hot Water) Systems
- Dual Fuel/Hybrid Heating Systems
- Line Voltage Systems (120-240V electric baseboards heat)
- Mini Split Heat Pump Air Conditioners
- RV Air Conditioners (Mach and Roughneck series)
- Konvektorid
- Kiirguslae küte
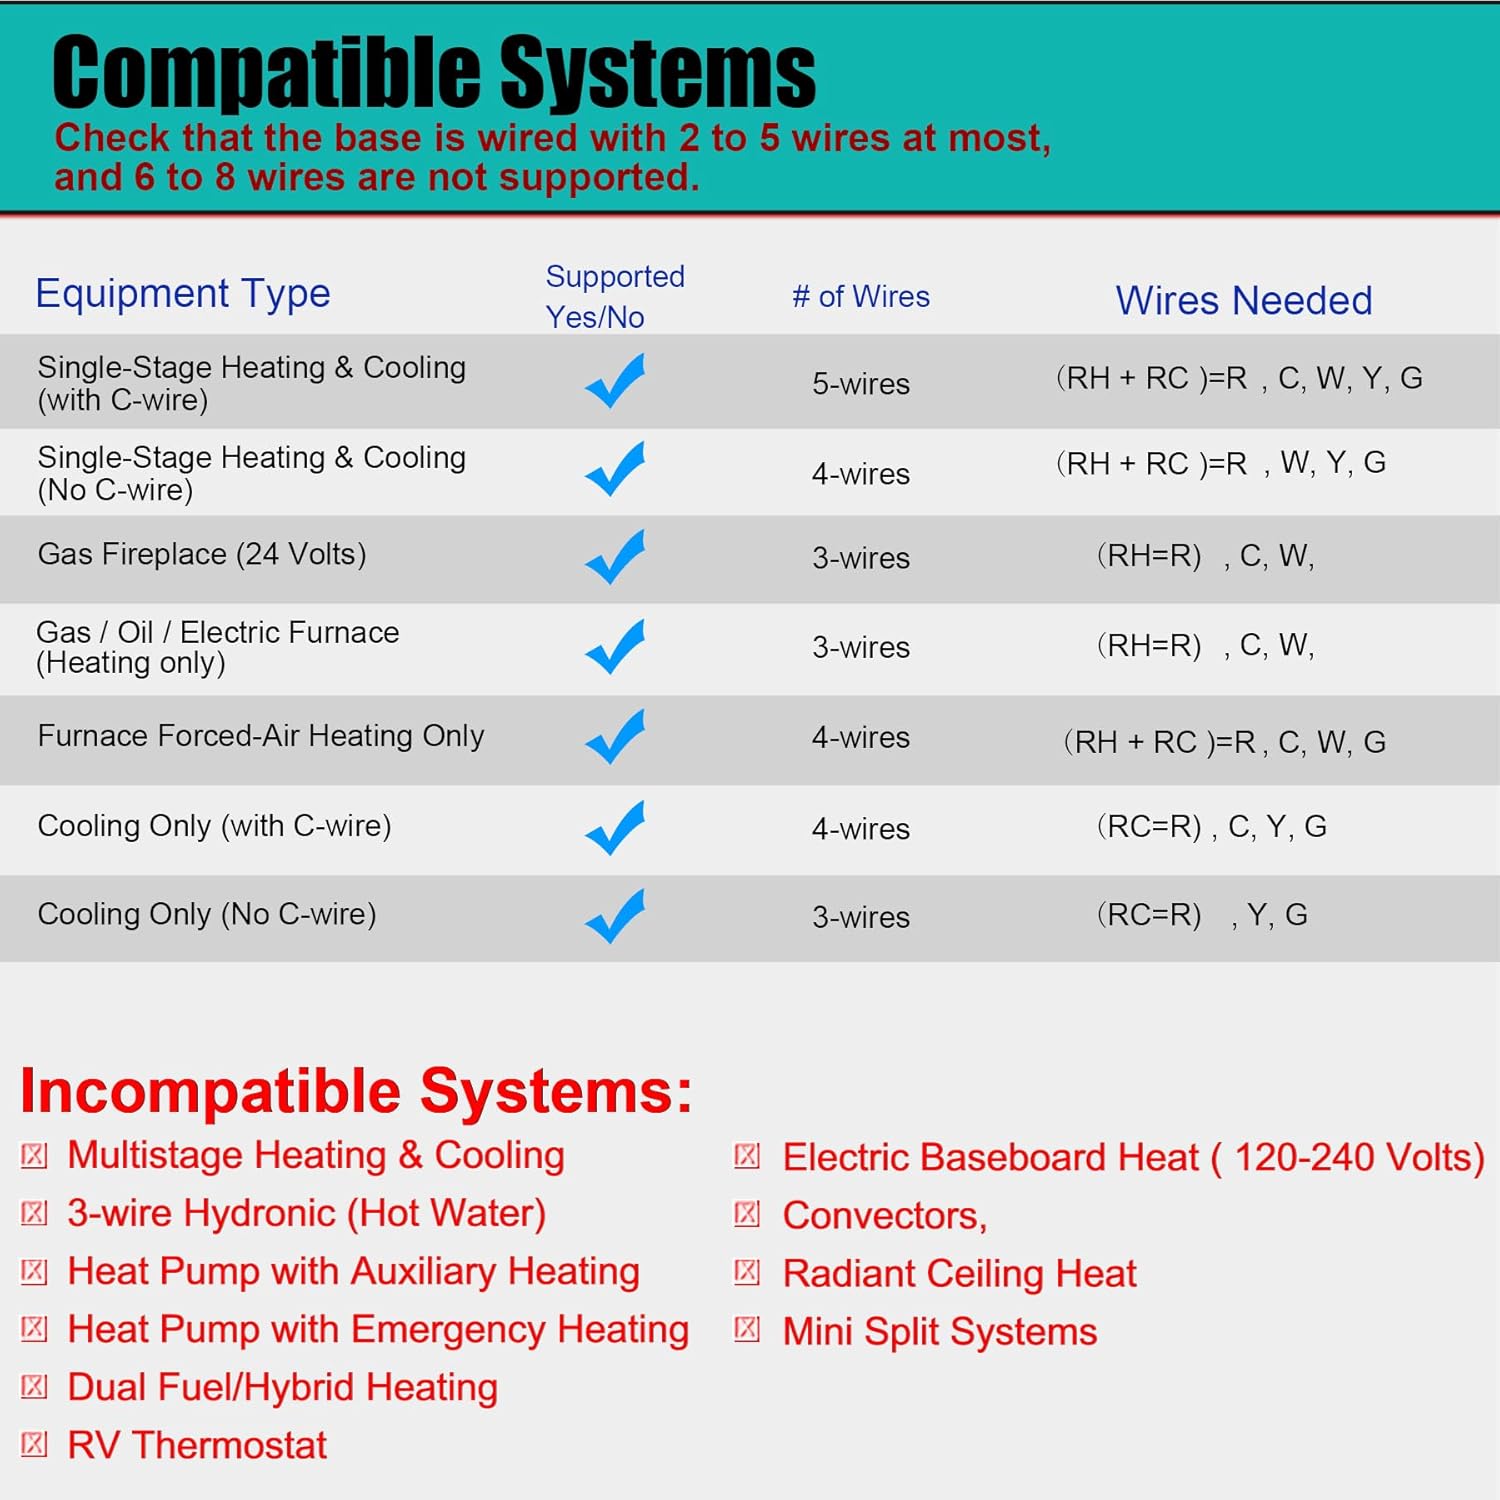
Image 4.1: Detailed compatibility chart for the Suuwer S701 thermostat.
5. Seadistamine ja installimine
Follow these steps for proper installation. It is recommended to take a picture of your old thermostat's wiring before disconnecting any wires.
5.1 Vana termostaadi eemaldamine
- Lülitage toide välja: Leidke oma kütte- ja jahutussüsteemi juhtiv kaitselüliti või kaitsmekarp ning lülitage toide välja.
- Eemaldage kate: Eemaldage ettevaatlikult vana termostaadi kate.
- Foto juhtmestik: Take a clear picture of the wiring connections, noting which wire is connected to each terminal.
- Märgistage juhtmed: Use the provided cable labels to mark each wire according to its terminal designation (e.g., R, W, Y, G, C).
- Juhtmete lahtiühendamine: Ühendage juhtmed vanade termostaatide klemmide küljest lahti.
- Eemaldage vana alus: Keerake lahti ja eemaldage vana termostaadi kinnitusalus seinast.
5.2 Uue termostaadi paigaldamine
- Positsiooni alus: Hold the new Suuwer S701 thermostat base against the wall where you want to mount it.
- Märkige kruviaugud: Mark the positions for the mounting screws. If possible, use existing screw holes.
- Puurida augud: If new holes are needed, drill pilot holes and insert the wall anchors.
- Kindel alus: Pull the wires through the opening in the thermostat base and secure the base to the wall using the provided screws.
5.3 Juhtmete ühendamine
Connect the labeled wires to the corresponding terminals on the Suuwer S701 thermostat base. Refer to the wiring diagram below and your photograph for accuracy.
- R/RC: 24VAC power (often jumpered, see diagram)
- G: Sisepuhur (ventilaator)
- Y: 1.-stage lahe
- W: 1.-stage kuumus
- C: Common wire (optional for battery-powered operation, but recommended for continuous backlight)

Image 5.1: Wiring diagram and system switch setting for the Suuwer S701 thermostat.
5.4 Setting the System Switch (GAS/ELEC)
On the back of the thermostat unit, locate the small switch labeled 'GAS' and 'ELEC'.
- Kui teil on a gas or oil furnace, seadke lüliti asendisse GAAS.
- Kui teil on electric furnace, seadke lüliti asendisse ELEC.
5.5 Patareide paigaldamine
The thermostat can be powered by 24VAC or 2 AAA batteries. Batteries are required for operation if no C-wire is connected. Even with a C-wire, batteries provide backup power.
- Open the battery compartment on the front of the thermostat.
- Sisestage kaks uut AAA-tüüpi leelispatareid, jälgides õiget polaarsust (+/-).
- Sulgege patareipesa.
5.6 Attaching the Thermostat to the Base
Joondage termostaat paigaldatud alusega ja suruge see ettevaatlikult paika, kuni see kindlalt klõpsuga kinnitub.
5.7 Elektrivarustuse taastamine
Once the thermostat is securely mounted and wired, turn the power back on at the main circuit breaker or fuse box.
6. Kasutusjuhised
The Suuwer S701 is a non-programmable thermostat, offering straightforward manual control of your home's temperature.

Image 6.1: Display and controls of the Suuwer S701 thermostat.
6.1 Kuva üleview
The large LCD with blue backlight shows the current room temperature and the set temperature. The backlight activates for 10 seconds when any button is pressed.
- Tuba: Kuvab hetke ümbritseva õhu temperatuuri.
- Määra: Kuvab soovitud temperatuuri seadistust.
- Cool/Heat/Off: Indicates the current system mode.
- Fan ON/AUTO: Näitab praegust ventilaatorirežiimi.
6.2 Temperatuuri reguleerimine
Kasutage + (Üles) ja - (Down) buttons on the right side of the thermostat to adjust the desired temperature setting. Each press changes the temperature by 1 degree Fahrenheit.
6.3 Süsteemirežiimi valik
Kasutage SÜSTEEM switch located at the bottom right of the thermostat to select the operating mode:
- LAHE: Aktiveerib jahutussüsteemi, kui toatemperatuur tõuseb üle seatud temperatuuri.
- KUUMUS: Aktiveerib küttesüsteemi, kui toatemperatuur langeb alla seatud temperatuuri.
- VÄLJAS: Lülitab välja nii kütte- kui ka jahutussüsteemid.
6.4 Ventilaatori režiimi valik
Kasutage FAN switch located at the bottom left of the thermostat to select the fan operating mode:
- AUTOMAATNE: Ventilaator töötab ainult siis, kui kütte- või jahutussüsteem töötab aktiivselt. See on kõige levinum ja energiatõhusam seadistus.
- PEAL: Ventilaator töötab pidevalt, olenemata sellest, kas kütte- või jahutussüsteem on aktiivne.
6.5 Adjusting Temperature Swing (Cycle Rate)
The temperature swing, also known as cycle rate or differential, determines how much the temperature can vary from your setpoint before the system turns on. A smaller swing results in more frequent, shorter cycles, while a larger swing results in less frequent, longer cycles.
The swing is adjustable from 0.2°F to 2°F. The factory default is 0.5°F for both heating and cooling.

Image 6.2: Thermostat display showing the temperature swing setting.
To adjust the temperature swing:
- Vajutage ja hoidke all nuppu FAN button for approximately 3 seconds until the display changes to show the current swing setting.
- Kasutage + (Üles) või - (Down) buttons to adjust the swing value.
- Vajutage nuppu FAN button again to toggle between heating and cooling swing settings.
- The thermostat will automatically save the setting after a few seconds of inactivity.
7. Hooldus
7.1 Aku vahetamine
When the low battery indicator (a battery icon) appears on the display, it is time to replace the batteries. Replace with two new AAA alkaline batteries. Refer to Section 5.5 for battery installation steps.
7.2 Puhastamine
Pühkige termostaadi välispind pehme lapigaamp riie. Ärge kasutage abrasiivseid puhastusvahendeid ega lahusteid.
8. Veaotsing
Kui teil tekib termostaadiga probleeme, vaadake järgmisi levinud probleeme ja lahendusi:
| Probleem | Võimalik põhjus | Lahendus |
|---|---|---|
| Kuva on tühi | Toide puudub, patareid on tühjad või kaitselüliti on rakendunud. | Check batteries and replace if necessary. Ensure power is on at the circuit breaker. Verify wiring connections. |
| Kütte-/jahutussüsteem ei reageeri | Incorrect system mode, incorrect wiring, or system issue. | Ensure SYSTEM switch is set to HEAT or COOL. Verify wiring. Check if furnace/AC unit has power. |
| Temperatuuri näit tundub ebatäpne | Thermostat location, or calibration needed. | Ensure thermostat is not in direct sunlight or near heat sources. The thermostat has a room temperature calibration adjustment for +/-1-degree F. Consult the full installation manual for advanced settings. |
| Low Battery Indicator (battery icon) | Patareid on tühjad. | Replace with two new AAA alkaline batteries immediately. |
| Compressor short cycling (turning on/off too frequently) | Temperature swing set too low. | Adjust the temperature swing to a higher value (e.g., 1.0°F or 1.5°F). |
Täpsema tõrkeotsingu saamiseks vaadake palun Veaotsingu juhend (PDF).
9. Tehnilised andmed
- Mudel: S701
- Toote mõõtmed: 0.98" P x 4.72" L x 3.86" K
- Kauba kaal: 6.7 untsi (0.42 naela)
- Värv: Sinine taustvalgus
- Materjal: Plastikust
- Kuva tüüp: Sinise taustvalgustusega LCD-ekraan
- Ekraani suurus: 4.5 tolli
- Kontrolli tüüp: Push Button / Button Control
- Paigaldustüüp: Seinakinnitus
- Toiteallikas: 24 Volts (AC) or 2 AAA Batteries
- Temperatuuri reguleerimise vahemik: 44°F kuni 90°F
- Room Temperature Display Range: 41°F kuni 95°F
- Temperatuuri täpsus: +/-1°F
- Eriomadused: Non-Programmable, Separate Heating and Cooling Swing (0.2°F to 2°F), Low Battery Indicator, 5 Minute Compressor Delay Protection (Selectable ON or OFF)
- UPC: 709327753278
10. Garantii ja tugi
10.1 Garantii teave
The Suuwer S701 Non-Programmable Thermostat comes with a 2-aastane muretu garantii alates ostukuupäevast. See garantii katab materjali- ja tootmisdefektid normaalse kasutamise korral. Palun hoidke oma ostutõend garantiinõuete esitamiseks alles.
10.2 Klienditugi
For technical assistance, troubleshooting, or warranty inquiries, please contact Suuwer customer service. We offer 24-hour customer service to assist you.
Täiendavad ressursid:


