1. Sissejuhatus
Tänan ostu eestasing the Optex Black Tabletop Tripod. This versatile tripod features a 2-in-1 mounting system, allowing you to securely attach both cameras and smartphones. Its compact design and adjustable ball head make it an ideal accessory for various photography and videography needs. Please read this manual carefully before use to ensure proper operation and longevity of your product.
2. Toote omadused
- 2-in-1 Mounting System: Integrated mount for both cameras and smartphones.
- Kuulpea: Fully articulating ball head for flexible positioning.
- Reguleeritavad jalad: 5 micro leg adjustments for height and angle.
- Kompaktne disain: Ideal for tabletop use and portability.
- Kandevõime: Supports devices up to 3 kg (6.6 lbs).
3. Pakendi sisu
- Optex Black Tabletop Tripod with integrated 2-in-1 Ballhead and Smartphone Mount
4. Komponentide identifitseerimine
Familiarize yourself with the different parts of your Optex Tabletop Tripod:
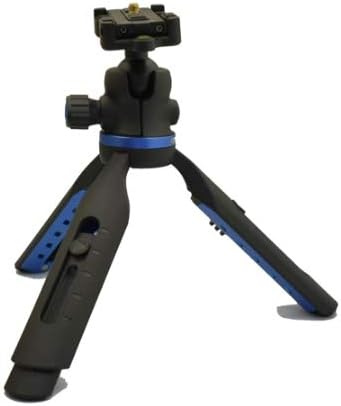
Figure 1: Tripod with camera mounting plate visible. This image shows the tripod in its compact form, with the standard camera screw mount at the top. The blue accents on the legs and ball head adjustment knob are visible.

Figure 2: Tripod with smartphone mount engaged. This image displays the tripod with the integrated smartphone holder extended and ready for use. The ball head and leg adjustment mechanisms are also clearly visible.
- Kaamera kinnituskruvi: Standard 1/4-inch screw for cameras.
- Nutitelefoni hoidja: Integrated spring-loaded clamp for smartphones.
- Ball Head Adjustment Knob: Loosen to adjust the angle of the mounted device, tighten to secure.
- Leg Release Buttons: Press to adjust leg angles and height.
- Statiivi jalad: Provide stability, with 5 micro adjustments.
5. Seadistamine
5.1 Statiivi lahtivoltimine
- Gently spread the tripod legs outwards until they click into their initial position.
- To adjust the leg angle, press the leg release button located on each leg and move the leg to the desired position. Release the button to lock the leg. There are 5 micro adjustments available.
5.2 Kaamera ühendamine
- Ensure the smartphone holder is folded down, revealing the standard 1/4-inch camera mounting screw.
- Align the camera's tripod socket with the mounting screw.
- Rotate the camera clockwise onto the screw until it is securely fastened. Do not overtighten.
5.3 Attaching a Smartphone
- Lift the integrated smartphone holder upwards until it locks into position.
- Gently pull the top jaw of the smartphone holder upwards to open the clamp.
- Sisestage oma nutitelefon pesasseamp, ensuring it is centered and securely held by the spring tension.
- Release the top jaw slowly to allow it to grip the smartphone.
6. Statiivi kasutamine
6.1 Kuulpea reguleerimine
- To change the angle of your mounted device, loosen the ball head adjustment knob (blue knob).
- Position your camera or smartphone to the desired angle.
- Tighten the ball head adjustment knob firmly to secure the device in place.
6.2 Adjusting Leg Height and Angle
- Each leg has a release button. Press this button to unlock the leg's angle.
- Adjust the leg to one of the 5 available micro-adjustment positions.
- Release the button to lock the leg securely. Ensure all legs are locked before placing a device on the tripod.
7. Hooldus
- Puhastamine: Wipe the tripod with a soft, dry cloth. For stubborn dirt, a slightly damp lapiga võib kasutada ja seejärel kohe kuivatada. Ärge kasutage tugevaid kemikaale ega abrasiivseid puhastusvahendeid.
- Hoiustamine: Hoidke statiivi jahedas ja kuivas kohas, eemal otsesest päikesevalgusest ja äärmuslikest temperatuuridest.
- Ülevaatus: Kontrollige regulaarselt kõigi kruvide ja liikuvate osade pingulolekut ja sujuvat toimimist.
8. Veaotsing
| Probleem | Võimalik põhjus | Lahendus |
|---|---|---|
| Device is unstable on tripod. | Ball head not tightened; legs not fully locked; device too heavy. | Ensure ball head knob is tight. Verify all leg release buttons are engaged. Check device weight against 3 kg limit. |
| Smartphone not fitting in holder. | Holder not fully extended; smartphone too wide. | Ensure the top jaw of the smartphone holder is pulled up completely. The holder accommodates most standard smartphone sizes. |
9. Tehnilised andmed
- Mudel: OBTT20
- Kaubamärk: Optex
- Kaalupiirang: 3 kilogrammi (6.6 naela)
- Ühilduvad seadmed: Kaamera, nutitelefon
- Statiivipea tüüp: Kuulpea
- Number of Leg Sections: 5 (micro adjustments)
- UPC: 059497264594
10. Garantii ja tugi
For warranty information and customer support, please refer to the documentation provided at the time of purchase or visit the official Optex webveebisait. Hoidke ostutõendit alles garantiinõuete esitamiseks.


