1. Toote lõppview
The ANENG Q1 is a 9999 counts True RMS digital multimeter designed for accurate measurement of various electrical parameters. It features an EBTN black screen with a large, backlit LCD for clear readability in diverse lighting conditions. This device supports both automatic and manual ranging, offering flexibility for different measurement needs. It includes an analog bar graph display for quick visual indication of readings.
Peamised omadused:
- Tegelik RMS mõõtmine: Annab täpseid näitu mittesinusoidaalsete lainekujude puhul.
- NCV (Non-Contact Voltage) Tuvastamine: For safe identification of live wires without direct contact.
- Auto/Manual Ranging: User-selectable measurement range for convenience and precision.
- Analoogne tulpdiagramm: Visual representation of measurement trends.
- Suur taustvalgustusega LCD-ekraan: Parem nähtavus hämaras keskkonnas.
- Ülekoormuskaitse: Tagab ohutuse kõigis mõõtepiirkondades.
- Aku tühjenemise indikaator: Alerts when battery replacement is needed.
- Andmete hoidmise funktsioon: Külmutab kuvatud näidu hõlpsaks salvestamiseks.
- Automaatne väljalülitus: Säästab aku tööiga.
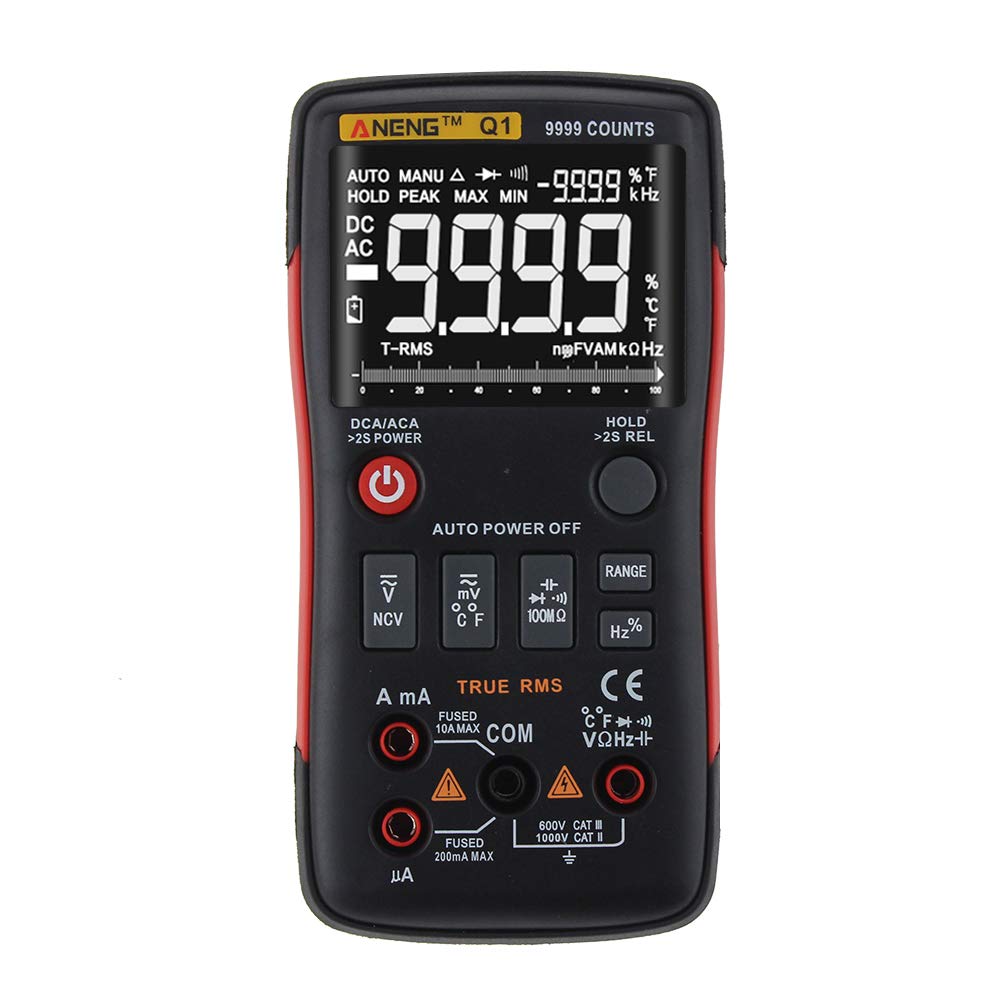
Figure 1: ANENG Q1 Digital Multimeter with its display and function buttons.
2. Ohutusalane teave
Always observe basic safety precautions when using this multimeter to prevent personal injury or damage to the device. Read and understand all safety information before operation.
- Ärge ületage ühegi funktsiooni maksimaalseid sisendväärtusi.
- Olge voldiga töötades ettevaatliktagüle 30 V vahelduvpinge RMS, 42 V tipp või 60 V alalispinge. Need pingedtagsee kujutab endast šokiohtu.
- Enne voolu mõõtmist veenduge, et vooluring on pingevaba ja multimeeter on järjestikku ühendatud.
- Always disconnect test leads from the circuit before changing functions.
- Enne kasutamist kontrollige testjuhtmeid kahjustatud isolatsiooni või paljastunud metalli suhtes. Kui need on kahjustatud, vahetage need välja.
- Ärge kasutage multimeetrit, kui patareide kate pole korralikult suletud.
- Täpsete näitude tagamiseks vahetage patareid kohe, kui ilmub patarei tühjenemise indikaator.
- Järgige kohalikke ja riiklikke ohutusnorme.
3. Seadistamine
3.1 Aku paigaldamine
- Veenduge, et multimeeter oleks välja lülitatud.
- Otsige üles akupesa seadme tagaküljel.
- Keerake lahti akupesa kate ja eemaldage see.
- Insert two 1.5V AA batteries, observing the correct polarity (+/-).
- Asetage patarei kate tagasi ja kinnitage see kruviga.
3.2 Testimisjuhtmete ühendamine
The multimeter comes with a set of test leads. Always connect the black lead to the 'COM' (Common) jack. Connect the red lead to the appropriate input jack based on the measurement function:
- VΩHz+ jack for Voltage, Takistuse, sageduse, mahtuvuse, dioodi ja järjepidevuse mõõtmised.
- mA jack for current measurements up to 999.9mA.
- 10A jack for current measurements up to 10A.

Figure 2: Included test leads and probes.

Figure 3: Complete ANENG Q1 Multimeter kit with accessories.
4. Kasutusjuhised
The ANENG Q1 multimeter offers both automatic and manual ranging. Press the 'RANGE' button to switch between auto and manual modes. In manual mode, press 'RANGE' repeatedly to cycle through available ranges.
4.1 Toide sisse/välja
Press the red power button to turn the multimeter on or off. The device features an auto power-off function to conserve battery life after a period of inactivity.
4.2 AC/DC mõõtmine Voltage (V)
- Connect the black test lead to the 'COM' jack and the red test lead to the 'VΩHz+' jack.
- Valige voltage measurement function (AC V or DC V) using the function button.
- Ühendage testsondid paralleelselt mõõdetava vooluringi või komponendiga.
- Lugege kdtage väärtus ekraanil.
4.3 Measuring AC/DC Current (A/mA/µA)
- Tähtis: Ensure the circuit is de-energized before connecting the multimeter for current measurement.
- Connect the black test lead to the 'COM' jack. Connect the red test lead to the 'mA' jack for currents up to 999.9mA, or to the '10A' jack for currents up to 10A.
- Select the current measurement function (AC A or DC A).
- Avage vooluring ja ühendage multimeeter koormusega järjestikku.
- Lülitage vooluring uuesti sisse ja lugege ekraanilt voolutugevuse väärtust.
4.4 Takistuse (Ω) mõõtmine
- Connect the black test lead to 'COM' and the red test lead to 'VΩHz+'.
- Select the resistance measurement function.
- Enne takistuse mõõtmist veenduge, et vooluring või komponent on pingevaba.
- Ühendage testsondid komponendiga.
- Lugege ekraanil takistuse väärtust.
4.5 Mahtuvuse (F) mõõtmine
- Connect the black test lead to 'COM' and the red test lead to 'VΩHz+'.
- Select the capacitance measurement function.
- Enne mõõtmist veenduge, et kondensaator on täielikult tühjenenud, et vältida multimeetri kahjustamist.
- Ühendage testsondid kondensaatori klemmidega.
- Lugege mahtuvusväärtust ekraanilt.
4.6 Measuring Frequency (Hz) and Duty Cycle (%)
- Connect the black test lead to 'COM' and the red test lead to 'VΩHz+'.
- Select the frequency/duty cycle measurement function.
- Ühendage testsondid signaaliallikaga.
- Lugege ekraanilt sageduse või töötsükli väärtust.
4.7 Measuring Temperature (°C/°F)
- Connect the temperature probe to the appropriate input jacks (usually 'COM' and 'VΩHz+' or dedicated temperature jacks if available).
- Select the temperature measurement function.
- Asetage temperatuurianduri ots objektile, mille temperatuuri mõõdetakse, või selle lähedale.
- Lugege temperatuuri väärtust ekraanilt.
4.8 Dioodi test
- Connect the black test lead to 'COM' and the red test lead to 'VΩHz+'.
- Select the diode test function.
- Ühenda punane sond anoodiga ja must sond dioodi katoodiga.
- Ekraanil kuvatakse edasiliikumise helitugevus.tage drop. Reverse the probes; an open circuit (OL) indicates a good diode.
4.9 Järjepidevuse test
- Connect the black test lead to 'COM' and the red test lead to 'VΩHz+'.
- Valige järjepidevuse testi funktsioon.
- Ühendage testsondid vooluringi või komponendiga.
- A continuous beep indicates a low resistance path (continuity).
4.10 NCV (kontaktivaba ruumala)tage) Avastamine
- Select the NCV function.
- Bring the top of the multimeter close to the conductor or outlet.
- Seade näitab vahelduvvoolu helitugevuse olemasolutage through an audible alarm and/or visual indicator.
5. Hooldus
5.1 Puhastamine
Pühkige ümbris koos reklaamigaamp lapiga ja õrna pesuvahendiga. Ärge kasutage abrasiivseid aineid ega lahusteid. Enne kasutamist veenduge, et seade on täiesti kuiv.
5.2 Säilitamine
When not in use for extended periods, remove the batteries to prevent leakage. Store the multimeter in a cool, dry place, away from direct sunlight and extreme temperatures. The recommended storage conditions are -20°C to 60°C (-4°F to 140°F) with humidity less than 80% RH.
6. Veaotsing
- Kuvarit pole: Kontrollige patareide paigaldust ja veenduge, et patareid poleks tühjad. Vajadusel vahetage need välja.
- Valed näidud: Verify that the correct function and range are selected. Ensure test leads are properly connected and not damaged. Check battery level.
- 'OL' (ülekoormuse) näit: The measured value exceeds the selected range or the maximum input limit. Switch to a higher range or ensure the input is within the device's specifications.
- Jätkuvuse puudumise piiks: Check if the circuit is truly continuous and has very low resistance. Ensure test leads are making good contact.
7. Tehnilised andmed
7.1 Elektrilised spetsifikatsioonid

Figure 4: Electrical Specifications - DC and AC Voltage.

Figure 5: Electrical Specifications - DC and AC Current, and Resistance.

Figure 6: Electrical Specifications - Capacitance, Frequency, and Duty Cycle.

Figure 7: Electrical Specifications - Temperature, Diode, Continuity, and NCV.
7.2 General, Mechanical, and Environmental Specifications

Figure 8: General, Mechanical, and Environmental Specifications.
| Parameeter | Väärtus |
|---|---|
| Ekraan | 9999 loendurit LCD-ekraan |
| Ulatus | Automaatne/käsitsi |
| Materjal | ABS+TPE |
| Värskendusmäär | 3 korda sekundis |
| Tõeline RMS | Jah |
| Andmete hoidmine | Jah |
| Taustvalgus | Jah |
| Aku tühjenemise indikaator | Jah |
| Automaatne väljalülitus | Jah |
| Parameeter | Väärtus |
|---|---|
| Mõõtmed | 146 * 74 * 34 mm |
| Kaal | 125 g |
| Aku tüüp | 2 x 1.5V AA Battery (not included) |
| Parameeter | Väärtus |
|---|---|
| Töötemperatuur | 0-40°C |
| Töö niiskus | <75% suhteline niiskus |
| Säilitustemperatuur | -20-60°C |
| Ladustamise niiskus | <80% suhteline niiskus |
8. Garantii ja tugi
8.1 Garantii
This ANENG Q1 Digital Multimeter comes with a üheaastane garantii from the date of purchase, covering manufacturing defects. This warranty does not cover damage caused by misuse, accident, unauthorized modification, or normal wear and tear. Please retain your proof of purchase for warranty claims.
8.2 Klienditugi
For technical assistance, troubleshooting, or warranty inquiries, please contact the retailer or manufacturer's customer service. Refer to your purchase documentation for specific contact details.


