1. Sissejuhatus
This user manual provides comprehensive instructions for the setup, operation, and maintenance of your Reloop RP-1000 MK2 Professional Belt Drive Turntable System. Please read this manual thoroughly before using the product to ensure proper function and to prevent damage.
The Reloop RP-1000 MK2 is designed for both aspiring DJs and HiFi enthusiasts, offering high-quality audio reproduction through its belt-driven mechanism. This design effectively isolates the platter from motor vibrations, ensuring clear, distortion-free sound. The MK2 version features an enhanced top panel construction, improved metallic buttons, and a pre-fitted Ortofon OM Black pick-up system for immediate playback.
2. Ohutusjuhised
To ensure safe operation and prolong the life of your turntable, please observe the following safety guidelines:
- Toiteallikas: Connect the unit only to an AC outlet with the correct voltage as indicated on the product. Ensure the power cord is not pinched or walked on.
- Niiskus: Ärge jätke seadet vihma, niiskuse ega liigse õhuniiskuse kätte. Ärge asetage seadmele vedelikega täidetud esemeid, näiteks vaase.
- Ventilatsioon: Tagage seadme ümber piisav ventilatsioon. Ärge blokeerige ventilatsiooniavasid.
- Soojusallikad: Hoidke seadet eemal soojusallikatest, näiteks radiaatoritest, küttekehadest, pliitidest või muudest seadmetest (sh amptõsteseadmed), mis toodavad soojust.
- Puhastamine: Puhastage ainult kuiva lapiga. Vältige vedelate puhastusvahendite või aerosoolide kasutamist.
- Teenindus: Do not attempt to service the unit yourself. Refer all servicing to qualified service personnel. Servicing is required when the apparatus has been damaged in any way, such as power-supply cord or plug is damaged, liquid has been spilled or objects have fallen into the apparatus, the apparatus has been exposed to rain or moisture, does not operate normally, or has been dropped.
- Paigutus: Place the turntable on a stable, level surface to prevent vibrations and ensure proper tracking.
3. Pakendi sisu
Palun kontrollige, kas kõik allpool loetletud esemed on teie pakendis olemas:
- Plaadimängutaldrik
- OM Black pick-up system (by Ortofon)
- Peakarp
- Slipmat
- Vastukaal
- Toitejuhe
- Kasutusjuhend (käesolev dokument)
If any items are missing or damaged, please contact your retailer or Reloop customer support immediately.
4. Toote lõppview
Familiarize yourself with the main components of your Reloop RP-1000 MK2 turntable.

Joonis 4.1: Nurga all view of the Reloop RP-1000 MK2 turntable, showcasing the platter, tonearm, and control panel.
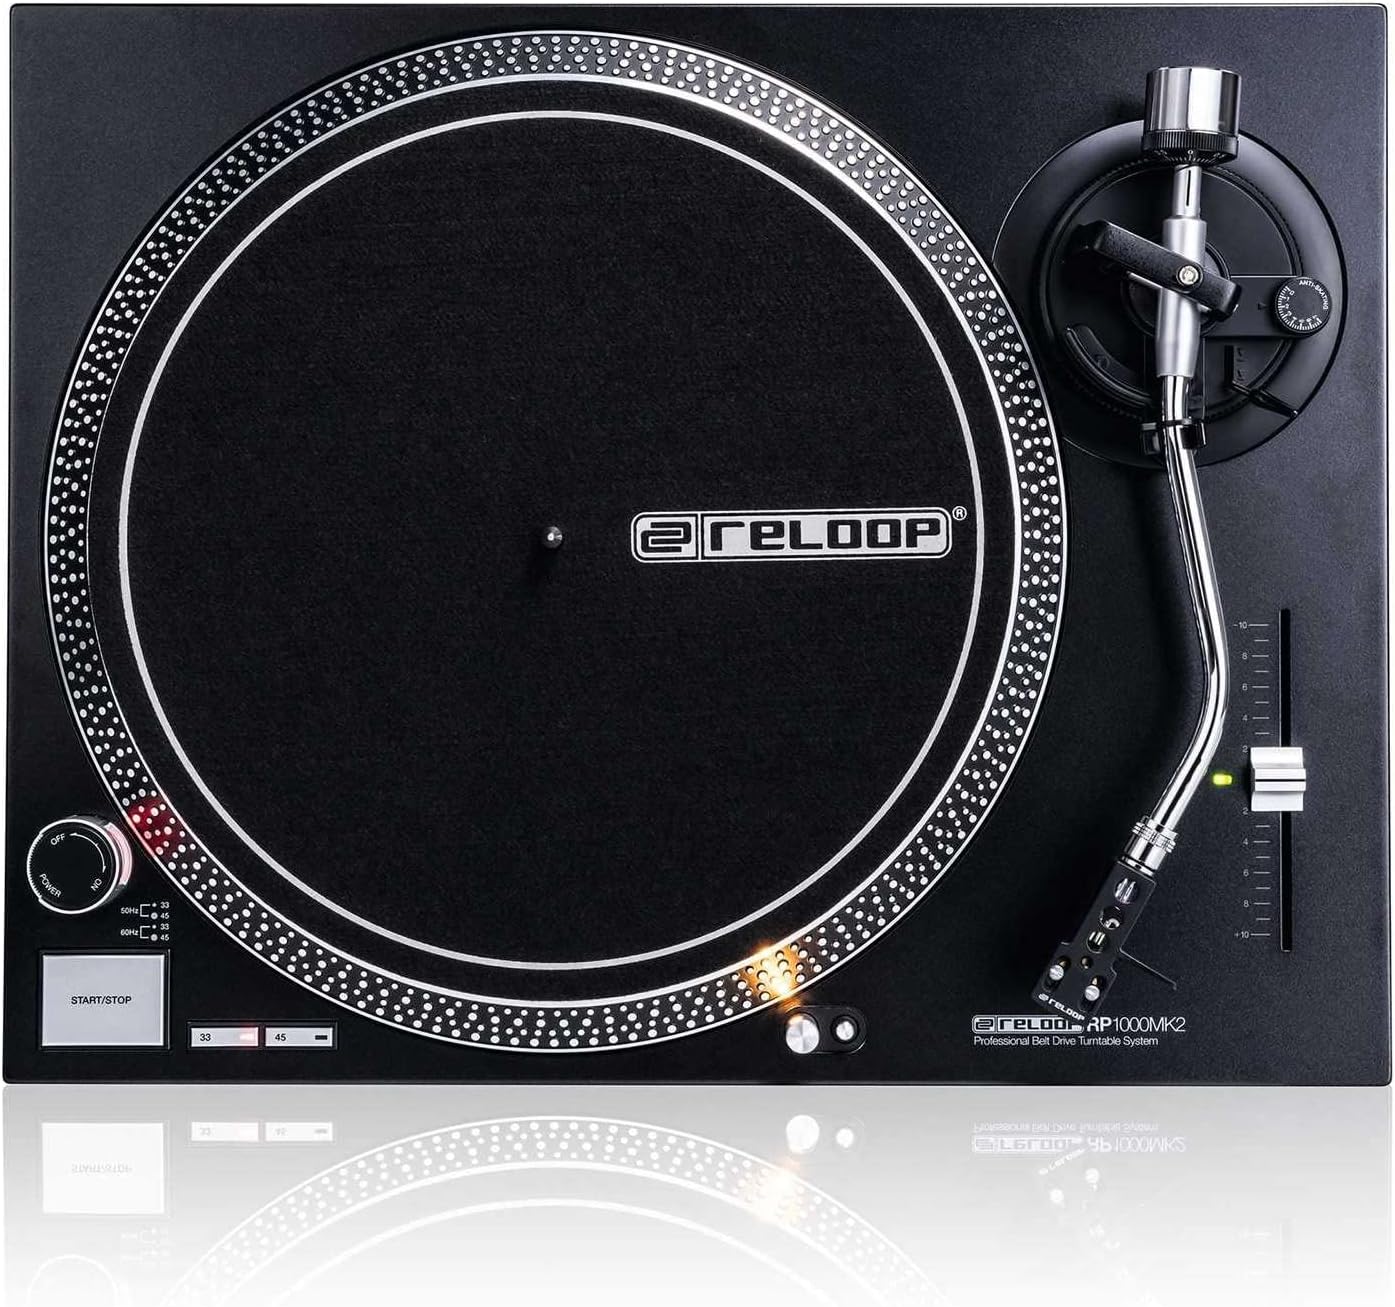
Joonis 4.2: Ülalt-alla view highlighting the platter, slipmat with Reloop logo, S-shaped tonearm, and pitch control slider.

Joonis 4.3: üksikasjalik view of the S-shaped tonearm, headshell, and the pre-fitted Ortofon OM Black pick-up system.

Figure 4.4: Close-up of the power knob, start/stop button, and speed selection buttons (33/45 RPM).
Põhikomponendid:
- Vaagen: Precision-engineered, die-cast aluminum platter for stable rotation.
- Toonar: Statically balanced S-shaped tonearm with hydraulic lift and anti-skating mechanism.
- Kassett: High-quality OM Black pick-up system by Ortofon, pre-fitted to a headshell.
- Kõrguse juhtimine: Adjustable slider with a range of +/-10% for fine speed adjustments.
- Speed Select Buttons: Buttons for selecting 33 1/3 RPM and 45 RPM playback speeds.
- Start/Stop nupp: Controls the rotation of the platter.
- Target Light: Extendable aluminum target light to illuminate the needle position in dark environments.
- Shock-absorbing Feet: Improve isolation from unwanted vibrations.
5. Seadistamine
5.1 Lahtipakkimine ja paigutamine
- Eemaldage pakendist ettevaatlikult kõik komponendid. Hoidke pakend alles edaspidiseks transportimiseks või ladustamiseks.
- Place the turntable on a flat, stable, and level surface, away from direct sunlight, heat sources, and strong magnetic fields.
- Ensure there is sufficient space around the unit for ventilation.
5.2 Taldriku ja rihma paigaldamine
- Asetage platvorm keskmisele spindlile. Veenduge, et see on kindlalt paigas.
- Locate the drive belt. Carefully stretch the belt around the inner rim of the platter and hook it onto the motor pulley, which is visible through one of the platter's openings.
- Asetage vildist libisemismatt vaagna peale.
5.3 Toonarmide seadistamine
The OM Black pick-up system is pre-fitted to the headshell. Follow these steps to balance the tonearm:
- Attach the headshell with the pre-fitted cartridge to the front end of the tonearm. Secure it by turning the locking ring clockwise.
- Place the counterweight onto the rear of the tonearm and rotate it until it is approximately centered.
- Vabastage toonivarre klahvamp and lower the tonearm lift.
- Carefully adjust the counterweight by rotating it forwards or backwards until the tonearm is perfectly balanced and floats horizontally.
- Once balanced, hold the counterweight steady and rotate only the numbered ring on the front of the counterweight to '0' (zero).
- Rotate the entire counterweight (including the numbered ring) counter-clockwise to set the recommended tracking force for the Ortofon OM Black cartridge, typically between 1.5 to 2.0 grams. Refer to the cartridge manufacturer's specifications for the precise recommended tracking force.
- Set the anti-skating dial to the same value as your tracking force.
- Pange toonarm tagasi oma kohale ja kinnitage see klambriga.amp.
5.4 Heli- ja toiteühendused
- Connect the RCA audio cables from the turntable's output to the PHONO input of your ampmikseri või soojendi külge. Veenduge, et vasak (valge) ja parem (punane) kanalite ühendused oleksid õiged.
- Ühendage plaadimängija maandusjuhe oma seadme maandusklemmiga. amphumina minimeerimiseks lihvijat või mikserit.
- Plug the power cord into the turntable's power input and then into a suitable AC power outlet.
6. Kasutusjuhised
6.1 Põhitoimingud
- Toide sisse: Turn the power knob clockwise to the "ON" position. The platter will not start spinning until the START/STOP button is pressed.
- Valige kiirus: Press the "33" or "45" button to select the desired playback speed according to the record you are playing. The corresponding LED will illuminate.
- Kohakirjeldus: Carefully place a vinyl record onto the platter.
- Alusta vaagen: Press the START/STOP button. The platter will begin to rotate.
- Toonarm: Vabastage toonivarre klahvamp. Use the tonearm lift lever to raise the tonearm. Carefully move the tonearm over the desired track on the record.
- Alumine toonarm: Gently lower the tonearm lift lever to allow the stylus to descend onto the record groove.
- Mängib: The audio will now play through your connected audio system.
- Peata taasesitus: At the end of the record, or when you wish to stop, use the tonearm lift lever to raise the tonearm, return it to its rest, and secure it with the clamp. Press the START/STOP button to stop the platter rotation.
- Toide välja: Turn the power knob counter-clockwise to the "OFF" position when not in use.
6.2 Using Pitch Control
The pitch control slider allows you to finely adjust the playback speed by +/-10%. Move the slider up or down to increase or decrease the speed. The center detent indicates 0% pitch adjustment (nominal speed).
6.3 Target Light
Press the aluminum target light button to extend the light, illuminating the needle position. This is particularly useful in low-light environments. Press it again to retract the light.
7. Hooldus
7.1 Seadme puhastamine
- Enne puhastamist ühendage alati toitejuhe lahti.
- Use a soft, dry, lint-free cloth to wipe the surface of the turntable.
- Kangekaelsete plekkide puhul kergeltamp Võib kasutada lappi ja seejärel kohe kuiva lappi. Vältige abrasiivseid puhastusvahendeid või lahusteid.
7.2 Pliiatsi hooldus
- Pliiats (nõel) on õrn osa. Käsitsege seda äärmise ettevaatlikkusega.
- Clean the stylus regularly using a soft brush designed for stylus cleaning, brushing gently from back to front.
- A worn or dirty stylus can damage your records and degrade sound quality. Replace the stylus when signs of wear are apparent (e.g., distorted sound, skipping).
7.3 Rihma vahetamine
The belt is a wear-and-tear part. If you notice inconsistent speed or the platter not spinning, the belt may need replacement. Contact Reloop support or an authorized service center for replacement belts and instructions.
7.4 Dust Cover Care (if applicable)
If your turntable includes a dust cover, clean it with a soft, damp cloth. Avoid using dry cloths as they can scratch the acrylic surface. Do not use harsh chemicals.
8. Veaotsing
Before contacting support, please refer to the following common issues and their solutions:
| Probleem | Võimalik põhjus | Lahendus |
|---|---|---|
| No power / Platter not spinning | Power cord not connected; Power switch off; Belt not installed or broken. | Ensure power cord is securely plugged in. Turn power switch ON. Check if the drive belt is correctly installed around the platter and motor pulley. Replace belt if broken. |
| Heli puudub või on väga vaikne | RCA cables not connected correctly; Amplifier/mixer input incorrect; Stylus damaged or dirty; Cartridge not properly seated. | Check RCA connections to amplifier/mixer (PHONO input). Ensure ground wire is connected. Clean stylus. Re-seat cartridge in headshell. |
| Distorted sound / Skipping | Stylus dirty or worn; Tracking force incorrect; Anti-skating incorrect; Turntable not level; Record dirty or damaged. | Clean or replace stylus. Re-adjust tracking force and anti-skating. Ensure turntable is on a level surface. Clean record. |
| Ebaühtlane kiirus | Worn or stretched belt; Motor issue. | Inspect the drive belt for wear and replace if necessary. If the issue persists, contact service. |
9. Tehnilised andmed
| Funktsioon | Kirjeldus |
|---|---|
| Mudeli nimi | RP-1000 MK2 Professional Belt Drive Turntable System |
| Ajami tüüp | Rihmülekanne |
| Mootori süsteem | Powerful belt-drive motor system absorbs unwanted vibration and noise |
| Vaagen | Precision-engineered, die-cast aluminum platter with stable rotation |
| Kiirused | 2 selectable speeds (33 1/3 & 45 RPM) |
| Pigi juhtimine | Adjustable range of +/-10% |
| Toonar | Statically balanced S-shaped tonearm with hydraulic lift and anti-skate |
| Ehitus | Redesigned metal top panel, tactile buttons, reinforced housing construction, optimized damping features, shock-absorbing feet |
| Mõõdud (L x S x K) | 17.72 x 13.86 x 5.67 tolli (umbes 45 x 35.2 x 14.4 cm) |
| Kaal | 16.06 naela (umbes 7.3 kg) |
| Ühenduvus | Analog RCA output, Ground terminal |
| Toiteallikas | Corded Electric, 220 Volts (check local voltage nõuded) |
10. Garantii ja tugi
10.1 Garantii teave
Reloop products are manufactured to the highest quality standards. This product comes with a manufacturer's warranty. Please refer to the warranty card included in your package or visit the official Reloop webTeie piirkonnas kehtivate üksikasjalike garantiitingimustega saate tutvuda veebisaidil.
Hoidke ostutõendit (kviitungit või arvet) alles, kuna seda on vaja garantiinõuete korral.
10.2 Klienditugi
Should you encounter any issues not covered in the troubleshooting section, or require further assistance, please contact Reloop customer support or your authorized dealer. Contact information can typically be found on the official Reloop websaidil või toote pakendil.
For the latest information, FAQs, and support resources, please visit the official Reloop websait: www.reloop.com


