1. Sissejuhatus
Thank you for choosing the Henry HVR 160-11 Bagged Cylinder Vacuum. This manual provides essential information for the safe and efficient operation, maintenance, and troubleshooting of your new vacuum cleaner. Please read these instructions carefully before use and retain them for future reference.

Joonis 1: Esiosa view of the Henry HVR 160-11 Bagged Cylinder Vacuum. This image shows the iconic red and black design with the friendly 'Henry' face, the main suction inlet, and the carrying handle.
2. Ohutusjuhised
Elektriseadmete kasutamisel järgige alati põhilisi ohutusnõudeid, et vähendada tulekahju, elektrilöögi või vigastuste ohtu.
- Veenduge, et toiteallikas voltage matches the rating shown on the vacuum cleaner's label.
- Ärge kasutage tolmuimejat märgadel pindadel ega vedelike kogumiseks.
- Ärge koristage tuleohtlikke või põlevaid materjale, kuuma tuhka ega teravaid esemeid.
- Hoidke juuksed, lahtised riided, sõrmed ja kõik kehaosad avadest ja liikuvatest osadest eemal.
- Ühendage pistik vooluvõrgust lahti, kui seda ei kasutata ja enne hooldust.
- Do not use with a damaged cord or plug. If the cord is damaged, it must be replaced by the manufacturer, its service agent, or similarly qualified persons to avoid a hazard.
- See seade ei ole mõeldud kasutamiseks isikutele (kaasa arvatud lapsed), kellel on füüsilised, sensoorsed või vaimsed võimed või kogemuste ja teadmiste puudumine, välja arvatud juhul, kui nende ohutuse eest vastutav isik on neid jälginud või seadme kasutamist juhendanud.
- Oluline märkus USA kasutajatele: This product is designed for UK electrical standards (230V). Use with a suitable voltage converter and adapter is required for safe and effective operation in regions with 120V power supplies, such as the United States. Failure to do so may result in poor performance, damage to the unit, or electrical hazard.
3. Seadistamine ja kokkupanek
3.1. Mis on karbis
Pakkige kõik komponendid ettevaatlikult lahti ja kontrollige neid alloleva loendi alusel:
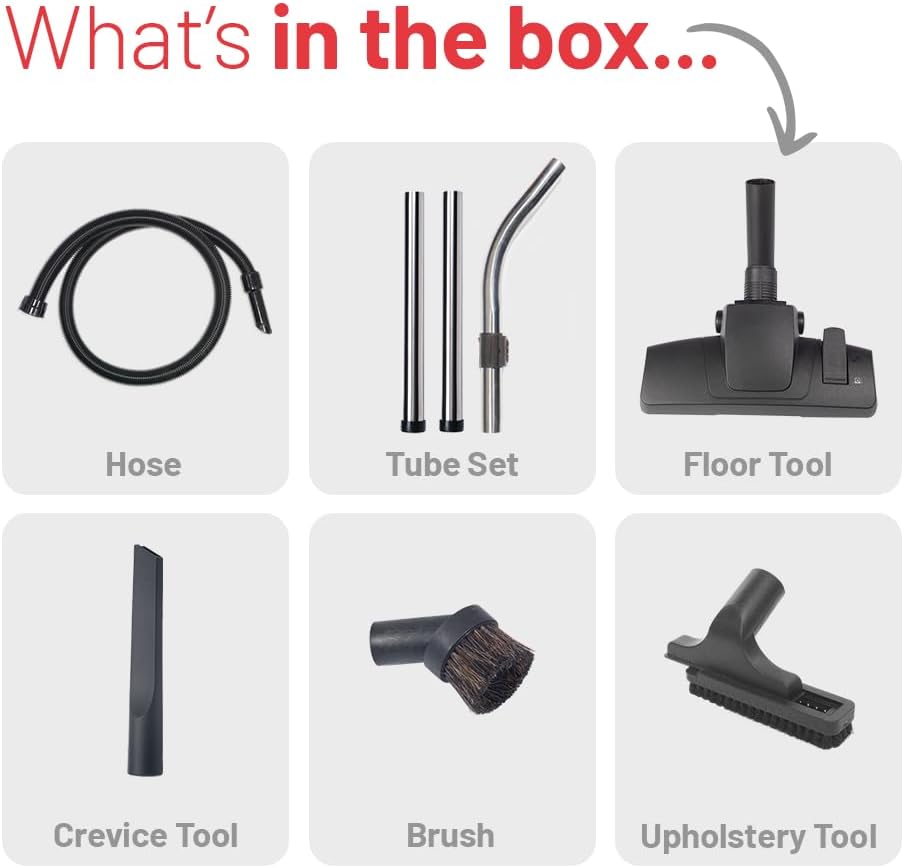
Joonis 2: All components included in the Henry HVR 160-11 packaging. This image displays the hose, tube set, floor tool, crevice tool, brush, and upholstery tool.
- Paindlik voolik
- Tube Set (usually 2 or 3 metal tubes)
- Põranda tööriist
- Lõhe tööriist
- Tolmu eemaldamise pintsel
- Polsterdustööriist
- Filter (eelinstallitud)
- Dust Bag (one pre-installed, usually one spare)
3.2. Kokkupanemisetapid
- Ühendage voolik: Insert the larger end of the flexible hose into the suction inlet on the front of the vacuum cleaner until it clicks securely into place.
- Assemble the Tube Set: Connect the metal tubes together by twisting them firmly. Attach one end of the assembled tube set to the handle end of the flexible hose.
- Põrandaotsiku kinnitamine: Connect the desired floor tool to the open end of the tube set. Ensure it is securely fitted.
- On-board Tool Storage: The vacuum features convenient on-board storage for accessories. Attach the crevice tool, dusting brush, and upholstery tool to the designated clips on the back of the vacuum for easy access.

Joonis 3: Illustration of the on-board tool storage feature. This image shows how the various cleaning tools can be neatly stored on the vacuum cleaner itself.
4. Kasutusjuhised
4.1. Toite sisse / välja lülitamine
Plug the power cord into a suitable electrical outlet. To turn the vacuum cleaner on, press the red power switch located on the top of the unit. Press it again to turn the unit off.
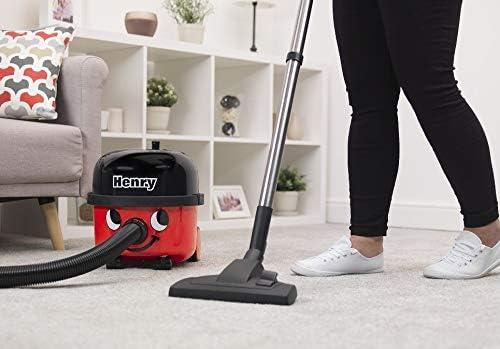
4.2. Using the Floor Tool
The main floor tool is designed for both carpets and hard floors. It features a brush bar that can be engaged or disengaged depending on the surface.
- Sest vaibad, ensure the brush bar is engaged (bristles extended) to agitate and lift dirt from the fibers.
- Sest kõvad põrandad, disengage the brush bar (bristles retracted) to prevent scratching and to allow for optimal suction on smooth surfaces.

Joonis 4: The floor tool demonstrating the switch mechanism for different floor types. The top panel shows the tool configured for carpet, and the bottom panel shows it configured for hard floors.
4.3. Tarvikute kasutamine
The Henry HVR 160-11 comes with several accessories for versatile cleaning:
- Prao tööriist: Ideaalne kitsastesse pragudesse, nurkadesse ja servadele ulatumiseks.
- Tolmuhari: Soft bristles for delicate surfaces, shelves, and intricate items.
- Polsterdustööriist: Designed for cleaning fabric surfaces like sofas, chairs, and curtains.
Joonis 5: A collage showing the various tools in action. This image illustrates the dusting brush cleaning skirting boards, the upholstery tool cleaning a mattress, the crevice tool reaching between sofa cushions, and the main floor tool on carpet.
5. Hooldus
Regular maintenance ensures optimal performance and extends the life of your Henry vacuum cleaner.
5.1. Tolmukoti vahetamine
The Henry HVR 160-11 uses high-efficiency dust bags. Replace the bag when the suction power noticeably decreases or when the 'full' indicator (if present) suggests it's time.
- Ühendage tolmuimeja vooluvõrgust lahti.
- Unclip and remove the top head unit of the vacuum.
- Carefully lift out the full dust bag. The Henry bags feature an innovative self-seal tab to lock dust inside, ensuring a dust-free emptying process.
- Dispose of the full bag responsibly.
- Insert a new Henry dust bag, ensuring the cardboard collar is correctly seated in the bag holder.
- Replace the top head unit and secure the clips.

Joonis 6: A hand demonstrating the self-seal feature of the Henry dust bag during emptying. This image highlights the clean and dust-free process of removing a full bag from the vacuum and placing it into a waste bin.
5.2. Filtri puhastamine
The vacuum is equipped with a foam filter. Periodically check the filter for excessive dust build-up. To clean:
- Eemaldage tolmuimeja vooluvõrgust.
- Remove the top head unit and the dust bag.
- Carefully remove the foam filter.
- Gently tap the filter to dislodge loose dust. For a more thorough clean, the foam filter can be rinsed under cold water.
- Ensure the filter is completely dry before reinserting it into the vacuum cleaner. Operating the vacuum with a wet filter can cause damage.
5.3. Cleaning Hoses and Accessories
Inspect the hose and accessories regularly for blockages or damage. Clear any obstructions using a blunt object. Do not use sharp objects that could puncture the hose.
6. Veaotsing
If you encounter issues with your Henry HVR 160-11, refer to the table below for common problems and solutions.
| Probleem | Võimalik põhjus | Lahendus |
|---|---|---|
| Vaakum ei lülitu sisse | Puudub toide; kahjustatud juhe/pistik; vigane lüliti | Check power outlet; Inspect cord/plug for damage (do not use if damaged); Contact support if switch is faulty. |
| Madal või puudub imemine | Full dust bag; Clogged hose/filter/accessories; Incorrectly fitted bag/filter; Motor issue; Incorrect voltage (for US users) | Replace dust bag; Clear blockages; Re-seat bag/filter correctly; Ensure correct voltage converter is used (if applicable); Contact support for motor issues. |
| Ebatavaline müra | Blockage in hose/brush head; Motor issue | Check and clear blockages; Contact support if noise persists. |
| Ülekuumenemine | Blocked airflow (bag/filter/hose); Prolonged use | Check and clear blockages; Allow unit to cool down before resuming use. |
7. Tehnilised andmed
Key technical specifications for the Henry HVR 160-11 Bagged Cylinder Vacuum:
| Funktsioon | Spetsifikatsioon |
|---|---|
| Mudeli nimi | Henry 160 |
| Mudeli number | HVR 160-11 |
| Toiteallikas | Juhtmega elekter |
| Wattage | 620 vatti |
| Mahutavus | 6 liitrit |
| Vooliku pikkus | 2.2 meetrit |
| Filtri tüüp | Vaht |
| Vaakumkogumistehnoloogia | Kotti pandud |
| Müra tase | 72 detsibelli |
| Toote mõõtmed | 13.39 x 13.58 x 12.6 tolli |
| Kauba kaal | 16.54 naela |
| Värv | Punane, Must |
8. Garantii ja tugi
For warranty information and customer support, please refer to the documentation provided with your purchase or visit the official Henry webveebisait. Hoidke ostutõendit alles garantiinõuete esitamiseks.
If you require technical assistance or have questions not covered in this manual, please contact Henry customer service.


