Sissejuhatus
This manual provides comprehensive instructions for the setup, operation, and maintenance of your GPX Digital AM/FM Clock Radio, model C224B. Please read this manual thoroughly before using the device to ensure proper functionality and to maximize your user experience. Keep this manual for future reference.
Toode läbiview
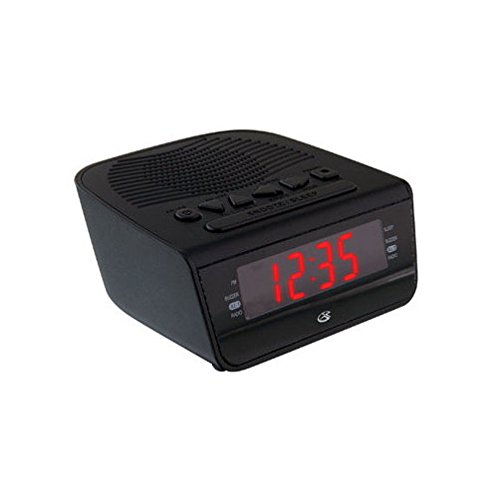
Joonis 1: Esiosa view of the GPX Digital AM/FM Clock Radio. This image shows the compact black unit with its digital display and control buttons.
The GPX Digital AM/FM Clock Radio (C224B) is designed for reliable timekeeping and audio entertainment. Key features include a clear multi-display clock, AM/FM radio tuner, dual alarm functionality, and a battery backup option to ensure continuous operation during power interruptions. Its compact and modern design makes it suitable for various indoor settings.
Seadistamine
1. Lahtipakkimine
Carefully remove the clock radio from its packaging. Ensure all components are present: the clock radio unit and the power adapter.
2. Toiteühendus
- Plug the power adapter into the DC input jack located on the back of the clock radio.
- Plug the other end of the power adapter into a standard wall outlet (AC 120V, 60Hz).
- The display will illuminate, indicating the unit is receiving power.
3. Varupatarei paigaldamine (valikuline)
Varutoite jaoks väljas ollestages, install batteries (not included).
- Leidke seadme põhjas olev patareipesa.
- Avage patareipesa kaas.
- Insert the required batteries (e.g., 2 x AAA, check unit for specific type) according to the polarity markings (+ and -).
- Sulgege akupesa kaas kindlalt.
Märkus. Batteries are for backup only and will not power the display or radio functions continuously. They preserve time and alarm settings during a power interruption.
Kasutusjuhised
1. Kellaaja seadmine
- Vajutage ja hoidke all nuppu AJA MÄÄRAMINE nuppu, kuni ekraan vilgub.
- Kasutage TUND ja MINUT nupud kellaaja reguleerimiseks.
- Vajutage AJA MÄÄRAMINE uuesti kinnitamiseks ja aja seadistamise režiimist väljumiseks.
2. Häirete seadistamine (Äratus 1 ja Äratus 2)
This unit features dual alarms, allowing you to set two independent wake-up times.
- Vajutage ja hoidke all nuppu ALARM 1 SET (või ALARM 2 SET) nuppu, kuni äratuse aeg vilgub.
- Kasutage TUND ja MINUT buttons to adjust the desired alarm time.
- Vajutage ALARM 1 SET (või ALARM 2 SET) again to confirm the time.
- Immediately after confirming the time, use the ALARM REŽIIM button to select the alarm source: SUMMER or RAADIO.
- The alarm icon (e.g., AL1 or AL2) will appear on the display, indicating the alarm is active.
To turn off an alarm, press the corresponding ALARM 1 SISSE/VÄLJA (või ALARM 2 SISSE/VÄLJA) button. The alarm icon will disappear.
3. AM/FM-raadio kasutamine
- Vajutage nuppu RAADIO SISSE/VÄLJA nuppu raadio sisselülitamiseks.
- Vajutage nuppu BÄND nuppu AM- ja FM-sagedusalade vahel vahetamiseks.
- Kasutage TUNE + or HÄÄLESTA - nuppe, et käsitsi soovitud jaamale häälestada.
- To automatically scan for the next available station, press and hold TUNE + or HÄÄLESTA - mõneks sekundiks.
- Reguleerige helitugevust nupu abil HELI + or MAHT - nupud.
- Raadio väljalülitamiseks vajutage nuppu RAADIO SISSE/VÄLJA nuppu uuesti.
4. Edasilükkamise funktsioon
Kui äratussignaal kõlab, vajutage nuppu UINAK nuppu äratuse ajutiseks vaigistamiseks umbes 9 minutiks. Äratus kõlab uuesti pärast edasilükkamisperioodi.
5. Unerežiim
Unefunktsioon võimaldab raadiol enne automaatset väljalülitumist teatud aja jooksul mängida.
- Raadio mängimise ajal vajutage MAGA nuppu korduvalt, et liikuda saadaolevate uneaegade vahel (nt 90, 60, 30, 15 minutit, VÄLJAS).
- Raadio lülitub valitud aja möödudes automaatselt välja.
Hooldus
1. Puhastamine
To clean the unit, wipe the exterior with a soft, slightly damp cloth. Do not use abrasive cleaners or solvents, as these may damage the finish. Ensure the unit is unplugged before cleaning.
2. Aku vahetamine
If the battery backup function is not working, or if the unit loses time during a power outage, the backup batteries may need replacement. Follow the "Battery Backup Installation" steps in the Setup section to replace them.
Veaotsing
| Probleem | Võimalik põhjus | Lahendus |
|---|---|---|
| Seade ei lülitu sisse. | Toiteadapter pole ühendatud või pistikupesa on vigane. | Veenduge, et toiteadapter on kindlalt seadmesse ja töötavasse seinakontakti ühendatud. Proovige teist pistikupesa. |
| Äratus ei helise. | Äratus pole seatud, äratuse helitugevus on liiga vaikne või äratus on välja lülitatud. | Verify alarm time and source (buzzer/radio) are set correctly. Ensure alarm is activated (icon visible). Increase radio volume if alarm source is radio. |
| Halb raadiovastuvõtt. | Nõrk signaal või häired. | Adjust the position of the unit or the antenna (if external). Move away from other electronic devices that may cause interference. |
| Aeg/seaded kaovad pärast voolukatkestusttage. | Varupatareid on tühjad või pole paigaldatud. | Install fresh backup batteries or replace existing ones. |
Tehnilised andmed
- Mudel: C224B
- Toiteallikas: AC 120V, 60Hz (main); Battery Powered (backup)
- Kuva tüüp: LED digitaalne ekraan
- Raadio ansamblid: AM/FM
- Mõõdud (umbes): 5.12" L x 5.12" K
- Kaal (umbes): 3 naela
- Värv: Must
- Materjal: Plastikust
Garantii ja tugi
For warranty information or technical support, please refer to the warranty card included with your product or visit the official GPX website. Do not attempt to repair this unit yourself, as this may void your warranty.
GPX Official Websait: www.gpx.com


