Sissejuhatus
This manual provides detailed instructions for the installation, operation, and maintenance of your Venstar T1900 Residential Slimline Platinum Thermostat. Please read this manual thoroughly before attempting to install or operate the thermostat to ensure proper function and to avoid potential damage.
Oluline ohutusteave
- Always turn off power to the heating/cooling system at the main circuit breaker or fuse box before installing or servicing the thermostat.
- This thermostat operates on 24 Volts AC. Do not connect to line voltage (120V või 240V).
- Paigaldamise peaks tegema kvalifitseeritud tehnik, kui te pole elektrijuhtmestikuga tuttav.
- Do not short circuit the terminals on the gas valve or at the system control to test the thermostat. This will damage the thermostat and void the warranty.
- Ensure all wiring connections are secure and insulated to prevent short circuits.
Pakendi sisu
Veenduge, et teie pakett sisaldab järgmisi esemeid:
- Venstar T1900 Thermostat Unit
- Kinnitusdetailid (kruvid ja seinatüüblid)
- Kasutusjuhend (see dokument)
Toode läbiview
The Venstar T1900 is a 7-day programmable digital thermostat designed for residential use. It offers precise temperature control and energy-saving scheduling capabilities. This thermostat is compatible with heat/cool, heat pump, and dual-fuel systems, controlling up to three heat stages ja kaks lahedat stages.
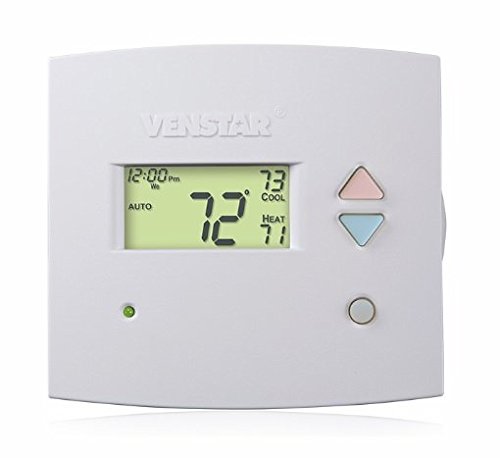
Joonis 1: Esiosa view of the Venstar T1900 Thermostat. This image displays the thermostat's LCD screen and control buttons, indicating its slimline design.
Peamised omadused:
- 7-Day Programmability: Allows for customized heating and cooling schedules for each day of the week.
- Süsteemi ühilduvus: Works with heat/cool, dual-fuel, and heat pump systems.
- Multi-Stage Juhtimine: Manages up to three heat stages ja kaks lahedat stages.
- Kaugjuhtimispuldi võimalus: Controllable by phone using an optional add-on (sold separately).
- Automatic or Manual Operation: Provides flexibility for scheduled or on-demand temperature adjustments.
Paigaldusjuhend
Vajalikud tööriistad:
- Kruvikeeraja (Phillips ja/või lameda otsaga)
- Drill with appropriate drill bit (if installing new wall anchors)
- Wire strippers
- Pliiats
- Tase (valikuline)
1. Lülitage toide välja
Locate the circuit breaker or fuse box that controls your heating and cooling system. Turn off the power completely before proceeding with any wiring.
2. Remove Old Thermostat (if applicable)
- Eemaldage ettevaatlikult vana termostaadi kate.
- Tehke olemasolevatest juhtmestikuühendustest pilt võrdluseks.
- Label each wire with the terminal designation it was connected to (e.g., R, G, Y, W).
- Ühendage juhtmed lahti ja eemaldage vana termostaadi kinnitusplaat seinast.
3. Mount the New Thermostat Base
- Separate the front cover of the T1900 thermostat from its base plate.
- Position the base plate on the wall where you want to install the thermostat. Ensure it is level.
- Märkige pliiatsiga kinnitusavad.
- Vajadusel puurige juhtaugud ja sisestage seinaankrud.
- Kinnitage termostaadi alusplaat kaasasolevate kruvide abil seina külge.
4. Juhtmestik
Connect the wires from your HVAC system to the corresponding terminals on the T1900 thermostat base. Refer to the wiring diagram provided with your specific HVAC system for precise connections. Ensure wires are stripped approximately 3/8 inch and securely fastened under the terminal screws.
Common Terminal Designations:
- R/Rc/Rh: 24V Power (Heating/Cooling)
- C: Common (24V return)
- G: Fänn
- A/A1: Kompressor S.tage 1 (jahutus)
- Y2: Kompressor S.tage 2 (jahutus)
- W/W1: Kuum Stage 1 (Küte)
- W2: Kuum Stage 2 (Küte)
- O / B: Reversing Valve (Heat Pumps)
Note: The T1900 supports various system types. Consult the detailed wiring diagrams in the full installation manual for specific configurations (e.g., heat pump with auxiliary heat, conventional multi-stage systems).
5. Termostaadi kinnitamine alusele
Once wiring is complete and verified, carefully align the thermostat front cover with the mounted base plate and snap it into place.
6. Taastage toide
Return to your circuit breaker or fuse box and restore power to your heating and cooling system.
Algseadistus
Upon initial power-up, the thermostat may prompt you to configure basic settings. Follow the on-screen instructions to set the current date, time, and system type (e.g., Conventional, Heat Pump).
System Type Configuration:
It is crucial to correctly configure the thermostat for your specific HVAC system. Incorrect settings can lead to improper operation or damage. Access the installer settings menu (refer to the full installation guide for specific button sequences) to select:
- Süsteemi tüüp: Heat/Cool, Heat Pump, Dual Fuel
- Kuumuse S arvtages
- Lahedate S-de arvtages
- Reversing Valve Operation: O (Cooling) or B (Heating)
Kasutusjuhised
Ekraani mõistmine:
The LCD screen displays the current temperature, set temperature, system mode, fan mode, time, and programming status. Refer to the icons and indicators on the screen for current operational status.
Setting System Mode:
Vajutage nuppu REŽIIM nuppu, et vahetada saadaolevaid süsteemirežiime:
- KUUMUS: The system will operate to maintain the heating setpoint.
- LAHE: The system will operate to maintain the cooling setpoint.
- AUTOMAATNE: The thermostat automatically switches between heating and cooling as needed to maintain the set temperature range.
- VÄLJAS: Kütte- ja jahutussüsteem on välja lülitatud.
Setting Fan Mode:
Vajutage nuppu FAN nupp ventilaatori režiimide vahel vahetamiseks:
- AUTOMAATNE: Ventilaator töötab ainult siis, kui kütte- või jahutussüsteem on aktiivselt töökorras.
- PEAL: Ventilaator töötab pidevalt, olenemata kütte- või jahutusvajadusest.
Temperatuuri reguleerimine:
Kasutage UP ja ALLA arrow buttons to adjust the desired temperature setpoint. In programmable modes, this will temporarily override the schedule until the next scheduled change.
Programmi ajakava (7 päeva):
The T1900 allows for 7-day programming, enabling different schedules for each day of the week. This feature helps save energy by adjusting temperatures when you are away or asleep.
- Vajutage nuppu PROGRAMM nuppu programmeerimisrežiimi sisenemiseks.
- Kasutage PÄEV button to select the day or group of days you wish to program (e.g., Mon-Fri, Sat-Sun, or individual days).
- Kasutage AEG button to cycle through the four available periods: Wake, Leave, Return, Sleep.
- Kasutage UP ja ALLA arrow buttons to set the desired temperature for each period.
- Kasutage HOIDA button to exit programming mode or save changes.
Refer to the detailed programming section in the full user guide for advanced options and specific button sequences.
Remote Control (Optional Add-on):
The Venstar T1900 thermostat can be controlled remotely via a phone using an optional add-on module (sold separately). This module connects to the thermostat and allows for remote access and control through a dedicated application. Installation and setup instructions for the remote control module are provided with the module itself.
Hooldus
Termostaadi puhastamine:
Termostaadi välimuse ja toimivuse säilitamiseks pühkige selle välispinda regulaarselt pehme lapiga.amp lapiga. Ärge kasutage abrasiivseid puhastusvahendeid, lahusteid ega keemilisi pihusteid, kuna need võivad kahjustada plastikut ja elektroonilisi komponente.
Patarei vahetus:
The Venstar T1900 thermostat does not require batteries for operation as it is powered by the 24V AC system.
Veaotsing
If you experience issues with your Venstar T1900 thermostat, consult the following common problems and solutions:
| Probleem | Võimalik põhjus | Lahendus |
|---|---|---|
| Termostaadi ekraan on tühi | Termostaadil puudub toide. | Kontrollige oma HVAC-süsteemi kaitselülitit. Veenduge, et kõik juhtmestikuühendused oleksid kindlad. |
| Heating/Cooling system does not respond | Valitud vale süsteemirežiim; juhtmestiku probleem; süsteemi lukustus. | Verify the system mode (HEAT/COOL/AUTO). Check wiring connections. Wait 5 minutes for system lockout to reset. |
| Temperatuuri näit tundub ebatäpne | Termostaadi asukoht; anduri takistamine. | Ensure the thermostat is not exposed to direct sunlight, drafts, or heat sources. Clean any dust from the thermostat vents. |
| Programming schedule is not working | Program not saved; temporary override active; incorrect time/day setting. | Ensure programs are saved. Check if a temporary override is active and cancel it. Verify current time and day settings. |
| Ventilaator töötab pidevalt automaatrežiimis | Fan mode set to ON; wiring issue. | Press the FAN button to ensure it is set to AUTO. Check fan wiring. |
If these solutions do not resolve the issue, please contact customer support or a qualified HVAC technician.
Tehnilised andmed
| Funktsioon | Spetsifikatsioon |
|---|---|
| Kaubamärk | Venstar |
| Mudeli nimi | Venstar T1900 |
| Kontrolleri tüüp | Vajutusnupp |
| Erifunktsioon | Programmeeritav |
| Värv | Valge |
| Toote spetsiifilised kasutusalad | Heat Pump, Heater |
| Temperatuuri reguleerimise tüüp | Programmable, Smart/Remote (with add-on) |
| Voltage | 24 Volts AC |
| Kuva tüüp | LCD või LED |
| Kontrollimeetod | Remote (with add-on) |
| Taustvalgus | Jah |
| Toote mõõtmed | 5.3 x 2 x 2 tolli |
| Kauba kaal | 0.01 untsi |
| Patareid on vaja? | Ei |
Garantii teave
Venstar products are manufactured to high-quality standards. This product is covered by a limited warranty against defects in materials and workmanship. The specific terms and duration of the warranty may vary. Please refer to the warranty card included with your product or visit the official Venstar webüksikasjaliku garantiiteabe ja registreerimisprotseduuride saamiseks külastage veebisaiti.
Klienditugi
For technical assistance, troubleshooting, or warranty inquiries, please contact Venstar customer support. You can typically find contact information, including phone numbers and email addresses, on the official Venstar websait (www.venstar.com) or on the product packaging.
When contacting support, please have your thermostat model number (T1900) and any relevant purchase information ready.


