1. Sissejuhatus
This manual provides detailed instructions for the installation, operation, and maintenance of your Reolink RLC-410WS 4MP Super HD Dual-Band Wi-Fi Wireless Security IP Camera. Please read this manual thoroughly before using the product to ensure correct usage and optimal performance.
2. Toote lõppview
2.1 Kaamera komponendid
Familiarize yourself with the main components of your RLC-410WS camera:

2.1. pilt: Reolink RLC-410WS Camera Component Diagram. This image illustrates the various parts of the camera including the antenna, lens, IR LEDs, daylight sensor, and connection ports for power, network, and the reset button.
- Antenn: WiFi-ühenduse jaoks.
- Metal Aluminum Case: Durable housing for outdoor use.
- High Definition F=4.0mm Lens: Captures 4MP Super HD video.
- 36 PCS IR LEDs: Provides infrared illumination for night vision up to 100ft.
- Päevavalguse andur: Detects ambient light to switch between day and night modes.
- Lähtestamisnupp: Kasutatakse tehaseseadete taastamiseks.
- Toiteport: 12 V alalisvooluadapteri ühendamiseks.
- Network Cable Port: For initial setup and optional wired Ethernet connection.
2.2 Põhifunktsioonid
- 4MP Super HD Video: Records clear video at 1440p resolution, supporting 1080p and 720p.
- 100ft Night Vision: Equipped with IR LEDs for clear surveillance in low-light conditions.
- Kahe ribaga WiFi: Supports 2.4GHz and 5GHz Wi-Fi for flexible and stable wireless connection.
- Liikumistuvastuse hoiatused: Sends real-time email alerts with photos or 30-second video clips, and push notifications to mobile phones.
- Kohalik salvestusruum: Built-in 16GB Micro SD card for recording and storing up to 400 motion-activated events.
- Kaugjuurdepääs: Monitor your home from anywhere using the Reolink Client software (PC/Mac) or Reolink App (iPhone/Android).
- 80 kraadi Viewnurk: Pakub laia valikut view.
- IP67 ilmastikukindel: Mõeldud kasutamiseks õues erinevates ilmastikutingimustes.
3. Mis on karbis
Veenduge, et pakis on kõik esemed olemas:

3.1. pilt: Package Contents. This image displays the camera, antenna, power adapter, extension cable, network cable, software CD, quick start guide, surveillance sign, mounting template, and screws.
- Reolink RLC-410WS Camera
- Toiteadapter
- Toite pikenduskaabel
- Network Cable (1 meter)
- Antenn
- Kiirjuhend
- Aukude malli paigaldamine
- Kruvid ja seinapistikud
- Jälgimärk
- CD (Manual/Software)
4. Seadistamine ja installimine
4.1 Esialgne konfiguratsioon
- Connect Power and Ethernet: Connect the camera to the power adapter and then to your router using the provided Ethernet cable.
- Download Reolink App/Client: Download the Reolink App from the App Store or Google Play, or the Reolink Client software from the official Reolink websait PC/Maci jaoks.
- Lisa kaamera: Open the app/client, click the "+" icon to add the camera. The app/client should automatically detect the camera on your local network.
- Määra parool: Looge oma kaamerale tugev parool.
- WiFi seadistamine: Once connected via Ethernet, navigate to the camera settings in the app/client to configure Wi-Fi. Select your 2.4GHz or 5GHz network and enter the password. Ensure a strong Wi-Fi signal at the installation location. Note: Wi-Fi settings can typically only be changed while the camera is connected via Ethernet.
- Testi ühendus: After configuring Wi-Fi, test the connection. Once successful, you can disconnect the Ethernet cable.
4.2 Kaamera paigaldamine
Consider the following when mounting your camera:
- Asukoht: Valige asukoht, mis pakub soovitud viewvaatenurga all ja on teie Wi-Fi-võrgu levialas.
- Power Cable Routing: The power cable requires a hole of approximately 3/4 inch (19mm) to pass through a wall due to the Ethernet socket and reset switch on the breakout cable. Plan your cable routing carefully.
- Klambri reguleerimine: The mounting bracket allows for three-dimensional adjustment. Loosen the small Allen screws to adjust the camera angle, then tighten them securely.
- Veekaitse: For outdoor installations, ensure the breakout cable connections (power, network, reset button) are protected from water. Consider using a waterproof junction box.

4.1. pilt: Camera Dimensions. This image provides the physical measurements of the RLC-410WS camera, useful for planning installation.
5. Kaamera kasutamine
5.1 Accessing the Camera
You can access your Reolink RLC-410WS camera using various platforms:

5.1. pilt: Reolink Software Platform. This image illustrates how the Reolink camera can be accessed and managed from various devices, including Mac, Windows, iPhone, and Android.
- Reolink App: Available for iOS (iPhone/iPad) and Android devices. Provides live view, taasesitus ja sätete haldamine.
- Reolink Client: Desktop software for Windows and macOS. Offers comprehensive control, multi-camera viewing, and recording options.
- Web Brauser: Access the camera directly via its IP address using a web browser (features may be limited compared to the app/client).
5.2 Liikumistuvastus ja salvestamine
The RLC-410WS camera features customizable motion detection:
- Tundlikkuse reguleerimine: Valehäirete minimeerimiseks reguleerige liikumistuvastuse tundlikkust.
- Tuvastamistsoonid: Määrake kaamera piires kindlad alad view to monitor for motion, ignoring irrelevant areas.
- Privaatsusmask: Mask out sensitive areas from being recorded or viewtoim.
- Märguanded: Receive instant push notifications on your phone, email alerts with snapshots or video clips, and upload recordings to an FTP server.
- Kohalik salvestusruum: Motion-activated events are recorded to the built-in 16GB Micro SD card for later playback.
5.3 Videokvaliteet ja öine nägemine
The camera provides high-quality video day and night:
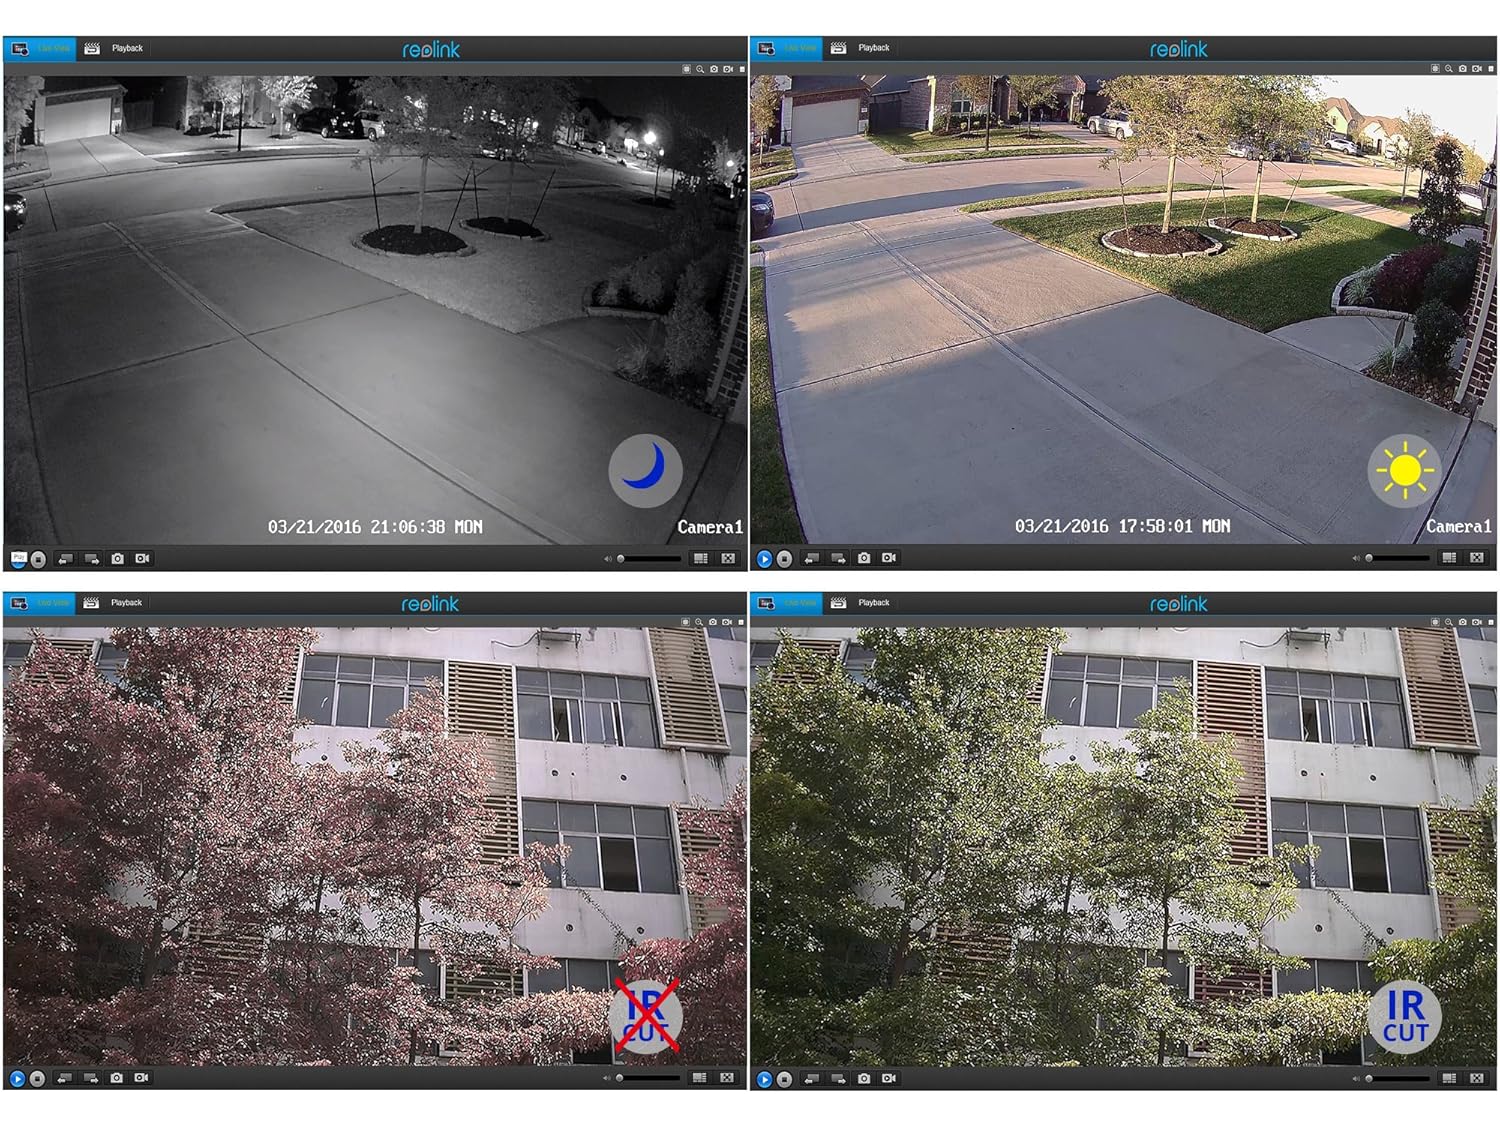
5.2. pilt: Day and Night Vision Comparison. This image demonstrates the camera's ability to capture clear video in both daylight and low-light conditions using its infrared capabilities.
- 4MP Super HD: Delivers crisp and clear video footage.
- Infrapunase öö visioon: Automatically switches to night mode in low light, providing clear black and white video up to 100 feet.
- IR lõigatud filter: Ensures accurate color reproduction during the day and enhanced infrared sensitivity at night.
6. Tehnilised andmed
Detailed technical specifications for the Reolink RLC-410WS camera:
| Funktsioon | Spetsifikatsioon |
|---|---|
| Mudel | RLC-410WS |
| Tõhus video eraldusvõime | 4 MP (1440p) |
| Viewing | 80 kraadi |
| Öise nägemise ulatus | 100 jalga |
| Kaadrisagedus | 25 kaadrit sekundis |
| Traadita side | Wi-Fi (2.4/5Ghz Dual Band) |
| Säilitamine | Sisseehitatud 16 GB micro SD-kaart |
| Toiteallikas | 12 volti alalisvoolu |
| Rahvusvaheline kaitse hinnang | IP67 |
| Mõõdud (P x L x K) | 18.8 x 6.6 x 6.6 sentimeetrit |
| Kauba kaal | 454 g (1 nael) |
| Kontrollimeetod | Rakendus |
| Paigaldustüüp | Seinakinnitus |

6.1. pilt: Reolink Model Feature Comparison. This table highlights the features available across various Reolink camera models, including PoE, Wi-Fi, Micro SD storage, optical zoom, and pan/tilt capabilities.
7. Veaotsing
This section addresses common issues you might encounter with your RLC-410WS camera.
7.1 WiFi-ühenduse probleemid
- WiFi-ühendust pole:
- Ensure the camera is initially configured via Ethernet before setting up Wi-Fi.
- Veenduge, et teie WiFi-parool on õige.
- Perform a firmware update. Outdated firmware can cause connectivity problems.
- Ensure the camera is within range of your Wi-Fi router and has a strong signal. Signal strength can drop quickly with distance.
- If changing Wi-Fi settings, ensure the camera is connected via Ethernet, run a connection test, and save changes.
- Frequent Disconnects:
- Check Wi-Fi signal strength at the camera's location. Consider using a Wi-Fi extender if the signal is weak.
- Ensure your router's 2.4GHz and 5GHz channels are not overly congested.
- Värskenda kaamera püsivara uusimale versioonile.
7.2 Camera Not Responding After Settings Change/Firmware Update
- If the camera becomes unresponsive after a settings change or firmware update, try power cycling the camera (unplug and re-plug the power adapter).
- If power cycling does not work, reconnect the camera via Ethernet. This often restores connectivity and allows further troubleshooting or re-configuration.
- If the issue persists, perform a factory reset using the reset button on the breakout cable. Märkus. See kustutab kõik sätted.
7.3 False Motion Detection Alerts
- Adjust the motion detection sensitivity in the camera settings.
- Define specific motion detection zones to exclude areas with frequent irrelevant movement (e.g., trees swaying, busy roads).
- In night vision mode, insects flying close to the IR illuminators can trigger alerts. Consider adjusting sensitivity or, if possible, using an external IR illuminator placed away from the camera.
8. Hooldus
- Puhastamine: Puhastage kaamera objektiivi ja korpust regulaarselt pehme lapigaamp lapiga selge pildikvaliteedi tagamiseks. Vältige abrasiivseid puhastusvahendeid.
- Püsivara värskendused: Periodically check the official Reolink webpüsivara värskenduste sait. Kaamera püsivara ajakohasena hoidmine tagab optimaalse jõudluse, turvalisuse ja juurdepääsu uutele funktsioonidele.
- Kaabli kontroll: Periodically inspect all cables and connections for wear or damage, especially in outdoor installations. Ensure waterproof seals are intact.
- SD-kaardi haldus: While the camera manages the 16GB SD card, it's good practice to occasionally check its status via the app/client.
9. Garantii ja tugi
For warranty information, please refer to the warranty card included in your product package or visit the official Reolink website. Reolink provides dedicated customer support.
- Tehniline tugi: For technical assistance, troubleshooting, or any product-related queries, please contact Reolink support via their official website. Email support is typically provided with responses within 24 hours.
- Firmware Downloads: Latest firmware versions and software clients can be downloaded from the Reolink support page.