1. Sissejuhatus
The AAXA P300 Pico Projector is a compact, high-definition projector designed for portability and versatility. It features a native 1280x800 HD resolution, 500 LED lumens, and a rechargeable battery, making it suitable for various applications including business presentations, home entertainment, and travel. This manual provides essential information for the proper setup, operation, and maintenance of your P300 projector.
2. Pakendi sisu
Palun veenduge, et kõik allpool loetletud esemed on teie pakendis olemas:
- AAXA P300 Pico Projector
- Toiteadapter
- Kaugjuhtimispult
- Mini statiiv
- Kasutusjuhend
3. Toote lõppview
Familiarize yourself with the physical components and ports of your P300 projector.

Joonis 3.1: Ees ja peal view of the AAXA P300 Pico Projector, illustrating its compact size and dimensions (5.9 x 3.8 x 1.5 inches).
3.1 Taga- ja külgpaneelid
The projector features various input and output ports for connectivity.

Joonis 3.2: Tagumine külg view of the projector, showing the USB port for media playback and the Mini VGA port for computer connections.
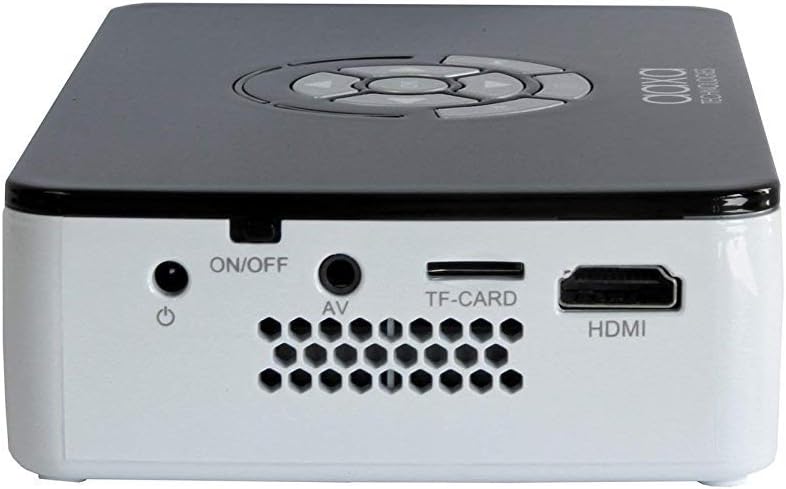
Joonis 3.3: Right side panel, featuring the HDMI input, AV (composite) input, TF-CARD slot, and the power ON/OFF button.

Joonis 3.4: Left side panel, highlighting the focus adjustment wheel for image clarity.
4. Seadistamine
4.1 Sisse-/väljalülitamine
- Ühendage toiteadapter projektori alalisvoolu sisendiga ja seejärel pistikupessa.
- Vajutage ja hoidke all nuppu SISSE/VÄLJA button located on the side panel until the projector powers on.
- Väljalülitamiseks hoidke all klahvi SISSE/VÄLJA button again until the projector shuts down.
4.2 Seadmete ühendamine
The P300 supports multiple input sources:
- HDMI: Connect an HDMI cable from your device (laptop, gaming console, streaming stick) to the projector's HDMI port.
- Mini VGA: Use a Mini VGA to VGA cable (sold separately) to connect to a computer's VGA output.
- Composite A/V: Use a 3.5mm to RCA composite A/V cable (sold separately) to connect to devices with RCA outputs.
- USB: Meediumi otseesituseks sisestage USB-mälupulk USB-porti.
- TF-CARD: Insert a MicroSD card into the TF-CARD slot for direct media playback.
4.3 Fookuse reguleerimine
To achieve a clear image, adjust the focus wheel on the side of the projector until the projected image is sharp.
4.4 Positioning and Projection Size
Place the projector on a stable, flat surface. The included mini tripod can be used for angle adjustments. The P300 can project an image up to 120 inches diagonally in low-light conditions.

Joonis 4.1: The AAXA P300 projector mounted on its mini tripod, demonstrating flexible positioning options.
5. Kasutusjuhised
5.1 Menüüs navigeerimine
Use the directional buttons on the projector or the remote control to navigate through the on-screen menu. Press the OK/Sisesta nuppu valikute valimiseks.
5.2 Meedia taasesitus
When a USB drive or TF-CARD is inserted, the projector's onboard media player can be accessed through the main menu. Select the desired file type (video, photo, music, text) and navigate to your content for playback.
5.3 Aku kasutamine
The P300 features a built-in rechargeable lithium-ion battery providing approximately 60 minutes of operation. The battery charges automatically when the projector is connected to the power adapter. For optimal battery life, fully charge the projector before first use and avoid completely draining the battery frequently.
6. Hooldus
6.1 Puhastamine
- Objektiiv: Use a soft, lint-free cloth or lens cleaning wipes specifically designed for optical surfaces. Avoid abrasive materials.
- Casing: Pühkige projektori välispind pehme ja kuiva lapiga. Ärge kasutage vedelaid puhastusvahendeid ega lahusteid.
- Vents: Ensure the ventilation openings are clear of dust and debris to prevent overheating. Use compressed air if necessary.
6.2 Aku hooldus
- Kui projektorit ei kasutata, hoidke seda jahedas ja kuivas kohas.
- If storing for extended periods, charge the battery to approximately 50% every few months to maintain battery health.
7. Veaotsing
-
Pilti/signaali pole:
Ensure the correct input source is selected in the projector's menu. Verify all cables are securely connected. Test with a different source device or cable if possible. -
Hägune pilt:
Adjust the focus wheel on the side of the projector. Ensure the projection surface is flat and the projector is at an appropriate distance. -
Heli puudub:
Check the volume settings on both the projector and the source device. Ensure external speakers are connected correctly if used. The internal speaker may have limited output. -
Projektori ülekuumenemine:
Ensure ventilation vents are not blocked. Operate the projector in a well-ventilated area. -
Akut ei laeta:
Veenduge, et toiteadapter on õigesti ühendatud ja pistikupesa töötab.
8. Tehnilised andmed
| Funktsioon | Spetsifikatsioon |
|---|---|
| Ekraani eraldusvõime | 1280 x 800 (natiivne) |
| Heledus | 500 LED luumenit |
| Ühenduvustehnoloogia | HDMI, Mini VGA, Composite A/V (3.5mm Jack), 5 Pin Mini USB 2.0 |
| Toote mõõtmed | 5.9 x 3.8 x 1.5 tolli |
| Kauba kaal | 15.5 untsi |
| Patareid | 2 Lithium Ion batteries (included, internal) |
| Tootja | AAXA |
| Mudeli number | KP-600-01 |
9. Garantii ja tugi
For warranty information, technical support, or service inquiries, please refer to the official AAXA Technologies webveebisaidilt või võtke otse ühendust klienditoega. Hoidke ostutšekk ostutõendina garantiinõuete korral.
AAXA Technologies Contact Information:
Palun külastage www.aaxatech.com for the most current support resources and contact details.


