Sissejuhatus
Welcome to the Greenlee DM-810A True RMS Digital Multimeter user manual. This document provides essential information for the safe and effective operation, maintenance, and troubleshooting of your device. The DM-810A is designed for accurate measurement of AC/DC voltage, AC/DC current, resistance, capacitance, frequency, and continuity, making it a versatile tool for electrical professionals.
Ohutusteave
Mõõturi ohutu töö ja hoolduse tagamiseks järgige neid juhiseid. Nende hoiatuste eiramine võib põhjustada raskeid vigastusi või surma.
- Always read and understand the entire instruction manual before using the meter.
- Ärge ületage ühegi funktsiooni maksimaalset sisendvõimsuse piirangut.
- Olge voldiga töötades ettevaatliktagüle 30 V vahelduvpinge RMS, 42 V tipp või 60 V alalispinge. Need pingedtagsee kujutab endast šokiohtu.
- Always use the proper terminals, function, and range for your measurements. The DM-810A features a Beep-Jack audible and visible warning to guard against improper A and mA terminal plug-in.
- Enne iga kasutuskorda kontrollige testjuhtmeid kahjustatud isolatsiooni või paljastunud metalli suhtes. Kui need on kahjustatud, vahetage need välja.
- Ärge kasutage mõõturit, kui see tundub kahjustatud või kui korpus on avatud.
- Enne kasutamist veenduge, et aku kate on kindlalt suletud.
- Adhere to local and national safety codes. Use personal protective equipment (PPE) such as approved safety glasses and electrically insulated gloves when necessary.
Toode läbiview
This section identifies the key parts and controls of your Greenlee DM-810A multimeter.

Joonis 1: Esiosa view of the Greenlee DM-810A Digital Multimeter, showing the display, function selector dial, and input jacks.
- Kuva: Large LCD for clear readings, often with dual display capability.
- Funktsioonivaliku nupp: Used to select the desired measurement function (e.g., V~, V-, A~, A-, Ω, CAP, Hz, Continuity).
- Sisend tungrauad:
- KOM: Kõigi mõõtmiste ühine (negatiivne) sisend.
- VΩHz: Positiivne sisend mahu jaokstage, takistuse, sageduse ja mahtuvuse mõõtmised.
- mAμA: Positiivne sisend millimeetri jaoksampere ja mikroamppraegused mõõtmised.
- A: Positive input for amppraegused mõõtmised.
- Nupud:
- VALI: Toggles between functions on a single dial position (e.g., AC/DC voltage, diood/pidevus).
- VALIK: Manually selects measurement range or returns to auto-ranging.
- △: Delta function for relative measurements.
- HOIA: Külmutab praeguse näidu.
Seadistamine
Aku paigaldamine
The Greenlee DM-810A requires batteries for operation. Refer to the back of the meter for the battery compartment. Use a screwdriver to open the compartment, insert the specified batteries (typically AA or 9V, check the compartment label), observing correct polarity, and then securely close the cover.
Testjuhtmete ühendamine
Always ensure test leads are properly connected before taking measurements.
- Sisestage must testjuhe pessa KOM (tavaline) sisendpesa.
- Insert the red test lead into the appropriate positive input jack based on the measurement you intend to make:
- Vol. Jaokstage, resistance, capacitance, or frequency, use the VΩHz tungraua.
- Milli kohtaampere or microampere current, use the mAμA tungraua.
- Sest ampere current, use the A tungraua.
- The meter's Beep-Jack feature will provide an audible and visible alert if the function selector is set to a current measurement (A or mA) but the test lead is incorrectly plugged into a voltage/resistance jack, or vice-versa. This helps prevent damage to the meter and ensures correct setup.
Kasutusjuhised
This section details how to perform various measurements with your DM-810A multimeter.
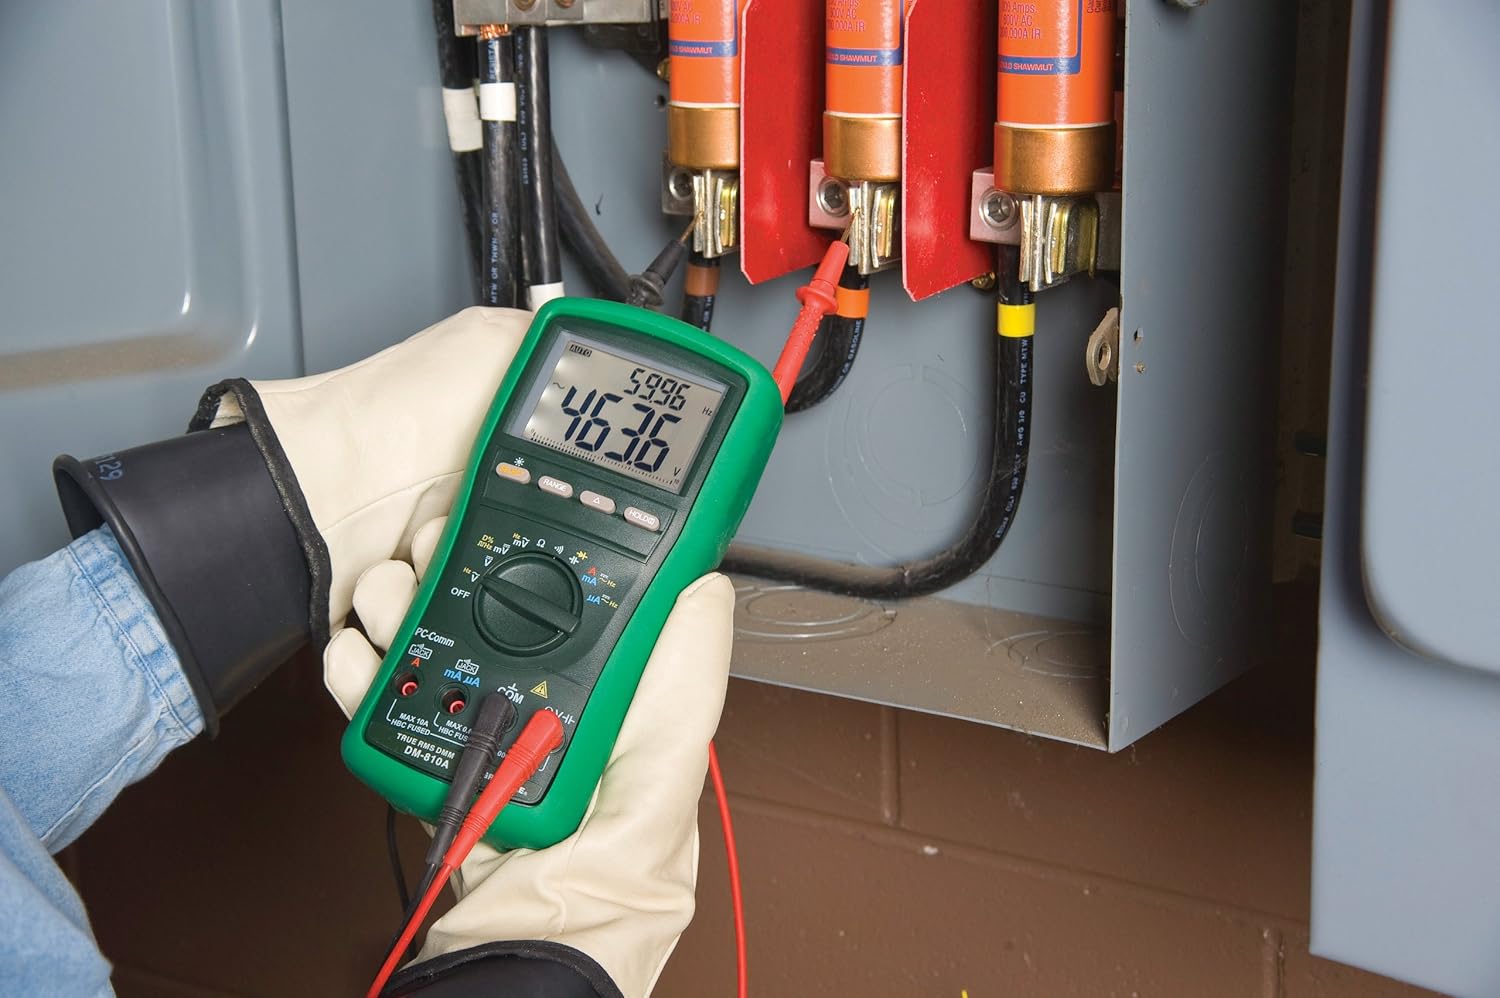
Joonis 2: The Greenlee DM-810A Digital Multimeter being used to take measurements within an electrical panel, demonstrating practical application.
Mõõtmine AC/DC Voltage
- Set the function selector to V~ (AC Voltage) või V- (alalisvoolu mahttage). Use the SELECT button to toggle if both are on one position.
- Ühendage must proovikaabel KOM ja punane testjuhe VΩHz.
- Ühendage testsondid paralleelselt mõõdetava vooluringi või komponendiga.
- Lugege kdtage väärtus ekraanil.
AC/DC voolu mõõtmine
Tähtis: Current measurements require the meter to be connected in series with the circuit. Ensure the circuit is de-energized before connecting the meter.
- Lülitage vooluring välja.
- Set the function selector to A~ (AC Current) or A- (DC Current), or mA~ / mA-.
- Ühendage must proovikaabel KOM. Connect the red test lead to mAμA for small currents or A for larger currents (up to 10A). The Beep-Jack warning will activate if leads are in the wrong jacks for the selected function.
- Open the circuit where the current is to be measured and connect the meter in series.
- Lülitage vooluring uuesti sisse ja lugege voolutugevuse väärtus.
- De-energize the circuit before disconnecting the meter.
Measuring Resistance (Ω)
- De-energize the circuit or component.
- Set the function selector to Ω.
- Ühendage must proovikaabel KOM ja punane testjuhe VΩHz.
- Ühendage testsondid komponendiga.
- Loe takistuse väärtust.
Measuring Capacitance (CAP)
- Enne mõõtmist veenduge, et kondensaator on täielikult tühjenenud.
- Set the function selector to CAP.
- Ühendage must proovikaabel KOM ja punane testjuhe VΩHz.
- Ühendage testsondid kondensaatori klemmidega.
- Loe mahtuvuse väärtus.
Measuring Frequency (Hz)
- Set the function selector to Hz.
- Ühendage must proovikaabel KOM ja punane testjuhe VΩHz.
- Ühendage testsondid signaaliallikaga.
- Loe sageduse väärtust.
Järjepidevuse test
- De-energize the circuit or component.
- Set the function selector to the continuity symbol (often shared with diode test, use SELECT to toggle).
- Ühendage must proovikaabel KOM ja punane testjuhe VΩHz.
- Ühendage testsondid vooluringi tee või komponendi külge.
- An audible beep indicates continuity (low resistance). The display will show the resistance value.
Hooldus
Puhastamine
Pühkige arvesti reklaamigaamp lapiga ja õrna pesuvahendiga. Ärge kasutage abrasiivseid aineid ega lahusteid. Enne kasutamist veenduge, et mõõteseade on täiesti kuiv.
Patarei vahetus
When the battery indicator appears on the display, replace the batteries immediately to ensure accurate readings. Follow the battery installation steps outlined in the Setup section.
Kaitsme vahetus
If the current measurement functions cease to work, the internal fuses may need replacement. Refer to the meter's internal diagram (usually accessible by opening the battery compartment or back casing) for fuse specifications and replacement instructions. Always replace fuses with those of the specified type and rating to maintain safety and performance.
Veaotsing
This section provides solutions for common issues encountered during the operation of your DM-810A multimeter.
| Probleem | Võimalik põhjus | Lahendus |
|---|---|---|
| Ekraan puudub või on hämar | Tühjad või tühjad patareid | Vahetage patareid välja. |
| Valed näidud | Incorrect function/range selected; Damaged test leads; External interference | Verify function and range; Inspect and replace test leads; Move away from strong electromagnetic fields. |
| Voolu mõõtmine ei tööta | Blown fuse; Incorrect lead connection | Check and replace fuses; Ensure leads are in the correct A or mA jacks. |
| Beep-Jack warning active | Test leads connected to incorrect input jacks for the selected function | Adjust test lead connections to match the selected function on the dial. |
| Continuity test not beeping | Open circuit; High resistance | Ensure the circuit is closed; Check for breaks in the circuit or component. |
Tehnilised andmed
The following table outlines the key technical specifications for the Greenlee DM-810A Digital Multimeter.
| Funktsioon | Väärtus |
|---|---|
| Kaubamärk | Greenlee |
| Mudel | DM-810A |
| Mõõtmise tüüp | Tõeline RMS digitaalne multimeeter |
| Toiteallikas | Akutoitel |
| Stiil | Digitaalne |
| Kauba kaal | 16 untsi (1 nael) |
| Toote mõõtmed (P x L x K) | 10 x 10 x 12 tolli |
| Sertifikaadid | CE, CSA, UL |
| UPC | 783310087434 |
Garantii ja tugi
Garantii teave
The Greenlee DM-810A Digital Multimeter comes with a 1-aastane tootjagarantiiSee garantii katab materjali- ja tootmisdefektid normaalse kasutamise korral. Palun hoidke oma ostutõend garantiinõuete esitamiseks alles.
Klienditugi
For technical assistance, warranty service, or to inquire about replacement parts, please contact Greenlee customer support. Refer to the official Greenlee webUusima kontaktteabe saamiseks külastage veebisaiti või toote pakendit.


