1. Sissejuhatus
Thank you for choosing the Craftsman Digital 400A AC Clamp-On Ammeter, Model 82372. This instrument is designed for safe and accurate measurement of AC current without breaking the circuit, as well as AC/DC voltage, resistance, frequency, capacitance, continuity, diode, and temperature. Please read this manual thoroughly before use to ensure proper operation and to prevent potential hazards.
2. Ohutusalane teave
HOIATUS: Elektrilöögi või kehavigastuste vältimiseks lugege enne selle arvesti kasutamist läbi kogu ohutusteave ja mõistke seda.
- Järgige alati kohalikke ja riiklikke ohutusnõudeid.
- Ärge kasutage mõõteriista, kui see tundub kahjustatud või kui testjuhtmed on kahjustatud.
- Ärge kandke rohkem kui nimimahttage, nagu arvestil märgitud, klemmide vahel või mis tahes klemmi ja maanduse vahel.
- Olge voldiga töötades ettevaatliktagüle 30 V vahelduvpinge RMS, 42 V tipp või 60 V alalispinge. Need pingedtagsee kujutab endast šokiohtu.
- Mõõtmiste ajal hoidke sõrmi testjuhtmete sõrmekaitsmete taga.
- Ärge kasutage arvestit plahvatusohtliku gaasi, auru või tolmu läheduses.
- Enne voolu mõõtmist veenduge, et mõõtur on seatud õigele funktsioonile ja mõõtepiirkonnale.
- Disconnect the test leads from the circuit before changing functions.
- Aku tühjenemise indikaatori ilmumisel vahetage patarei kohe välja.
- This meter is rated for Category III - 600V.
3. Toote lõppview
The Craftsman Digital 400A AC Clamp-On Ammeter features a compact design for measurements in tight locations and an extra-large 4000 count LCD screen for clear readings.
3.1 Meter Components

Figure 1: Top Section of the Ammeter
This image displays the upper portion of the Craftsman Digital 400A AC Clamp-On Ammeter. Visible components include the clamp jaw for non-contact current measurement, the rotary function dial with settings for AC current (2A, 20A, 200A, 400A), resistance (Ω), DC voltage (VDC), AC voltage (VAC), and OFF. The yellow 'MAX' button and 'HOLD' button are also shown, along with the 'AUTO POWER OFF' indicator.
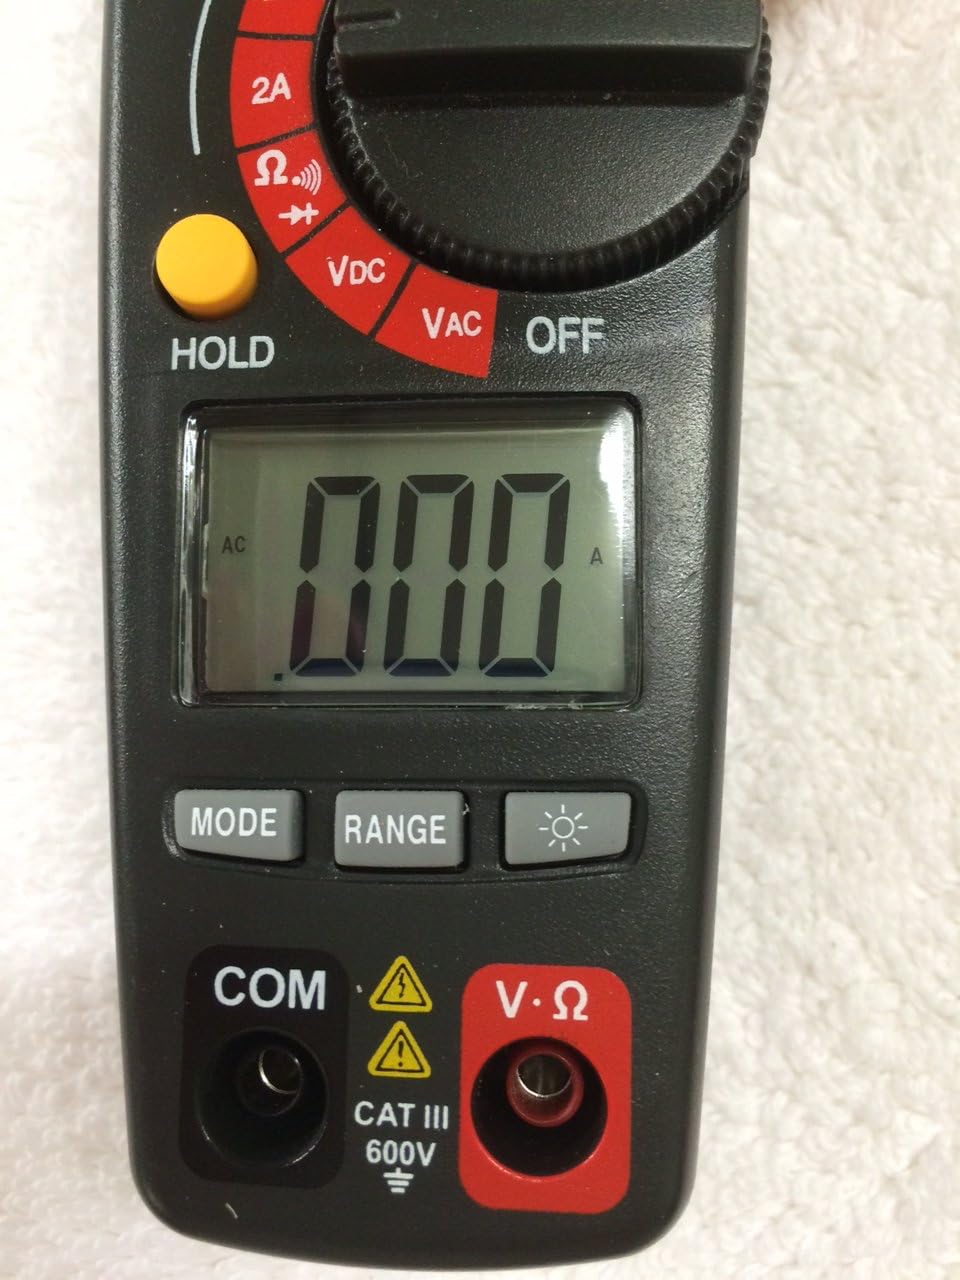
Figure 2: Bottom Section of the Ammeter
This image shows the lower part of the Craftsman Digital 400A AC Clamp-On Ammeter. Key features include the large LCD display, the 'MODE' button, 'RANGE' button, and the backlight button (indicated by a light bulb icon). Below the display are the input jacks: 'COM' (common) and 'V·Ω' (voltage/resistance) with a CAT III 600V safety rating warning.
- Clamp Lõualuu: Used for non-contact AC current measurements.
- Funktsioonide ketas: Selects the desired measurement function (AC Current, Voltage, Resistance, etc.) and turns the meter ON/OFF.
- LCD ekraan: Näitab mõõtmistulemusi, ühikuid ja funktsioonide indikaatoreid.
- MAX nupp: Toggles between maximum value hold and normal operation.
- HOLD nupp: Külmutab ekraanil kuvatava näidu.
- MODE nupp: Selects between different functions within a dial setting (e.g., AC/DC voltage, continuity/diode).
- RANGE nupp: Manually selects measurement range or returns to auto-ranging.
- Taustvalgustuse nupp: Aktiveerib ekraani taustvalgustuse parema nähtavuse tagamiseks hämaras valguses.
- Input Jacks (COM, V·Ω): Volumeetri mõõtejuhtmete ühendamisekstage, resistance, continuity, diode, capacitance, and frequency measurements.
4. Seadistamine
4.1 Aku paigaldamine
Mõõtja vajab töötamiseks patareisid. Patareide paigaldamiseks või vahetamiseks toimige järgmiselt.
- Ensure the meter is OFF and disconnect any test leads.
- Leidke mõõturi tagaküljel olev patareipesa kate.
- Keerake lahti kinnituskruvi(d) ja eemaldage kaas.
- Insert new batteries, observing correct polarity (+ and -).
- Pange patareipesa kate tagasi ja kinnitage see kruvi(de)ga.
Note: The meter features auto power off to conserve battery life.
5. Kasutusjuhised
Before taking any measurements, ensure the meter is in good condition and the test leads are properly connected (if applicable).
5.1 Vahelduvvoolu mõõtmine (Clamp Funktsioon)
This function allows non-contact measurement of AC current up to 400A.
- Turn the function dial to the desired AC current range (2A, 20A, 200A, or 400A).
- Vajutage nuppu clamp päästik cl avamiseksamp lõualuu.
- Pange klambri sisse üksik juht (mitte juhtmete kimp).amp lõualuu. Veenduge, et lõualuu on täielikult suletud.
- Lugege vahelduvvoolu väärtust LCD-ekraanilt.
Märkus: Täpsete näitude saamiseks veenduge, et kontakti sees on ainult üks juht.amp lõualuu.
5.2 AC/DC mõõtmine Voltage
The meter measures AC/DC voltage kuni 600V.
- Insert the black test lead into the COM jack and the red test lead into the V·Ω jack.
- Turn the function dial to the VDC or VAC position.
- If measuring DC voltage, press the MODE button to select DC if necessary.
- Ühendage testsondid mõõdetava vooluringi või komponendiga.
- Lugege kdtage väärtus LCD -ekraanil.
5.3 Takistuse (Ω) mõõtmine
Measures resistance in Ohms (Ω).
- Insert the black test lead into the COM jack and the red test lead into the V·Ω jack.
- Keera funktsiooninupp Ω asendisse.
- Enne takistuse mõõtmist veenduge, et vooluring või komponent on pingevaba.
- Ühendage testsondid komponendiga.
- Lugege takistuse väärtust LCD-ekraanilt.
5.4 Continuity and Diode Test
These functions are typically accessed via the Ω setting using the MODE button.
- Insert the black test lead into the COM jack and the red test lead into the V·Ω jack.
- Keera funktsiooninupp Ω asendisse.
- Press the MODE button repeatedly until the continuity symbol (a speaker icon) or diode symbol (a triangle with a line) appears on the display.
- For continuity: Connect probes across the circuit. A continuous beep indicates a complete circuit.
- For diode: Connect probes across the diode. A forward bias voltage drop will be displayed. Reverse bias should show OL (open loop).
5.5 Measuring Frequency and Capacitance
The meter supports frequency and capacitance measurements, typically accessed through the V·Ω input and MODE button.
- Insert the black test lead into the COM jack and the red test lead into the V·Ω jack.
- Turn the function dial to the appropriate setting (often shared with voltage or resistance, requiring MODE selection).
- Press the MODE button until the frequency (Hz) or capacitance (F) symbol appears.
- Connect the test probes to the circuit or component.
- Lugege väärtust LCD-ekraanilt.
5.6 Temperature Measurement (Type K Thermometer)
The meter includes a Type K thermometer for surface or air temperature measurements.
- Ensure the meter is OFF and disconnect any test leads.
- Insert the Type K thermocouple probe into the designated input jacks (usually marked with 'TEMP' or shared with V·Ω, check meter markings).
- Turn the function dial to the temperature setting (often marked with °C or °F).
- Asetage termopaari ots objektile, mille temperatuuri mõõdetakse, või selle lähedale.
- Lugege temperatuuri LCD-ekraanilt.
5.7 Data Hold and Max Hold
- HOLD nupp: Praeguse näidu ekraanile külmutamiseks vajutage nuppu HOLD. Vabastamiseks vajutage uuesti.
- MAX nupp: Press the MAX button to capture and display the maximum measured value. Press again to exit MAX hold.
6. Hooldus
6.1 Puhastamine
Pühkige arvesti reklaamigaamp cloth and mild detergent. Do not use abrasives or solvents. Keep the clamp jaw free of dust and debris.
6.2 Aku vahetamine
Refer to Section 4.1 for battery installation/replacement instructions. Replace batteries when the low battery indicator appears on the display to ensure accurate readings.
6.3 Säilitamine
If the meter is not used for an extended period, remove the batteries to prevent leakage. Store the meter in a cool, dry place away from direct sunlight.
7. Veaotsing
| Probleem | Võimalik põhjus | Lahendus |
|---|---|---|
| Mõõtur ei lülitu sisse. | Tühjad või valesti paigaldatud patareid. | Kontrollige patareide polaarsust; vahetage patareid välja. |
| Kuvatakse "OL" (ülekoormus). | Mõõtmine ületab valitud vahemiku või arvesti maksimaalse mõõteulatuse. | Select a higher range or ensure measurement is within meter's specifications. |
| Ebatäpsed näidud. | Tühja aku, vale funktsioon/vahemik, halb testjuhtme ühendus, välised häired. | Replace batteries, verify function/range, ensure secure connections, move away from strong magnetic fields. |
| No reading for AC current. | Mitu juhti cl-samp jaw, DC current being measured. | Ensure only one AC conductor is in the clamp. This meter measures AC current only. |
8. Tehnilised andmed
| Funktsioon | Spetsifikatsioon |
|---|---|
| Kaubamärk | Käsitööline |
| Mudel | 82372 |
| Mõõtmise tüüp | Ammeter (Clamp-Peal) |
| Vahelduvvoolu vahemik | Kuni 400A |
| AC/DC kdtage Vahemik | Kuni 600V |
| Vastupidavus | Jah |
| Sagedus | Jah |
| Mahtuvus | Jah |
| Järjepidevuse test | Jah |
| Diooditesti | Jah |
| Temperatuuri mõõtmine | K-tüüpi termomeeter |
| Ekraan | 4000 Count LCD |
| Accuracy (AC Current) | 3.0% (VAC) - Note: Product description states 3.0% (VAC) for AC/DC current, which is unusual. Assuming it refers to AC current accuracy. |
| Ohutushinnang | Category III - 600V |
| Toiteallikas | Akutoitel |
| Eriomadused | One-touch auto zero, belt holster, molded rubber holster, auto on/off, Data Hold, Max Hold. |
9. Garantii ja tugi
For warranty information and technical support, please refer to the official Craftsman webveebisaidilt või võtke ühendust nende klienditeenindusega. Hoidke ostutšekk ostutõendina alles garantiinõuete korral.
Craftsman Customer Service: Palun külastage www.craftsman.com/support uusima tugiteabe ja kontaktandmete saamiseks.


