1. Sissejuhatus
This manual provides detailed instructions for the safe installation, operation, and maintenance of the Leviton 15 Amp, 125 Volt, Industrial Series Extra Heavy Duty Grade, 4-In-1 Receptacle, Model 1254-R. This device is designed for demanding environments requiring high-abuse tolerance, such as healthcare facilities, manufacturing plants, and educational institutions. It features four outlets in a single-gang footprint, offering increased power access without requiring larger electrical boxes.
2. Ohutusalane teave
HOIATUS: To avoid fire, shock, or death, turn off power at the circuit breaker or fuse box and test that power is off before wiring. All wiring must be in accordance with national and local electrical codes. If you are unsure about any part of these instructions, consult a qualified electrician.
- Always disconnect power before servicing or installing the receptacle.
- Ärge paigaldage märgadesse kohtadesse, välja arvatud juhul, kui see on spetsiaalselt selliseks kasutamiseks ette nähtud.
- Veenduge, et kõik juhtmeühendused on kindlad ja korralikult isoleeritud.
- Use only copper wire with this device.
- Selle seadme hinnang on 15 Amp, 125 Volt applications. Do not exceed these ratings.
3. Pakendi sisu
The package for the Leviton 1254-R 4-in-1 Receptacle typically includes:
- One (1) Leviton 1254-R 4-In-1 Receptacle
- Mounting Screws (typically two)
4. Tehnilised andmed
| Funktsioon | Detail |
|---|---|
| Mudeli number | 1254-R |
| Ampajastu | 15 Amp |
| Voltage | 125 volti |
| Hinne | Industrial Series Extra Heavy Duty Grade |
| Mahuti tüüp | 4-In-1, Straight Blade, Grounding |
| Värv | Punane |
| Materjal | Thermoplastic Nylon (Cover and Body) |
| Juhtmete valikud | Back and Side Wiring |
| Kontaktid | Extra Heavy-Duty, T-type triple-wipe bronze |
| Mõõtmed | Ligikaudu 8 x 8 x 8 cm (toote mõõtmed) |
| Kaal | Umbes 6.4 untsi |
5. Paigaldamine
Follow these steps for proper installation of your Leviton 4-in-1 Receptacle. If you are not familiar with electrical wiring, consult a qualified electrician.
- Lülitage toide välja: Locate the circuit breaker or fuse that controls the outlet where you intend to install the receptacle. Turn it OFF. Verify that the power is off using a voltage testija.
- Eemaldage vana pistikupesa (kui see on olemas): Unscrew the wall plate and then the mounting screws holding the existing receptacle in the electrical box. Carefully pull the old receptacle out of the box.
- Juhtmete lahtiühendamine: Disconnect the wires from the old receptacle. Note which wire was connected to which terminal (hot, neutral, ground).
- Valmistage juhtmed ette: Strip approximately 1/2 inch of insulation from the ends of the wires if necessary. Ensure the wire ends are clean and straight.
- Connect Wires to New Receptacle:
- Ühendage HOT (Black or Red) juhe Messing klemmi kruvid.
- Ühendage NEUTRAALNE (valge) juhe Hõbedane klemmi kruvid.
- Ühendage GROUND (Green or Bare Copper) juhe Roheline maanduskruvi.
This receptacle supports both back-wiring (inserting wires into holes on the back and tightening screws) and side-wiring (wrapping wires around terminal screws). Ensure connections are tight and no bare wire is exposed outside the terminals.
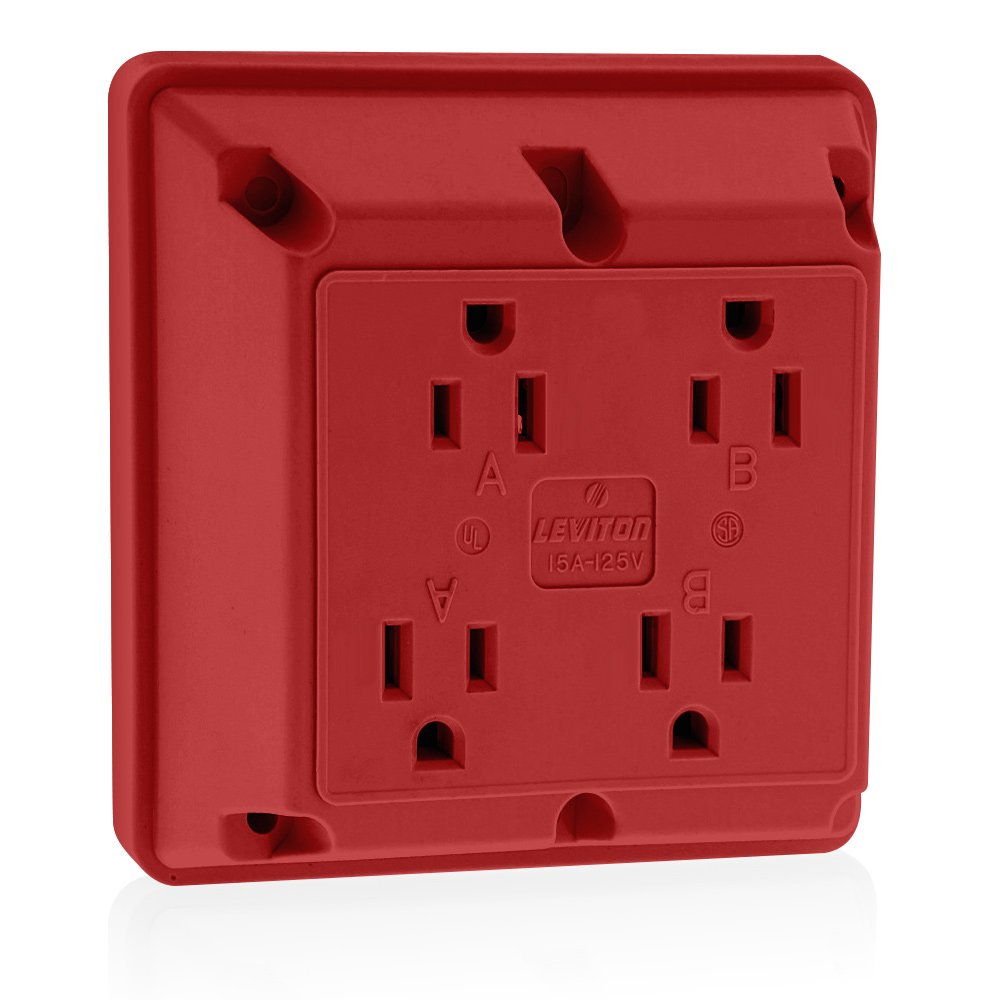
Pilt 5.1: esikülg view of the Leviton 1254-R 4-in-1 Receptacle in Red. This image shows the four outlets and the robust construction.
Pilt 5.2: Lähivõte view of a Leviton receptacle's wiring terminals, illustrating the side-wiring option and the grounding screw.
- Pistikupesa: Carefully push the wired receptacle back into the electrical box. Secure it with the provided mounting screws.
- Paigaldage seinaplaat: Attach the wall plate over the receptacle.
- Toite taastamine: Turn the circuit breaker or fuse back ON.
- Test: Plug a device into each of the four outlets to ensure proper function.
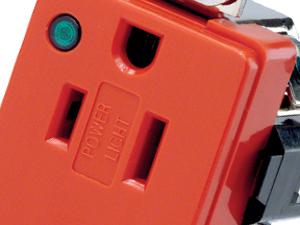
The 1254-R features an interlocking thermoplastic nylon cover and body for enhanced durability and a nickel-plated brass strap with integral ground contacts for reliable grounding. The permanent "Green Dot" marking on the face indicates its hospital/industrial grade compliance.
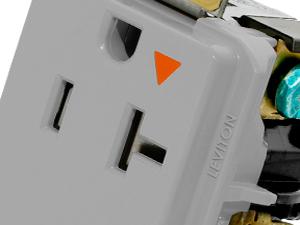
Image 5.3: Detail showing the "Green Dot" marking, signifying the industrial/hospital grade rating of the receptacle.
6. Operatsioon
The Leviton 1254-R 4-in-1 Receptacle operates like any standard electrical outlet. Simply insert the plug of your electrical device into one of the four available receptacles. Ensure the plug is fully inserted for a secure connection. The extra heavy-duty, T-type triple-wipe bronze contacts provide maximum performance and a strong grip on cords.
7. Hooldus
This industrial-grade receptacle requires minimal maintenance. Periodically inspect the receptacle for any signs of damage, such as cracks, discoloration, or loose connections. If any damage is observed, turn off power at the circuit breaker and replace the receptacle immediately. Clean the surface with a soft, dry cloth. Do not use abrasive cleaners or solvents.
8. Veaotsing
| Probleem | Võimalik põhjus | Lahendus |
|---|---|---|
| Pistikus pole voolu. | Kaitselüliti on rakendunud või kaitse on läbi põlenud. Juhtmestik on lahti. | Check and reset the circuit breaker or replace the fuse. Turn off power and inspect wiring connections for tightness. |
| Device plug feels loose in the outlet. | Worn contacts (unlikely for new industrial grade). Incorrect plug type. | Ensure the plug is fully inserted. If the issue persists, and the receptacle is old, consider replacement. Verify plug compatibility. |
| Receptacle is warm to the touch. | Overload on the circuit. Loose wiring connection. | Disconnect some devices to reduce load. Turn off power and check wiring connections. If warming persists, consult an electrician. |
9. Garantii teave
Leviton products are backed by a limited warranty. For specific warranty terms and conditions applicable to the 1254-R receptacle, please refer to the warranty documentation included with your purchase or visit the official Leviton webveebisait. Hoidke ostutõendit garantiinõuete esitamiseks.
10. Toetus
For technical assistance, product information, or customer support, please visit the official Leviton website or contact their customer service department. Contact details can typically be found on the product packaging or the Leviton websaidile.
Leviton Websait: www.leviton.com


