1. Sissejuhatus
The Velleman DVM810 is a compact and economical 3 1/2 digit digital multimeter designed for measuring DC and AC voltages, DC currents, resistance, and for performing diode and transistor (hFE) tests. It features overload protection and automatic polarity indication, making it suitable for hobbyists, field use, and workshops. This manual provides essential information for the safe and effective operation of your DVM810 multimeter.
2. Toote omadused
- Automatic polarity indication
- Voltage measurements: AC 500V and DC 500V maximum
- Current measurements: DC 10A maximum (0.2A fused, 10A unfused)
- Resistance measurements: Up to 2MΩ
- Diode and transistor (hFE) test functions
- Ülekoormuskaitse
- Compact design with 3 1/2 digit LCD display
3. Pakendi sisu
Palun kontrollige paki sisu, et kõik esemed oleksid olemas:
- Velleman DVM810 digitaalne multimeeter
- Testjuhtmed (üks punane, üks must)
- Kasutusjuhend
4. Oluline ohutusteave
Enne toote kasutamist lugege hoolikalt läbi kõik ohutushoiatused ja juhised. Nende juhiste eiramine võib põhjustada elektrilöögi, tulekahju või tõsiseid vigastusi.
- Always ensure the multimeter is set to the correct function and range before making any measurements.
- Never exceed the maximum input limits for any range. The maximum voltage for AC/DC is 500V.
- Do not attempt to measure current on circuits with voltages üle 250 V.
- Enne iga kasutamist kontrollige testjuhtmeid kahjustatud isolatsiooni või paljastunud metalli suhtes. Vahetage kahjustatud juhtmed kohe välja.
- Ärge kasutage multimeetrit, kui see tundub kahjustatud või kui selle korpus on avatud.
- Exercise extreme caution when working with live circuits. Use appropriate personal protective equipment.
- Always disconnect power to the circuit and discharge high-voltage capacitors before measuring resistance or performing diode/transistor tests.
- Täpsete näitude tagamiseks vahetage patarei välja, kui ekraanile ilmub patarei tühjenemise indikaator.
5. Toote lõppview
Familiarize yourself with the components of your Velleman DVM810 multimeter:
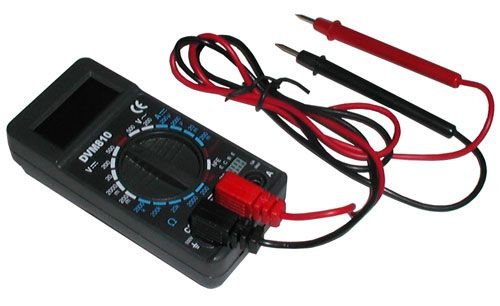
Figure 1: Velleman DVM810 Digital Multimeter. This image displays the front view of the compact multimeter, highlighting its liquid crystal display (LCD), the central rotary function switch, and the input jacks for test leads at the bottom.
- LCD ekraan: Shows measurement readings, units, and polarity.
- Pöördlüliti: Kasutatakse soovitud mõõtefunktsiooni ja -vahemiku valimiseks.
- Sisend tungrauad:
- KOM-i pesa: Common (negative) input for all measurements. Connect the black test lead here.
- VΩmA pesa: Positiivne sisend mahu jaokstage, resistance, and current measurements up to 200mA. Connect the red test lead here.
- 10A pesa: Positive input for high current measurements (up to 10A). Connect the red test lead here for 10A measurements.
- Testi juhtmed: Punased ja mustad juhtmed, mida kasutatakse multimeetri ühendamiseks testitava vooluringiga.
6. Seadistamine
6.1 Aku paigaldamine
The DVM810 multimeter requires a 9V battery (not always included). To install or replace the battery:
- Ensure the multimeter is turned OFF (rotary switch set to OFF).
- Leidke seadme tagaküljelt patareipesa kate.
- Remove the screw(s) securing the cover and carefully lift it off.
- Ühendage uus 9 V patarei patareiklambriga, jälgides õiget polaarsust.
- Asetage aku sahtlisse ja pange kaas tagasi, kinnitades selle kruvi(de)ga.
6.2 Testimisjuhtmete ühendamine
Täpsete ja ohutute mõõtmiste tagamiseks ühendage testjuhtmed alati õigesti:
- Sisestage must testjuhe pessa KOM (tavaline) tungraud.
- Enamiku mõõtmiste (mahttage, resistance, diode, hFE, and current up to 200mA), insert the red test lead into the VΩmA tungraua.
- Suure voolutugevuse mõõtmiseks (kuni 10 A) sisestage punane testjuhe 10A tungraua.
7. Kasutusjuhised
Before making any measurement, ensure the test leads are correctly connected and the rotary switch is set to the appropriate function and range.
7.1 Alalisvoolu mõõtmine Voltage (V=)
- Sisestage punane juhe pessa VΩmA jack and the black lead into the KOM tungraua.
- Seadke pöördlüliti soovitud alalisvoolu helitugevusele.tage (V=) range. Start with the highest range if the voltage on teadmata.
- Connect the test leads across the component or circuit to be measured (in parallel).
- Lugege kdtage value on the LCD display. The display will show the correct polarity.
7.2 Vahelduvvoolu mõõtmine Voltage (V ~)
- Sisestage punane juhe pessa VΩmA jack and the black lead into the KOM tungraua.
- Seadke pöördlüliti soovitud vahelduvvoolu helitugevuse peale.tage (V~) range. Start with the highest range if the voltage on teadmata.
- Connect the test leads across the component or circuit to be measured (in parallel).
- Lugege kdtage väärtus LCD -ekraanil.
7.3 Alalisvoolu (A=) mõõtmine
Caution: Never connect the multimeter in parallel with a voltage source when measuring current, as this can blow the fuse or damage the meter.
- Determine the expected current. For currents up to 200mA, insert the red lead into the VΩmA pesa. Kuni 10 A voolutugevuse korral sisestage punane juhe 10A jack. Always insert the black lead into the KOM tungraua.
- Set the rotary switch to the appropriate DC Current (A=) range. Start with the highest range if the current is unknown.
- Turn off power to the circuit. Open the circuit where the current is to be measured.
- Ühendage multimeeter vooluringiga järjestikku.
- Restore power to the circuit and read the current value on the LCD display.
7.4 Takistuse (Ω) mõõtmine
Caution: Ensure the circuit is completely de-energized and all capacitors are discharged before measuring resistance.
- Sisestage punane juhe pessa VΩmA jack and the black lead into the KOM tungraua.
- Set the rotary switch to the desired Resistance (Ω) range. Start with a higher range if the resistance is unknown.
- Ühendage testjuhtmed mõõdetava komponendiga.
- Lugege takistuse väärtust LCD-ekraanilt.
7.5 Dioodi test
Caution: Ensure the diode is disconnected from the circuit or the circuit is de-energized before testing.
- Sisestage punane juhe pessa VΩmA jack and the black lead into the KOM tungraua.
- Set the rotary switch to the Diode symbol (→|).
- Ühenda punane juhe dioodi anoodiga ja must juhe katoodiga. Ekraanile kuvatakse päripinget.tage langus (tavaliselt 0.5 V kuni 0.8 V ränidioodide puhul).
- Reverse the leads. The display should show 'OL' (Overload) for a good diode. If it shows a reading in both directions or 'OL' in both directions, the diode may be faulty.
7.6 Transistor (hFE) Test
Caution: Ensure the transistor is disconnected from the circuit before testing.
- Sisestage punane juhe pessa VΩmA jack and the black lead into the KOM tungraua.
- Seadke pöördlüliti asendisse hFE.
- Identify if the transistor is NPN or PNP. Insert the transistor's emitter, base, and collector leads into the corresponding holes in the hFE socket on the multimeter.
- Read the hFE (DC current gain) value on the LCD display.
8. Tehnilised andmed
| Parameeter | Väärtus |
|---|---|
| Kaubamärk | Velleman |
| Mudeli number | DVM810 |
| Mõõtmise tüüp | Multimeeter |
| DC kdtage Vahemik | Kuni 500V |
| AC kdtage Vahemik | Kuni 500V |
| Alalisvoolu vahemik | Up to 10A (0.2A fused, 10A unfused) |
| Vastupidavuse vahemik | Kuni 2 MΩ |
| Diooditesti | Jah |
| Transistori (hFE) test | Jah |
| Ekraan | 3 1/2 Digit LCD |
| Toiteallikas | 9 V patarei (ei kuulu komplekti) |
| Mõõtmed | Ligikaudu 3.70 cm x 1.81 cm x 1.03 cm |
| Kauba kaal | Ligikaudu 3.2 untsi (0.2 naela) |
| UPC | 836479002272 |
9. Hooldus
9.1 Aku vahetamine
When the low battery indicator appears on the LCD, replace the 9V battery as described in Section 6.1. A weak battery can lead to inaccurate readings.
9.2 Puhastamine
Multimeetri puhastamiseks pühkige korpust reklaamigaamp cloth and a mild detergent. Do not use abrasives or solvents. Ensure the unit is completely dry before use.
9.3 Testjuhtmete kontroll
Regularly inspect the test leads for any signs of damage, such as cracked insulation, exposed wires, or loose connections. Replace damaged leads immediately to prevent electric shock hazards.
10. Veaotsing
- Ekraani ei kuvata või see on ähmane: Kontrollige akut. Vajadusel vahetage see välja.
- Valed näidud:
- Veenduge, et pöördlüliti on seatud õigele funktsioonile ja vahemikule.
- Kontrollige aku mahtutage; replace if low.
- Veenduge, et testjuhtmed on korralikult ühendatud ja pole kahjustatud.
- Takistuse mõõtmiseks veenduge, et vooluring oleks pingevaba.
- Kuvatakse teade „OL” (ülekoormus): The measured value exceeds the selected range. Select a higher range or ensure the circuit is within the meter's capabilities.
- Fuse blown (during current measurement): If the meter stops measuring current, the internal fuse may have blown. Refer to a qualified technician for fuse replacement.
11. Garantii ja tugi
Warranty information for the Velleman DVM810 Digital Multimeter is typically provided with your purchase documentation or can be found on the official Velleman website. For technical support, service, or further inquiries, please refer to the contact information provided by your retailer or the manufacturer's official support channels.


