1. Sissejuhatus
The SPL 2Control is a compact and user-friendly stereo monitor controller designed to provide comprehensive control over your digital audio workstation's (DAW) monitoring functions. It ensures high-quality audio reproduction through both studio monitors and headphones, allowing you to hear every detail of your mix. Key features include a precise speaker volume potentiometer, active circuitry for sound integrity, and a unique Crossfeed control for accurate headphone monitoring that simulates a stereo speaker image.
2. Ohutusjuhised
- Enne seadme kasutamist lugege need juhised hoolikalt läbi.
- Hoidke see juhend edaspidiseks kasutamiseks alles.
- Tulekahju või elektrilöögi vältimiseks ärge jätke seadet vihma ega niiskuse kätte.
- Tagage piisav ventilatsioon; ärge blokeerige ühtegi ventilatsiooniava.
- Kasutage ainult tootja poolt määratud tarvikuid/tarvikuid.
- Ühendage toitejuhe lahti äikese ajal või kui seadet pikka aega ei kasutata.
- Andke kõik hooldustööd kvalifitseeritud teeninduspersonalile.
- Vältige seadme paigutamist soojusallikate, näiteks radiaatorite, küttekehade, pliitide või muude seadmete (sh. amptõsteseadmed), mis toodavad soojust.
3. Pakendi sisu
Lahtipakkimisel palun kontrollige, kas järgmised esemed on kaasas:
- 1 x SPL 2Control Module
- 1 x toitejuhe
- See kasutusjuhend
4. Toote lõppview
4.1 Esipaneeli juhtnupud ja indikaatorid
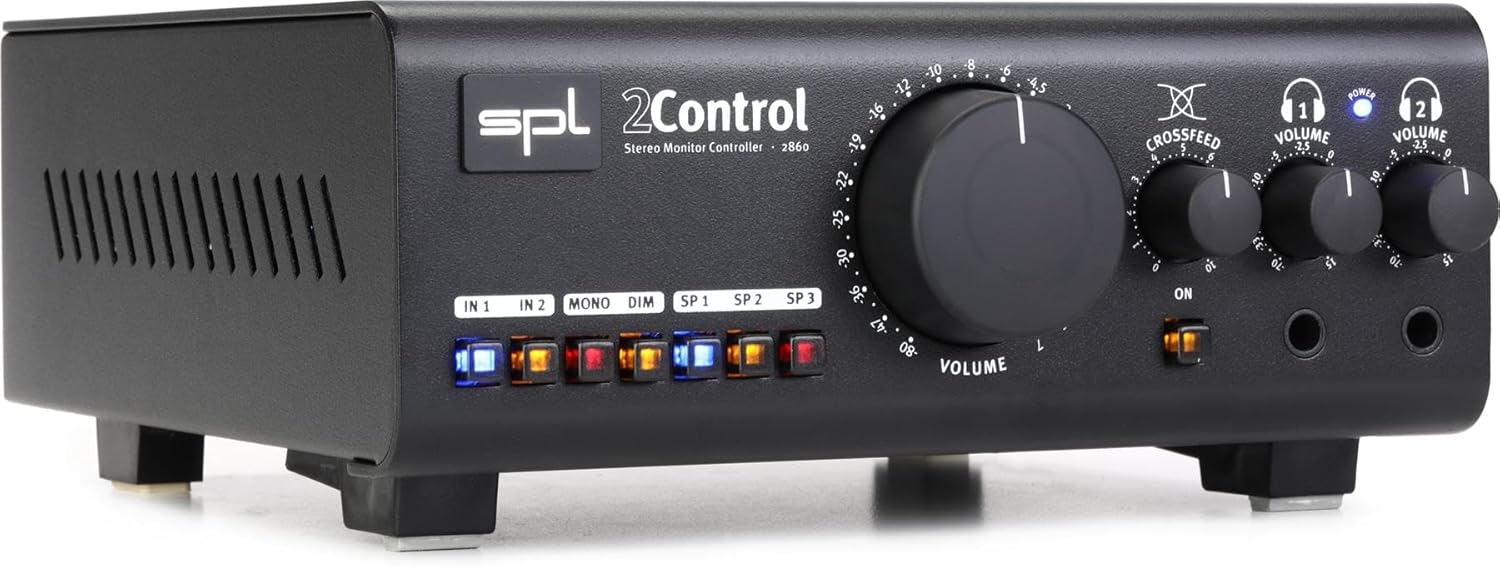
Joonis 1: Front Panel of the SPL 2Control Stereo Monitor Controller.
This image displays the front panel of the SPL 2Control. From left to right, it features input selection buttons (IN 1, IN 2), function buttons (MONO, DIM), speaker output selection buttons (SP 1, SP 2, SP 3), a large central master VOLUME knob, a CROSSFEED knob, and two individual headphone VOLUME knobs with corresponding headphone output jacks. A power indicator LED is visible above the headphone controls.
- IN 1 / IN 2 Buttons: Selects the active stereo input source.
- MONO nupp: Sums the stereo signal to mono for compatibility checking.
- DIM nupp: Reduces the output volume by a fixed amount (e.g., -20dB) for temporary level reduction.
- SP 1 / SP 2 / SP 3 Buttons: Selects the active stereo speaker output pair.
- VOLUME nupp: Master volume control for selected speaker outputs.
- CROSSFEED Knob: Adjusts the stereo panorama for headphone monitoring to simulate a speaker listening environment.
- HEADPHONE VOLUME 1 / 2 Knobs: Independent volume controls for the two headphone outputs.
- HEADPHONE 1 / 2 Jacks: 1/4-inch stereo headphone outputs.
- TOITE LED: Näitab, et seade on sisse lülitatud.
4.2 Rear Panel Connections (Inferred)
The rear panel typically houses the audio input and output connections, as well as the power input. Based on common audio equipment and product specifications, you can expect:
- Analoogsisendid: Balanced XLR or TRS inputs for connecting your audio interface or mixer.
- Kõlarite väljundid: Multiple sets of balanced XLR or TRS outputs for connecting up to three pairs of studio monitors.
- Toite sisend: Connector for the included power cord.
5. Seadistamine
- Paigutus: Position the SPL 2Control on a stable, flat surface, ensuring adequate ventilation around the unit.
- Toiteühendus: Connect the provided power cord to the power input on the rear panel of the 2Control and then to a suitable AC power outlet.
- Sisendühendused: Connect the stereo outputs of your audio interface, mixer, or other audio source to the IN 1 and/or IN 2 inputs on the rear panel using balanced XLR or TRS cables.
- Kõlarite ühendused: Connect your studio monitors to the SP 1, SP 2, and/or SP 3 outputs on the rear panel using balanced XLR or TRS cables. Ensure correct left and right channel connections.
- Headphone Connections: Plug your headphones into the HEADPHONE 1 and/or HEADPHONE 2 jacks on the front panel.
- Esialgne sisselülitamine: Ensure all volume controls are set to their minimum positions before powering on the unit. Then, connect the power cord to the wall outlet. The POWER LED on the front panel will illuminate.
6. Kasutusjuhised
- Sisendi valimine: Vajutage kas nuppu AASTAL 1 or AASTAL 2 button to select your desired audio source. The active button will illuminate.
- Selecting Speaker Outputs: Vajutage nuppu SP 1, SP 2, või SP 3 button to route the audio to the corresponding pair of studio monitors. Only one speaker output can be active at a time.
- Adjusting Master Volume: Slowly turn the large VOLUME knob clockwise to increase the listening level for the selected speaker outputs. Turn counter-clockwise to decrease.
- Mono Summing: Vajutage nuppu MONO button to sum the stereo signal to mono. This is useful for checking phase compatibility and mix balance. Press again to return to stereo.
- Hämardusfunktsioon: Vajutage nuppu DIM button to temporarily reduce the output volume. This is useful for quick conversations or when you need to lower the volume without losing your main volume setting. Press again to restore the original volume.
- Kõrvaklappide jälgimine:
- Plug your headphones into the desired headphone jack (HEADPHONE 1 or 2).
- Adjust the individual HEADPHONE VOLUME 1 or 2 knob to set the listening level for your headphones.
- Kasutage RISTSÖÖT knob to adjust the stereo image for headphone listening. Turning it clockwise increases the crossfeed, simulating a more natural speaker-like stereo field by blending the left and right channels slightly.
7. Hooldus
- Puhastamine: Seadme välispinna puhastamiseks kasutage pehmet ja kuiva lappi. Ärge kasutage vedelaid puhastusvahendeid ega lahusteid.
- Ventilatsioon: Ensure that the ventilation slots are kept clear of dust and debris to prevent overheating.
- Hoiustamine: Kui seadet pikemaks ajaks hoiustate, ühendage see vooluvõrgust lahti ja hoidke jahedas ja kuivas kohas.
8. Veaotsing
| Probleem | Võimalik põhjus | Lahendus |
|---|---|---|
| Kõlaritest pole heli. |
|
|
| Kõrvaklappidest ei kostu heli. |
|
|
| Moonutatud heli. |
|
|
9. Tehnilised andmed
| Funktsioon | Detail |
|---|---|
| Mudeli nimi | 2 Control (also known as 2860) |
| Kaubamärk | SPL |
| Kõlari tüüp | Monitor |
| Soovitatavad kasutusalad | Control, Volume for Monitors |
| Ühilduvad seadmed | Monitors, Speakers |
| Ruumilise heli kanali konfiguratsioon | 2.0 |
| Värv | Must |
| Kaasatud komponendid | 1 x SPL Control Module |
| Toote mõõtmed (P x L x K) | 8.66" x 8.46" x 3.15" |
| Kauba kaal | 7.06 naela (umbes 3.2 kg) |
| Toiteallikas | Juhtmega elekter |
| Ühenduvustehnoloogia | TRS, XLR |
| Heliväljundi režiim | Stereo |
| Paigaldustüüp | Lauaplaadi kinnitus |
| Tootja | Sound Performance Lab |
10. Garantii ja tugi
The SPL 2Control Monitor Controller comes with a limited warranty. For specific warranty terms, duration, and conditions, please refer to the documentation provided with your purchase or visit the official SPL website. For technical support, service, or inquiries, please contact the manufacturer, Sound Performance Lab, or your authorized dealer.
Tootja: Sound Performance Lab


