1. Sissejuhatus
The VuPoint FS-C1-VP-BX2 USB 2.0 Negative Film and Slide Digital Converter is designed to digitize your 35mm negative film and mounted slides into high-resolution digital images. This device connects to your computer via a USB interface, allowing you to preserve your memories in a digital format for easy viewing, sharing, and archiving. This manual provides detailed instructions for setting up, operating, and maintaining your digital converter.
2. Pakendi sisu
Palun märkige järgmiste üksuste ruut:
- VuPoint FS-C1-VP-BX2 Digital Converter Unit
- USB kaabel
- Slide Holder (for up to 3 mounted slides)
- Negative Film Holder (for up to 6 frames of 35mm film)
- Puhastuspintsel
- Software CD (containing drivers and ArcSoft PhotoImpression6)
- Kasutusjuhend (see dokument)
3. Seade üleview
Familiarize yourself with the main components of your digital converter.
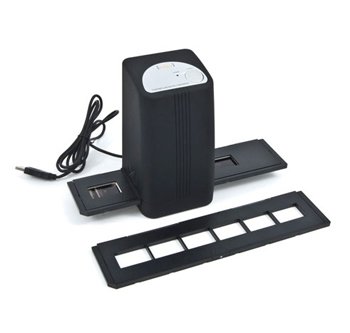
Joonis 1: Esiosa view of the VuPoint FS-C1-VP-BX2 Digital Converter. This image shows the main unit with its input slot for film/slide holders and the USB port.
The device features a slot for inserting the film or slide holders, a USB port for connecting to your computer, and a power/capture button. The button's functionality is primarily controlled through the software.

Figure 2: The slide holder, designed to accommodate up to three mounted slides for scanning.

Figure 3: The negative film holder, designed to hold a strip of 35mm film with up to six frames.
4. Süsteeminõuded
To ensure proper operation, your computer must meet the following minimum requirements:
- Operatsioonisüsteem: Windows 7 (or later, check manufacturer's website for updated driver compatibility)
- Ühenduvus: USB 2.0 port
- Protsessor: Pentium III or equivalent
- RAM: 512 MB või rohkem
- Kõvakettaruum: 500MB free space
- Optiline seade: CD-ROM-draiv (tarkvara installimiseks)
5. Setup and Software Installation
Proper installation of drivers and software is crucial for the functionality of your digital converter.
- Do NOT connect the device to your computer yet.
- Installige draiverid ja tarkvara:
- Insert the provided Software CD into your computer's CD-ROM drive.
- Follow the on-screen instructions to install the device drivers and the ArcSoft PhotoImpression6 software.
- Important Note for 64-bit Operating Systems: The drivers on the included CD may primarily support 32-bit systems. If you are using a 64-bit version of Windows (e.g., Windows 7 x64), it is highly recommended to visit the official VuPoint Solutions websait (www.vupointsolutions.com) to download the latest drivers for your specific operating system. Some users have reported success with Windows Vista x64 drivers on Windows 7 x64.
- Pärast installimist taaskäivitage arvuti, kui seda küsitakse.
- Ühendage seade:
- Once the software and drivers are installed, connect the smaller end of the USB cable to the USB port on the digital converter.
- Connect the larger end of the USB cable to an available USB 2.0 port on your computer.
- Your computer should detect the new hardware. Allow it to complete any automatic driver installation processes.
6. Kasutusjuhised
Follow these steps to digitize your film and slides:
- Prepare Film or Slides:
- Slaidide jaoks: Open the slide holder. Carefully place up to three mounted slides into the designated slots, ensuring they are oriented correctly (emulsion side facing down, or as indicated by the software preview). Close the holder securely.
- For Negative Film: Open the negative film holder. Carefully insert a strip of 35mm negative film into the guide, ensuring the frames align with the openings. The holder can typically accommodate up to six frames. Close the holder securely.
- Use the included cleaning brush to gently remove any dust or debris from your film or slides before loading to prevent artifacts in your scans.
- Insert Holder into Converter:
- Slide the loaded film or slide holder into the input slot on the front of the digital converter until it clicks into place or is fully inserted.
- Käivitage skannimistarkvara:
- Open the ArcSoft PhotoImpression6 software (or other compatible scanning software) from your computer's Start Menu or desktop shortcut.
- Within the software, locate the option to "Acquire from Film Scanner" or similar. This will open the scanning interface.
- Note: The physical button on the device may not initiate a scan directly; scanning is typically controlled via the software interface.
- Preview and Adjust Settings:
- The software should display a live preview of the film/slide in the holder.
- Adjust settings such as resolution (DPI), color depth (e.g., 48-bit color), and image type (Negative Film or Positive Slide).
- Use the holder's sliding mechanism to advance to the next frame or slide if scanning multiple items.
- Pildistamine:
- Click the "Capture" or "Scan" button within the software to take a digital image of the current frame.
- The software will process the image.
- Salvesta pildid:
- After capturing, the image will appear in the software's workspace. You can perform basic edits if desired.
- Save the image to your desired location on your computer. The software may use a default naming convention (e.g., MM-DD-YYYY_sequence_number.TIF or .JPG). Be aware that sequence numbers may reset if the software is closed or if files are moved.
- Repeat steps 5-6 for each frame or slide.
7. Hooldus
To ensure the longevity and optimal performance of your digital converter:
- Objektiivi puhastamine: Use the provided cleaning brush or a soft, lint-free cloth to gently clean the optical lens inside the converter if you notice dust or smudges affecting image quality. Do not use liquid cleaners directly on the lens.
- Cleaning Holders: Keep the film and slide holders clean and free of dust and debris.
- Hoiustamine: Store the converter and its accessories in a clean, dry place away from direct sunlight and extreme temperatures.
- Käitlemine: Handle the device and its components with care to avoid damage.
8. Veaotsing
If you encounter issues with your VuPoint FS-C1-VP-BX2, refer to the following common problems and solutions:
- Problem: Device is not recognized by the computer.
-
- Veenduge, et USB-kaabel oleks kindlalt ühendatud nii muunduri kui ka arvutiga.
- Proovige ühendada arvuti muu USB -port.
- Verify that the device drivers are correctly installed. Reinstall them if necessary, especially if you have recently updated your operating system.
- Kontrollige tootja poolt website for updated drivers, particularly for 64-bit operating systems.
- Problem: Software does not launch or crashes.
-
- Veenduge, et teie arvuti vastaks süsteemi miinimumnõuetele.
- Reinstall the ArcSoft PhotoImpression6 software.
- Check for software updates on the ArcSoft or VuPoint Solutions websaidile.
- Sulgege muud nõudlikud rakendused, mis võivad süsteemiressursse tarbida.
- Problem: Slides or negatives do not fit into the holders.
-
- Ensure you are using the correct holder for your media type (slide holder for mounted slides, negative holder for film strips).
- For slides, ensure they are standard 35mm mounted slides. Some thicker or non-standard mounts may not fit.
- For negatives, ensure the film strip is properly aligned with the guides and not bent or damaged.
- Problem: Scanned images are poor quality (blurry, color issues, dust).
-
- Tolm: Use the cleaning brush to remove dust from the film/slides and the converter's lens.
- Focus/Clarity: Ensure the film/slide is correctly seated in the holder and the holder is fully inserted into the converter.
- Värv: Adjust color correction settings within the scanning software. The age and condition of the original film/slides can significantly impact color accuracy.
- Resolutsioon: Ensure you have selected a high enough DPI setting in the software for your desired output quality.
- Problem: The device's capture button does not work.
-
- The physical button on the device is often not functional for initiating a scan. All scanning operations, including capture, are typically performed through the software interface.
9. Tehnilised andmed
| Kaubamärk | VUPOINT |
| Mudel | FS-C1-VP-BX2 |
| Skänneri tüüp | Filmiskanner |
| Ühenduvustehnoloogia | USB 2.0 |
| Optilise anduri tehnoloogia | CMOS |
| Minimaalsed süsteeminõuded | Windows 7 |
| Kauba kaal | 3 naela |
| Esmakordselt saadaval olev kuupäev | 20. juuli 2009 |
10. Garantii ja tugi
For warranty information and technical support, please refer to the documentation included with your purchase or visit the official VuPoint Solutions website. Support resources typically include FAQs, driver downloads, and contact information for customer service.
Websait: www.vupointsolutions.com


