Sissejuhatus
This manual provides essential instructions for the installation, operation, maintenance, and troubleshooting of the IBM 49P1599 FRU System Board. This system board is designed for personal computers, featuring a 400/533 Front Side Bus, integrated 10/100 Ethernet, and support for DDR2 memory.
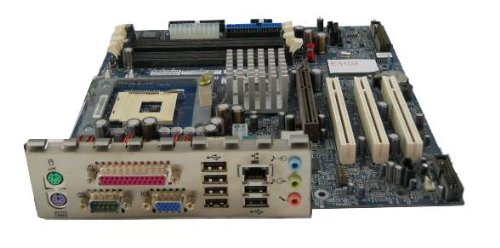
Image: The IBM 49P1599 FRU System Board. This image displays the main components and layout of the motherboard, including CPU socket, memory slots, and various connectors.
Seadistamine ja installimine
Careful installation is crucial for the proper functioning of your system board. Always handle the board by its edges to avoid static discharge.
1. Paigaldamise ettevalmistamine
- Ensure your computer case is compatible with the system board's form factor.
- Koguge kokku vajalikud tööriistad: Phillipsi kruvikeeraja, antistaatiline randmepael.
- Unplug the power supply from the wall outlet before beginning.
2. Installing the System Board
- Paigaldage I/O-kaitse arvuti korpuse tagumisse avasse.
- Carefully align the system board with the standoffs in the case.
- Secure the system board with screws, ensuring it is firmly seated.
3. Komponentide paigaldamine
Protsessor (CPU)
This system board is supplied without a processor. Refer to your CPU's manual for specific installation instructions. Ensure the CPU is correctly oriented in the socket before securing the retention lever.
Mälu (RAM)
The board supports DDR2 RAM and has 2 memory slots.
- Avage mälupesa mõlemas otsas olevad klambrid.
- Joondage mälumoodul pesaga, veendudes, et mooduli sälk sobiks pesas oleva võtmega.
- Suruge mooduli mõlemat otsa kindlalt alla, kuni klambrid oma kohale klõpsavad.
Graafikakaart
The system board features an Integrated Graphics Card Interface and a PCI-Express x16 slot for dedicated graphics cards.
- Locate the PCI-Express x16 slot.
- Eemaldage korpuse küljest vastav laienduspesa kate.
- Insert the graphics card firmly into the slot until it clicks. Secure it with a screw to the case.
4. Ühenduskaablid
- Toitepistikud: Connect the main 24-pin ATX power connector and the 4-pin CPU power connector from your power supply to the system board.
- SATA-seadmed: Connect SATA 3 data cables from your storage devices (hard drives, SSDs) to the SATA ports on the system board.
- Esipaneeli pistikud: Connect the power button, reset button, HDD LED, power LED, and USB ports from your case to the corresponding headers on the system board. Refer to the board's silkscreen labels for correct orientation.
- Ethernet: The board has integrated 10/100 Ethernet. Connect your network cable to the RJ-45 port on the I/O panel.
Kasutusjuhised
After completing the physical installation, you can proceed with the initial boot and operating system setup.
1. Esialgne käivitamine
- Veenduge, et kõik komponendid on kindlalt ühendatud.
- Ühendage monitor, klaviatuur ja hiir.
- Plug in the power supply and turn on the system.
- Süsteem peaks sisse lülituma ja te peaksite oma monitoril nägema ekraani.
2. BIOS-i/UEFI seadistamine
During the initial boot sequence, press the designated key (commonly DEL, F2, F10, or F12) to enter the BIOS/UEFI setup utility. Here you can configure boot order, system time, and other hardware settings. Save changes before exiting.
3. Operatsioonisüsteemi installimine
This system board is compatible with platforms such as Windows 10. Insert your operating system installation media (USB drive or DVD) and follow the on-screen prompts to install the operating system. Ensure all necessary drivers for the system board components are installed after the OS installation.
Hooldus
Regular maintenance helps ensure the longevity and stable performance of your system board.
- Puhastamine: Periodically clean dust from the system board and components using compressed air. Ensure the system is powered off and unplugged before cleaning.
- BIOS-i värskendused: Check the official IBM support website for BIOS updates. BIOS updates can improve compatibility, stability, and performance. Follow the provided instructions carefully when updating the BIOS.
- Komponentide kontrollid: Ensure all cables and components remain securely connected.
Veaotsing
Probleemide korral vaadake järgmisi levinud tõrkeotsingu samme.
Jõudu pole
- Verify the power supply is connected to the wall outlet and turned on.
- Check that the 24-pin and 4-pin power connectors are securely attached to the system board.
- Ensure the front panel power button cable is correctly connected to the system board header.
Kuvarit pole
- Confirm the monitor is powered on and connected to the correct video output (either integrated or dedicated graphics card).
- Reseat the graphics card (if applicable) and memory modules.
- Võimalusel testi teise monitori või videokaabliga.
Süsteem ei käivitu
- Check for any loose cables or components.
- Ensure the CPU is properly seated and its cooler is installed correctly.
- Try booting with only one memory module installed, rotating through the modules and slots to identify a faulty one.
- Reset the BIOS to default settings (refer to your system board's specific instructions for clearing CMOS).
Tehnilised andmed
Garantii ja tugi
For warranty information and technical support, please refer to the official IBM website or contact your point of purchase. Keep your proof of purchase for warranty claims. IBM provides resources and support for its products to ensure customer satisfaction.
Täiendava abi saamiseks külastage aadressi IBMi tugi websaidile.
| Funktsioon | Spetsifikatsioon |
|---|---|
| Mudeli number | 49P1599 FRU |
| Esikülje buss (FSB) | 400/533 MHz |
| RAM-mälu tehnoloogia | DDR2 |
| Mälu kella kiirus | 2133 MHz |
| Saadaval on mälupesad | 2 |
| Graafikakaardi liides | Integrated, PCI-Express x16 |
| Toetatud süsteemibussi standard | SATA 3 |
| Integrated Ethernet | 10/100 Mbps |
| Ühilduvad seadmed | Personaalarvuti |
| Platvormi ühilduvus | Windows 10 |
| Kauba kaal | 8 naela |