Sissejuhatus
Tänan ostu eestasing the Generic Solar Pathway Lights. These lights are designed to provide efficient and decorative outdoor illumination for your yard, lawn, walkway, or driveway. Featuring a durable stainless steel and glass construction, an efficient solar panel, and dual brightness settings, these lights are built for reliable, year-round performance.
1. Seadistamine ja installimine
Before first use, ensure the solar lights are assembled correctly and placed in an area that receives direct sunlight for optimal charging.
1.1 Karbist väljavõtmise sisu
Veenduge, et pakendis on kõik komponendid olemas:
- 4 x päikeselampi
- 4 x panused
- 1 x Kasutusjuhend (käesolev dokument)
1.2 Kokkupanemisetapid
- Valguse aktiveerimine: Gently twist off the top cap of the light fixture. Locate the ON/OFF/MODE switch on the underside of the cap. Set the switch to either Mode 1 (12 lumens) or Mode 2 (25 lumens) to activate the light. Ensure the light is turned ON before charging.
- Pange panus kokku: The spike is inserted into the tube. Remove the spike from the bottom of the metal tube, flip it, and reinsert it into the tube to form the ground stake.
- Connect the Light Head: Attach the light fixture (top cap with glass housing) to the assembled metal tube and stake.
- Paigutus: Choose a location that receives at least 6-8 hours of direct sunlight daily. Avoid placing lights under trees or near other light sources (like streetlights) that might interfere with the auto dusk-to-dawn sensor.
- Sisestage maapinnale: Gently push the assembled light into the ground. If the ground is too hard, loosen the soil first to prevent damage to the stake.
Image: Underside of the solar light cap showing the ON/OFF/MODE switch.
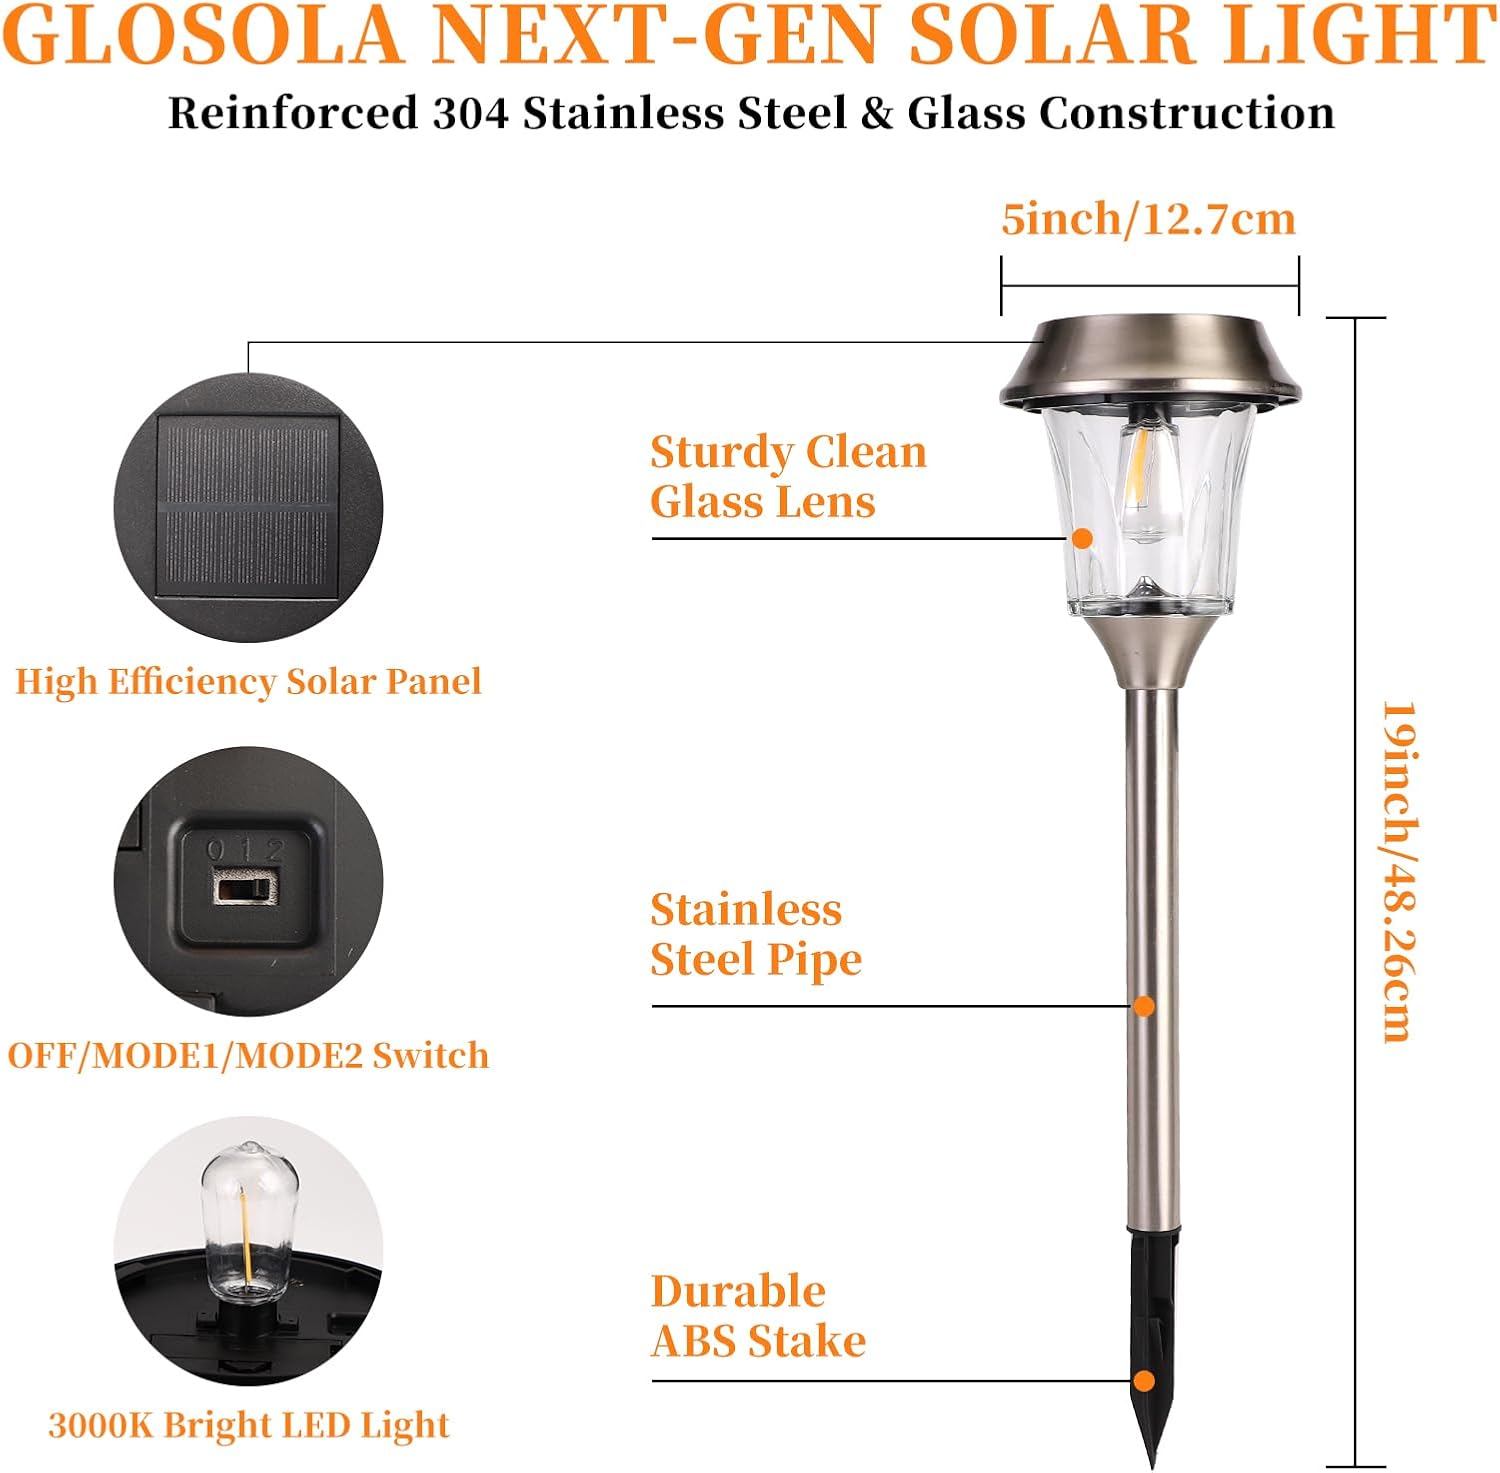
This image shows the underside of the solar light's top cap, highlighting the solar panel and the switch for power and brightness settings. The switch allows selection between two brightness modes or turning the unit off.
Image: Assembly of the metal tube and ground stake.
This image illustrates the assembly process of the solar light's stake. It shows how the pointed ground spike is attached to the metal pole, ready for insertion into the ground.
Image: Easy installation steps for the solar pathway lights.

This image provides a visual guide for installing the solar pathway lights. It shows twisting off the cap, turning on the switch, connecting the pole and spike, and inserting the light into the ground. It also advises loosening hard ground.
1.3 Paigaldusvideo
Watch this video for a visual guide on assembling and installing your solar pathway lights.
This video demonstrates the simple assembly process of the solar pathway lights, including connecting the pole and activating the light. It also shows the lights installed in a garden setting at night.
2. Kasutusjuhised
The Generic Solar Pathway Lights are designed for automatic operation.
2.1 Automaatne töö
Once activated and fully charged, the lights will automatically turn on at dusk and turn off at dawn. The integrated solar panel charges the internal battery during the day.
2.2 Heleduse seaded
You can select between two brightness levels:
- Mode 1 (12 Lumens): Provides a softer glow and extends the operating time (12-16 hours). Ideal for winter or when longer illumination is desired.
- Mode 2 (25 Lumens): Offers brighter illumination for enhanced visibility (8-10 hours). Suitable for summer or when maximum brightness is needed.
Image: Diagram illustrating dual brightness modes and their corresponding runtimes.
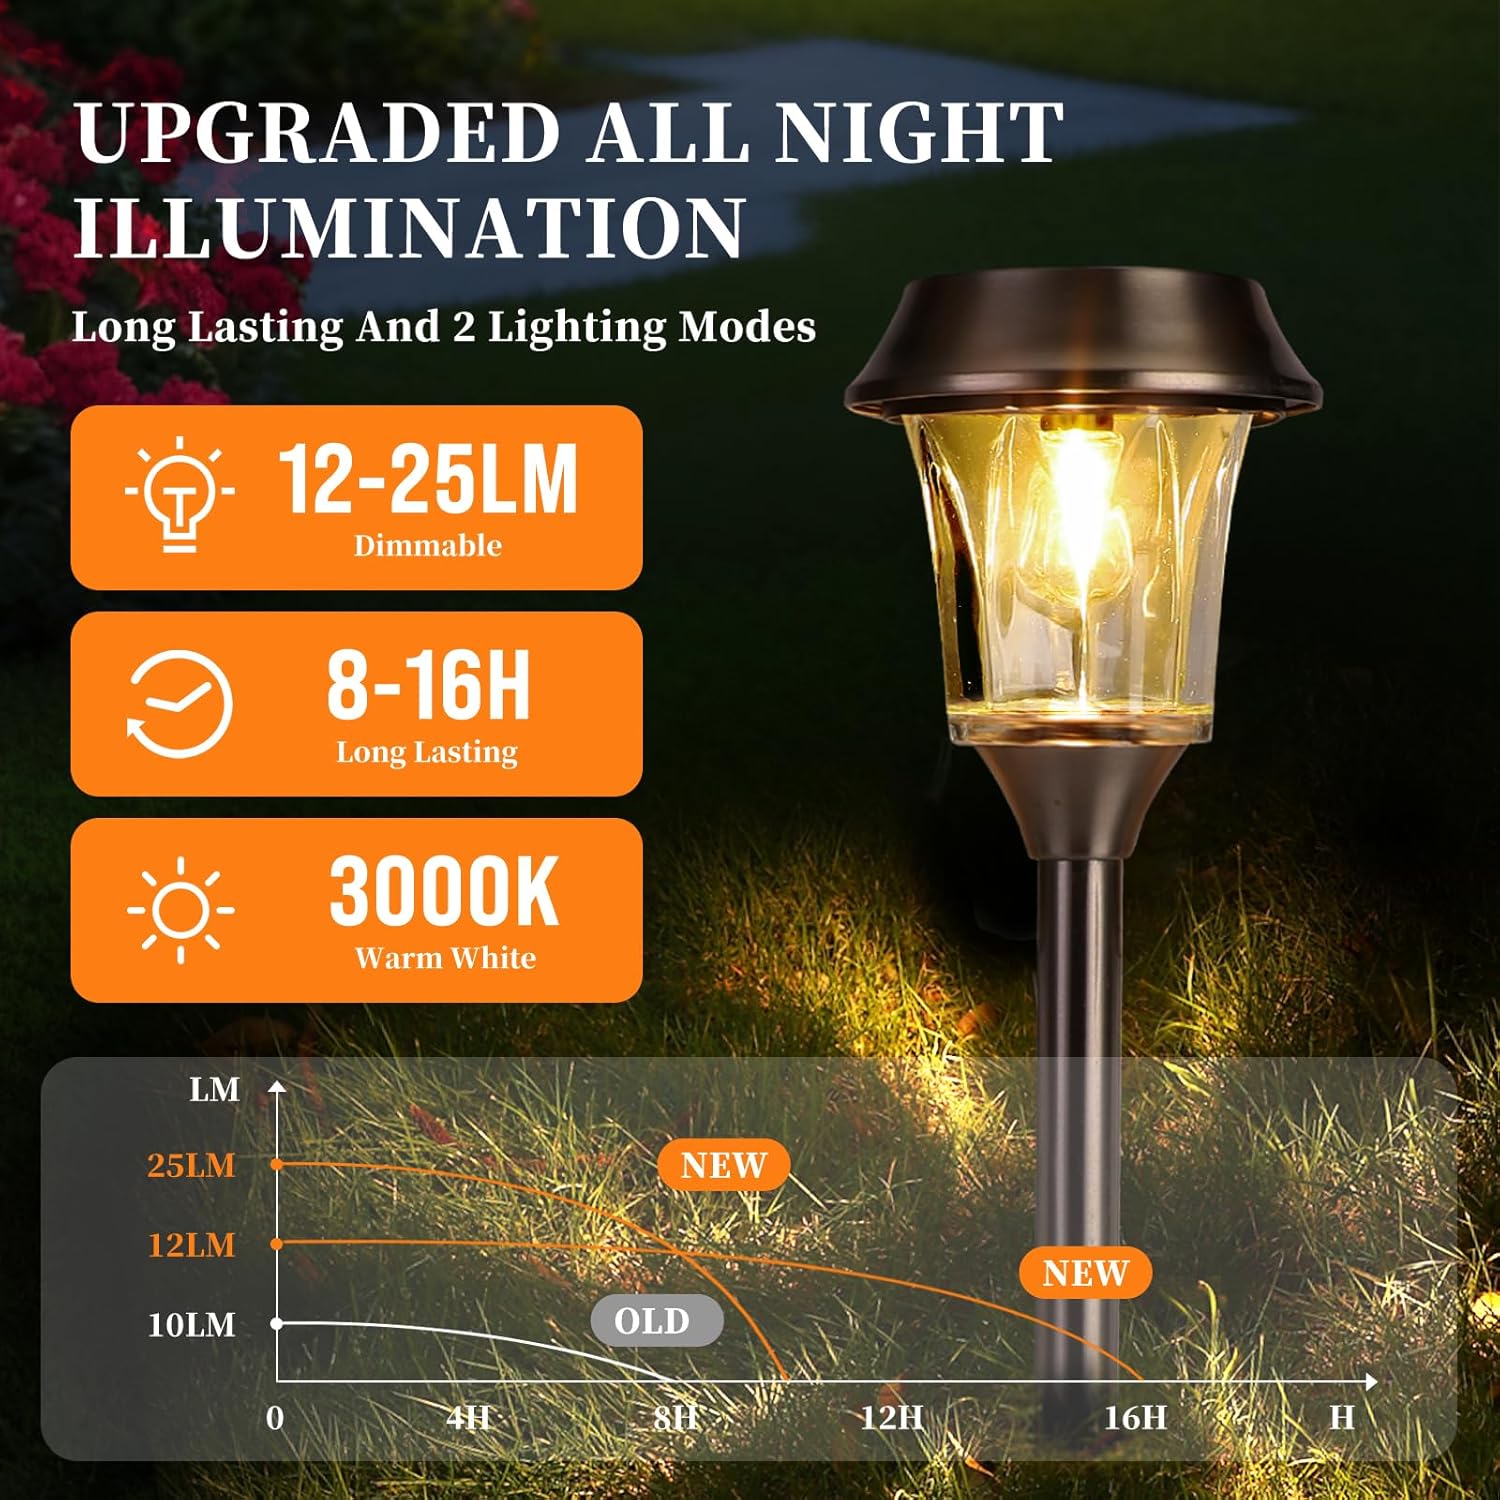
This diagram visually explains the two brightness settings (12 lumens and 25 lumens) and their respective operating durations, indicating longer runtime for lower brightness and vice-versa.
Image: Comparison of 25 lumens (high brightness) and 12 lumens (low brightness) in an outdoor setting.

This image shows a side-by-side comparison of the solar light operating at 25 lumens (high brightness) and 12 lumens (low brightness) in a garden, demonstrating the visual difference in light output.
3. Hooldus
Regular maintenance ensures optimal performance and longevity of your solar pathway lights.
3.1 Puhastamine
Wipe the solar panel regularly with a soft, damp lapiga tolmu, mustuse ja prahi eemaldamiseks. Puhas päikesepaneel tagab tõhusa laadimise.
3.2 Aku hooldus
The lights are equipped with a LiFePO4 3.2V 600mAh battery. While designed for longevity (2000-3000 cycles), if the light duration significantly decreases, the battery may need replacement. Use only compatible LiFePO4 3.2V 600mAh 14500 batteries.
Image: Close-up of the LiFePO4 battery inside the solar light.
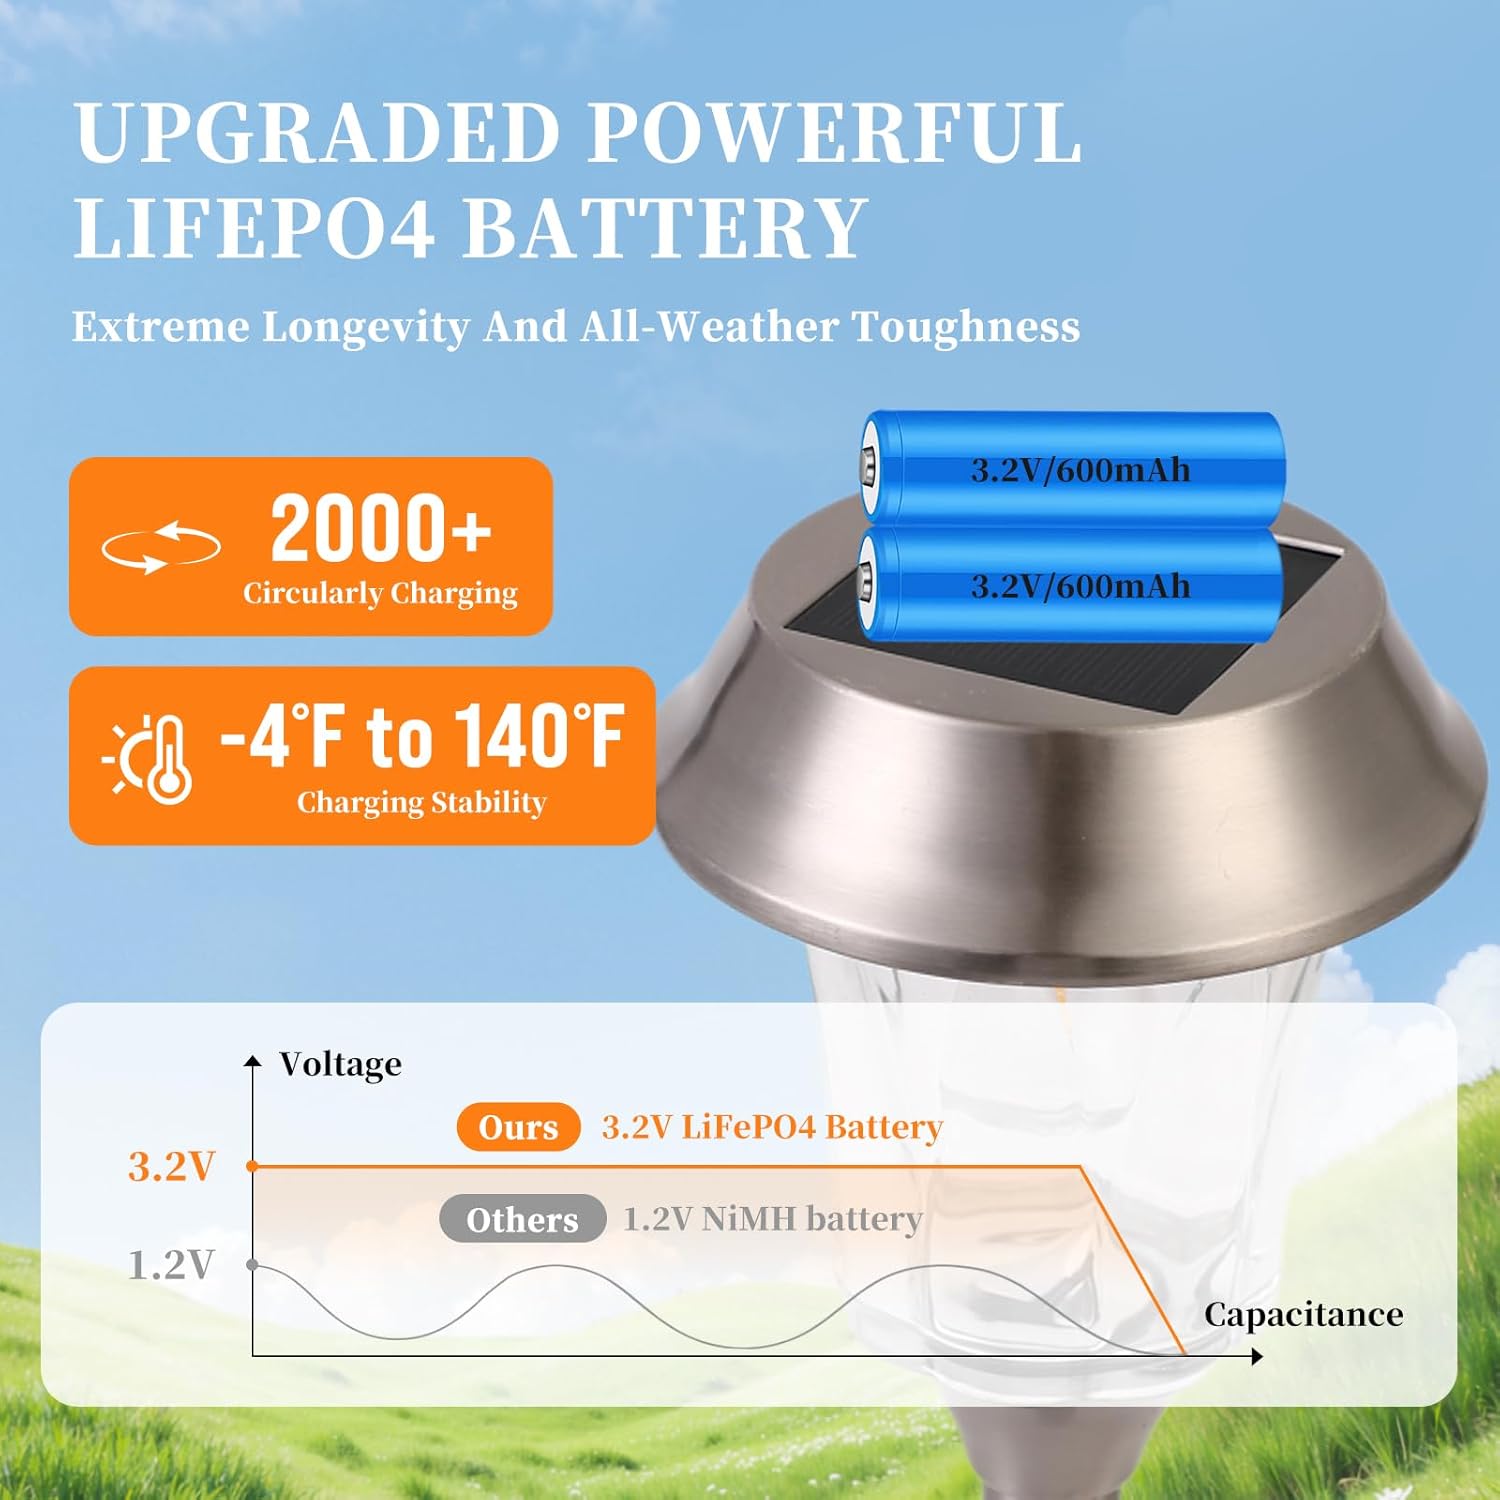
See pilt annab detailse ülevaate view of the LiFePO4 3.2V 600mAh battery installed within the solar light, indicating its specifications and position for potential replacement.
3.3 Ilmastikukindlus
These lights feature an IP65 waterproof design, making them resistant to rain, snow, and heat. However, extreme weather conditions may temporarily affect performance. Ensure the lights are securely staked to withstand strong winds.
Image: Solar light in a rainy environment, highlighting its IP65 waterproof rating.

This image shows the solar light functioning effectively in a rainy outdoor setting, emphasizing its IP65 waterproof and weather-resistant design.
4. Veaotsing
If your solar pathway lights are not performing as expected, consider the following:
- Tuli ei lülitu sisse:
- Ensure the ON/OFF/MODE switch is set to Mode 1 or Mode 2.
- Verify the solar panel is clean and receiving adequate direct sunlight (6-8 hours).
- Check if the light is placed near other strong light sources (e.g., streetlights) that might trigger the dusk sensor to keep the light off.
- Allow the light to charge for at least 24-48 hours in direct sunlight before expecting full performance.
- Lühike valgustusaeg:
- The solar panel may not be receiving enough direct sunlight. Relocate the light to a sunnier spot.
- The battery may not be fully charged due to cloudy weather or insufficient sunlight.
- If using Mode 2 (25 lumens), switch to Mode 1 (12 lumens) for extended runtime.
- Aku eluiga võib olla lõppemas ja see vajab väljavahetamist.
5. Tehnilised andmed
| Funktsioon | Detail |
|---|---|
| Kaubamärk | Üldine |
| Mudeli number | HSS1557.V5 |
| Värv | Hõbedane |
| Materjal | Acrylonitrile Butadiene Styrene, Glass, Stainless Steel |
| Toiteallikas | Päikeseenergial töötav |
| Valgusallikas | LED |
| Hele Värv | Soe valge |
| Heledus | 12/25 Lumen (Adjustable) |
| Aku | LiFePO4 3.2V 600mAh |
| Laadimisaeg | 6-8 tundi (otsene päikesevalgus) |
| Valgustuse aeg | 8-10 hours (25LM) / 12-16 hours (12LM) |
| Veekindluse tase | IP65 Veekindel |
| Mõõdud (P x L x K) | 4.88" P x 19" L x 4.88" K |
| Artiklite arv | 4 |
| Nõutav kokkupanek | Jah |
6. Garantii teave
This product comes with a manufacturer's warranty of 180 days from the date of purchase. Please retain your proof of purchase for any warranty claims. The warranty covers defects in materials and workmanship under normal use. It does not cover damage caused by misuse, accidents, unauthorized modifications, or improper installation.
7. Klienditugi
For further assistance, technical support, or warranty inquiries, please contact the retailer or manufacturer directly. Refer to your purchase documentation for specific contact details.