Sissejuhatus
This user manual provides comprehensive instructions for the safe and effective operation, maintenance, and troubleshooting of your ThermoPro TP511 Digital Cooking Thermometer. Please read this manual thoroughly before using the device and retain it for future reference.
Toode läbiview
Komponendid
- ThermoPro TP511 Thermometer Unit
- 20cm Stainless Steel Probe
- Adjustable Pot Clip
- 1 x AAA Battery (pre-installed or included)
Põhifunktsioonid
- Preset Temperature & Alarm Function: The display backlight flashes red when the preset target temperature is reached, preventing overcooking.
- Premium 20cm Probe with Pot Clip: Provides accurate temperature readings with a precision of ±0.5°C (±0.9°F). The clip securely attaches to cookware, reducing the risk of injury from hot oil or steam.
- 90° Adjustable & Backlit Display: Features an extra-large, anti-vapor LCD screen with a touch-activated backlight and an adjustable head for easy reading from various angles, even in low light.
- IPX5 veekindel: This digital food thermometer can be easily washed under running water without damage.
- Kalibreerimisfunktsioon: Ensures long-lasting accuracy of temperature measurements.

Image: ThermoPro TP511 thermometer unit, stainless steel probe, and included AAA battery.

Image: The 20cm stainless steel probe with its pot clip, demonstrating its use for constant temperature measurement in a cooking pot.

Image: The thermometer in a kitchen setting, illustrating its versatility for measuring temperatures of fried foods, desserts, and liquids.
Seadistamine
Aku paigaldamine
- Locate the battery compartment on the back of the thermometer unit.
- Avage aku kaas.
- Sisestage üks AAA-patarei, jälgides õiget polaarsust (+/-).
- Sulgege aku kaas kindlalt.
Attaching the Pot Clip
- Slide the pot clip onto the stainless steel probe.
- Adjust the clip's position along the probe to ensure the probe tip is submerged in the liquid or food without touching the bottom of the pot.
- Securely attach the clip to the rim of your cooking pot or container.
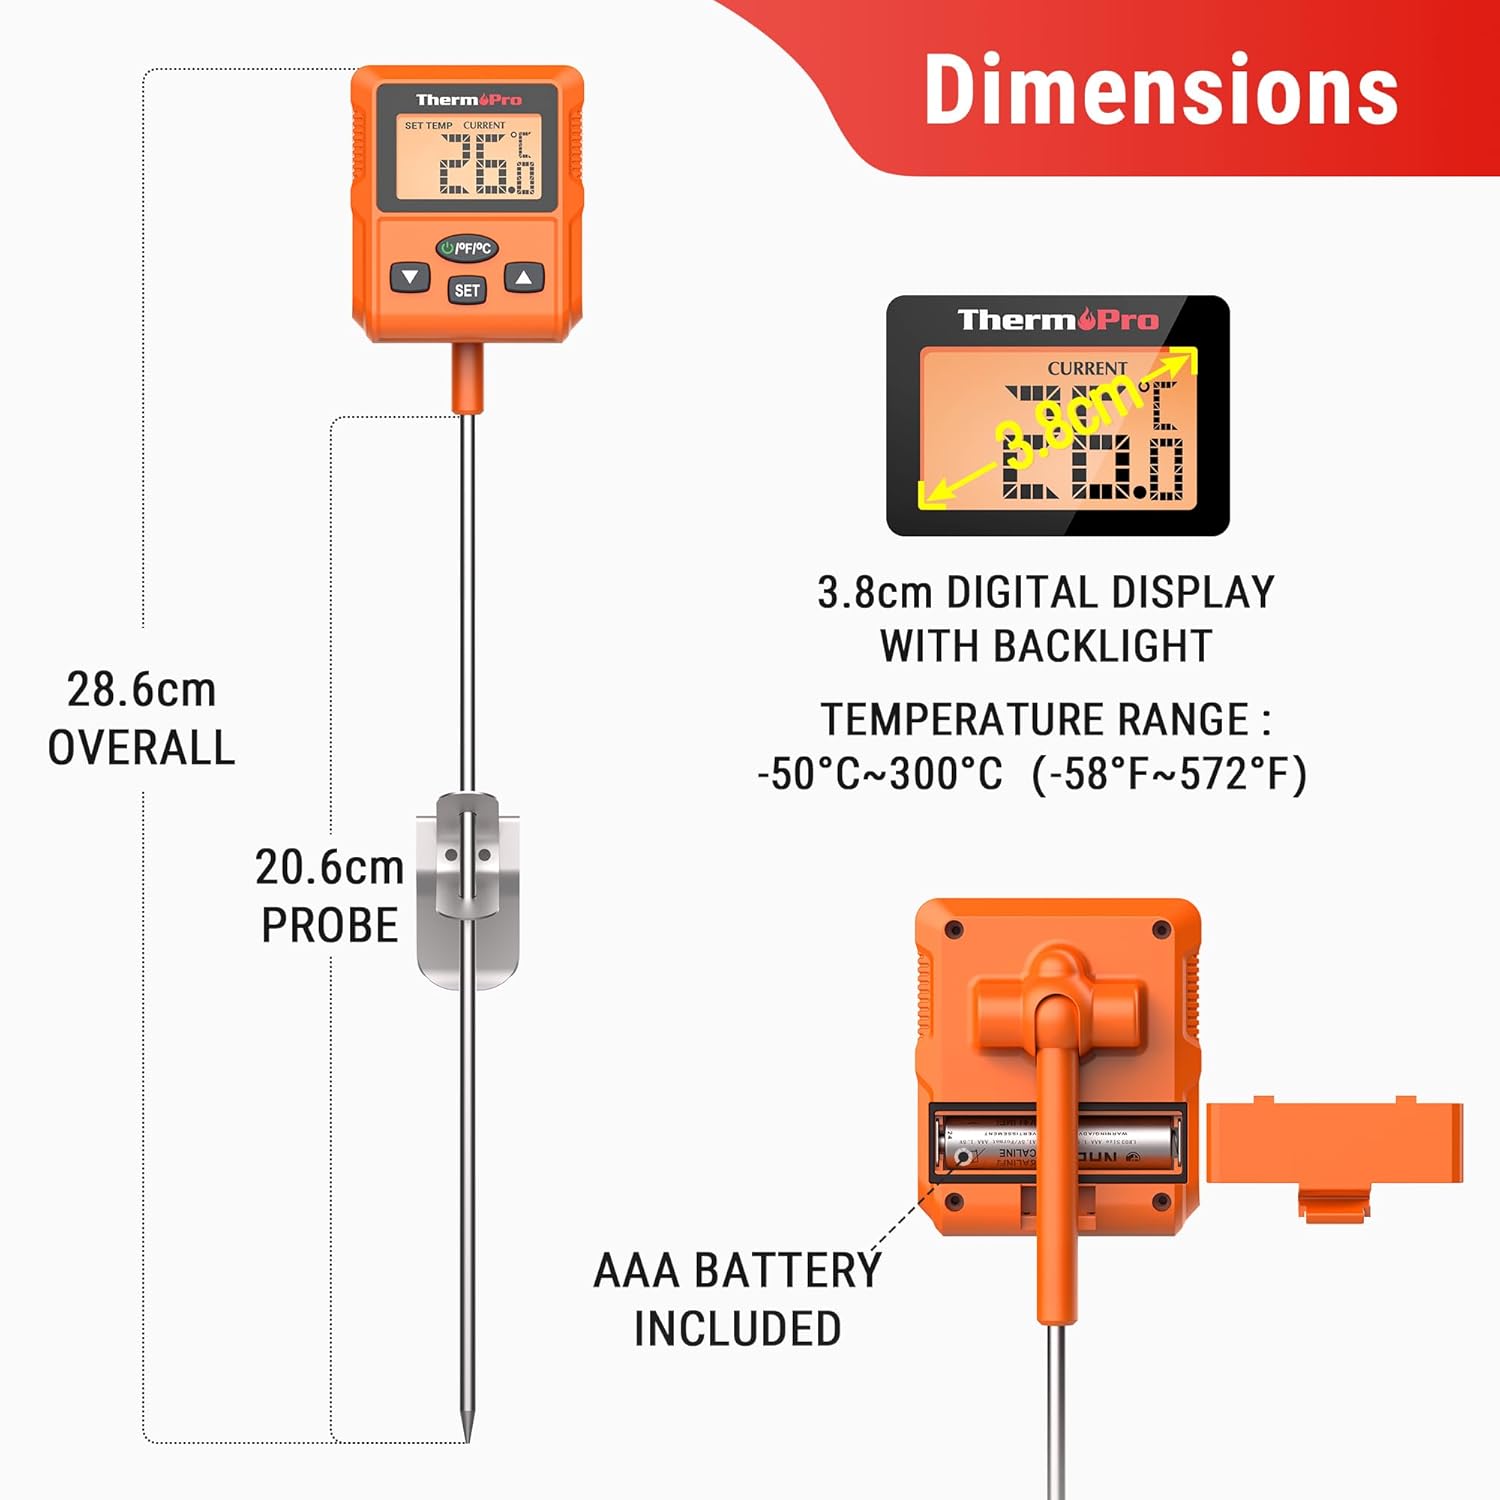
Image: A diagram illustrating the overall dimensions of the thermometer and probe, along with the location of the AAA battery compartment.
Kasutusjuhised
Toide sisse/välja
- Vajutage nuppu SISSE/VÄLJA nupp termomeetri sisse- või väljalülitamiseks.
Temperatuuri mõõtmine
- Insert the stainless steel probe into the center of the food or liquid you wish to measure. Ensure the probe tip is fully immersed and not touching the bottom or sides of the container.
- The current temperature will be displayed on the LCD screen.
Setting Target Temperature and Alarm
- Vajutage nuppu SET button to enter the target temperature setting mode.
- Kasutage UP or ALLA arrow buttons to adjust the desired target temperature.
- Vajutage SET again to confirm the value and exit setting mode.
- When the measured temperature reaches the preset target, the display backlight will flash red, indicating the alarm.

Image: The thermometer display showing the process of setting a target temperature and the visual alarm when the temperature is reached.
Switching Temperature Units (°C/°F)
- Vajutage nuppu ° C / ° F button (usually located on the back or side) to toggle between Celsius and Fahrenheit temperature units.
Ekraani taustvalgus
- The display features a touch-activated backlight. Simply touch the screen or any button to illuminate the display for easier reading in dim conditions.

Image: The thermometer display shown at various adjustable angles (30°, 60°, 90°) and with its backlight activated for improved visibility.
Kalibreerimine
The TP511 features a calibration function to ensure long-term accuracy. Calibration is recommended periodically or if you suspect inaccurate readings.
Kuidas kalibreerida
- Prepare an ice bath by filling a glass with crushed ice and topping it with cold water. Stir well and let it sit for a few minutes.
- Insert the thermometer probe into the center of the ice bath, ensuring the tip is fully submerged but not touching the bottom or sides of the glass.
- Wait for the temperature reading to stabilize (it should be close to 0°C or 32°F).
- While the probe is in the ice bath, press and hold the CAL button (if available, or refer to specific button combination in product packaging) until the display enters calibration mode.
- Adjust the reading to 0°C (32°F) using the arrow buttons if necessary.
- Confirm the calibration (usually by pressing SET or waiting for it to auto-confirm).
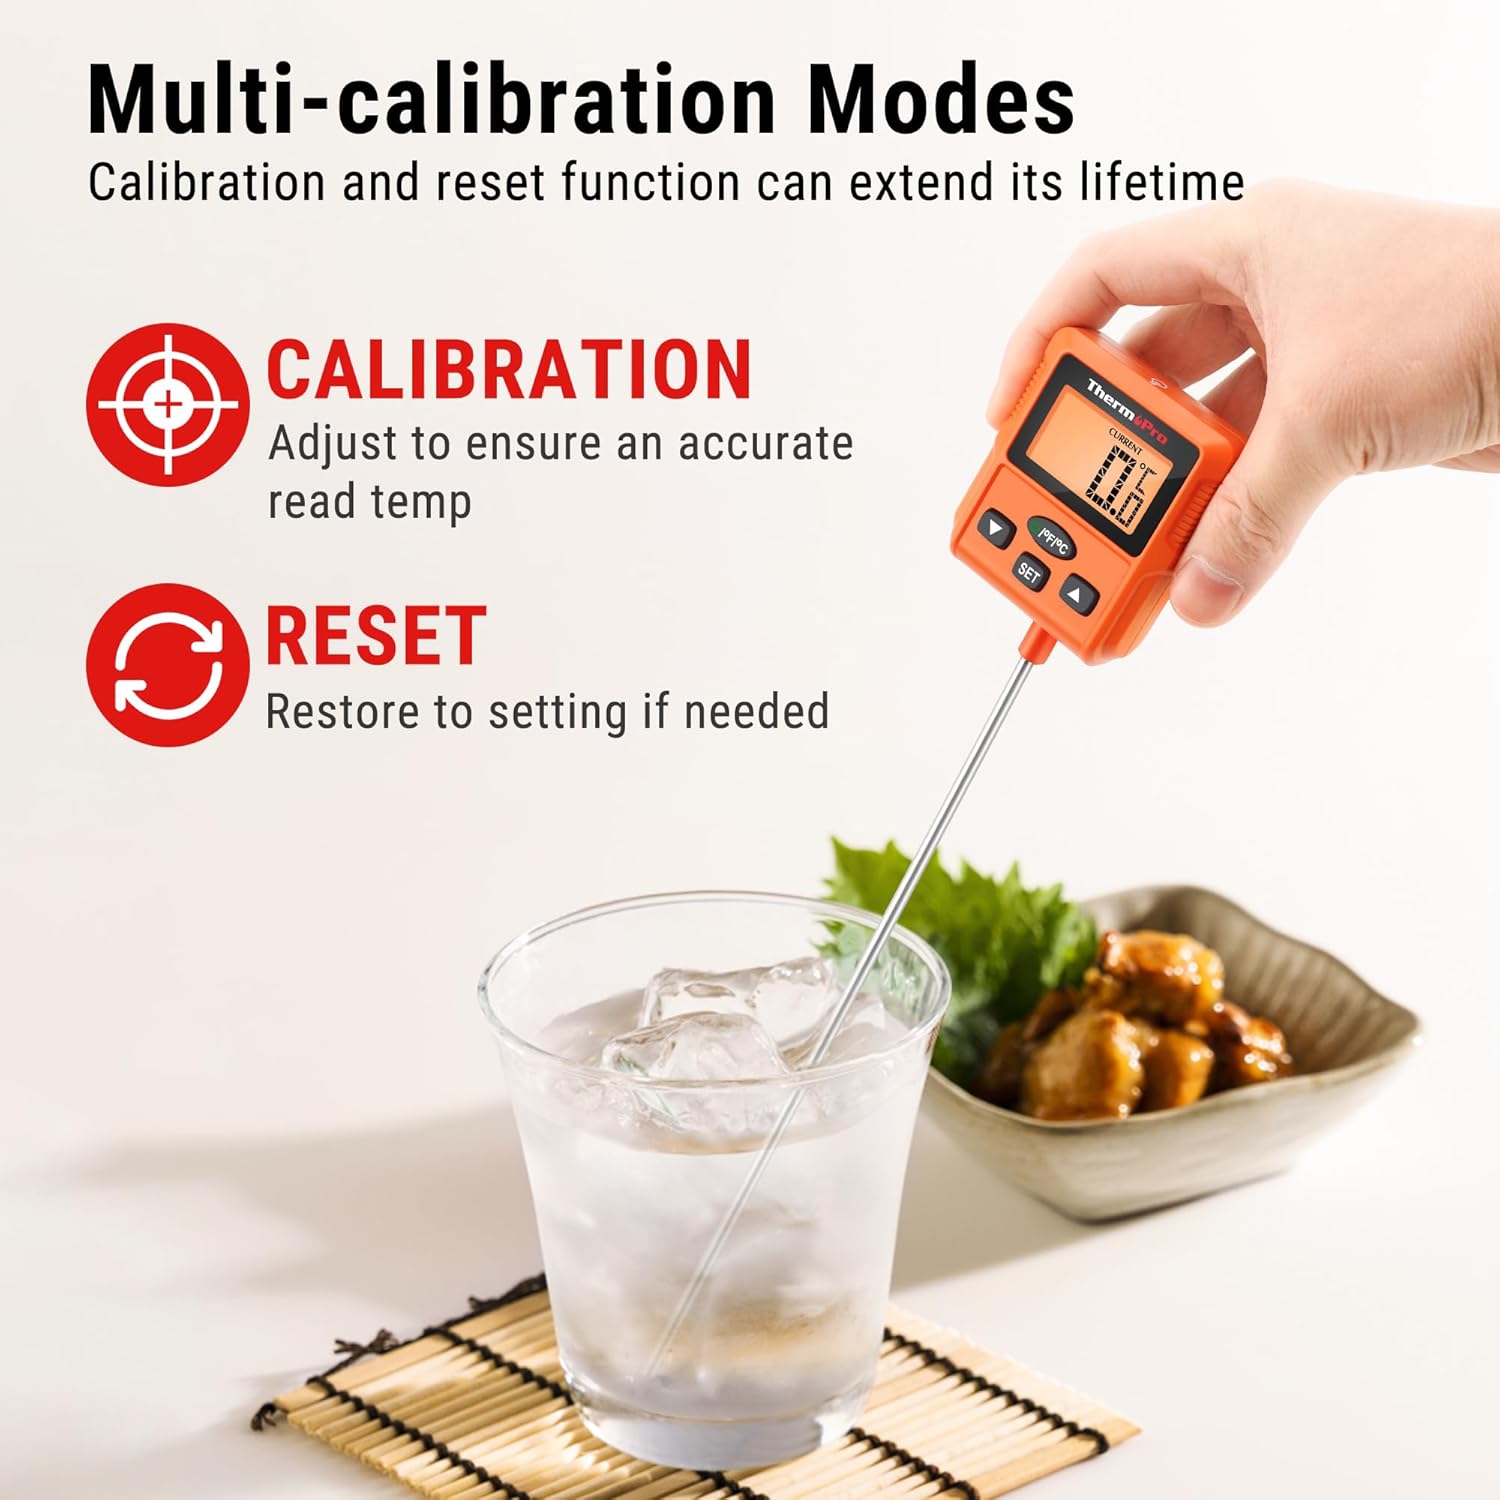
Image: The thermometer illustrating its calibration function, typically performed in an ice bath to ensure accuracy.
Hooldus ja hooldus
Puhastamine
- The ThermoPro TP511 is IPX5 waterproof. After each use, clean the probe and the thermometer unit under running water with mild soap.
- Wipe the unit dry with a clean cloth before storing.
- Do not immerse the entire unit in water for extended periods or place it in a dishwasher.
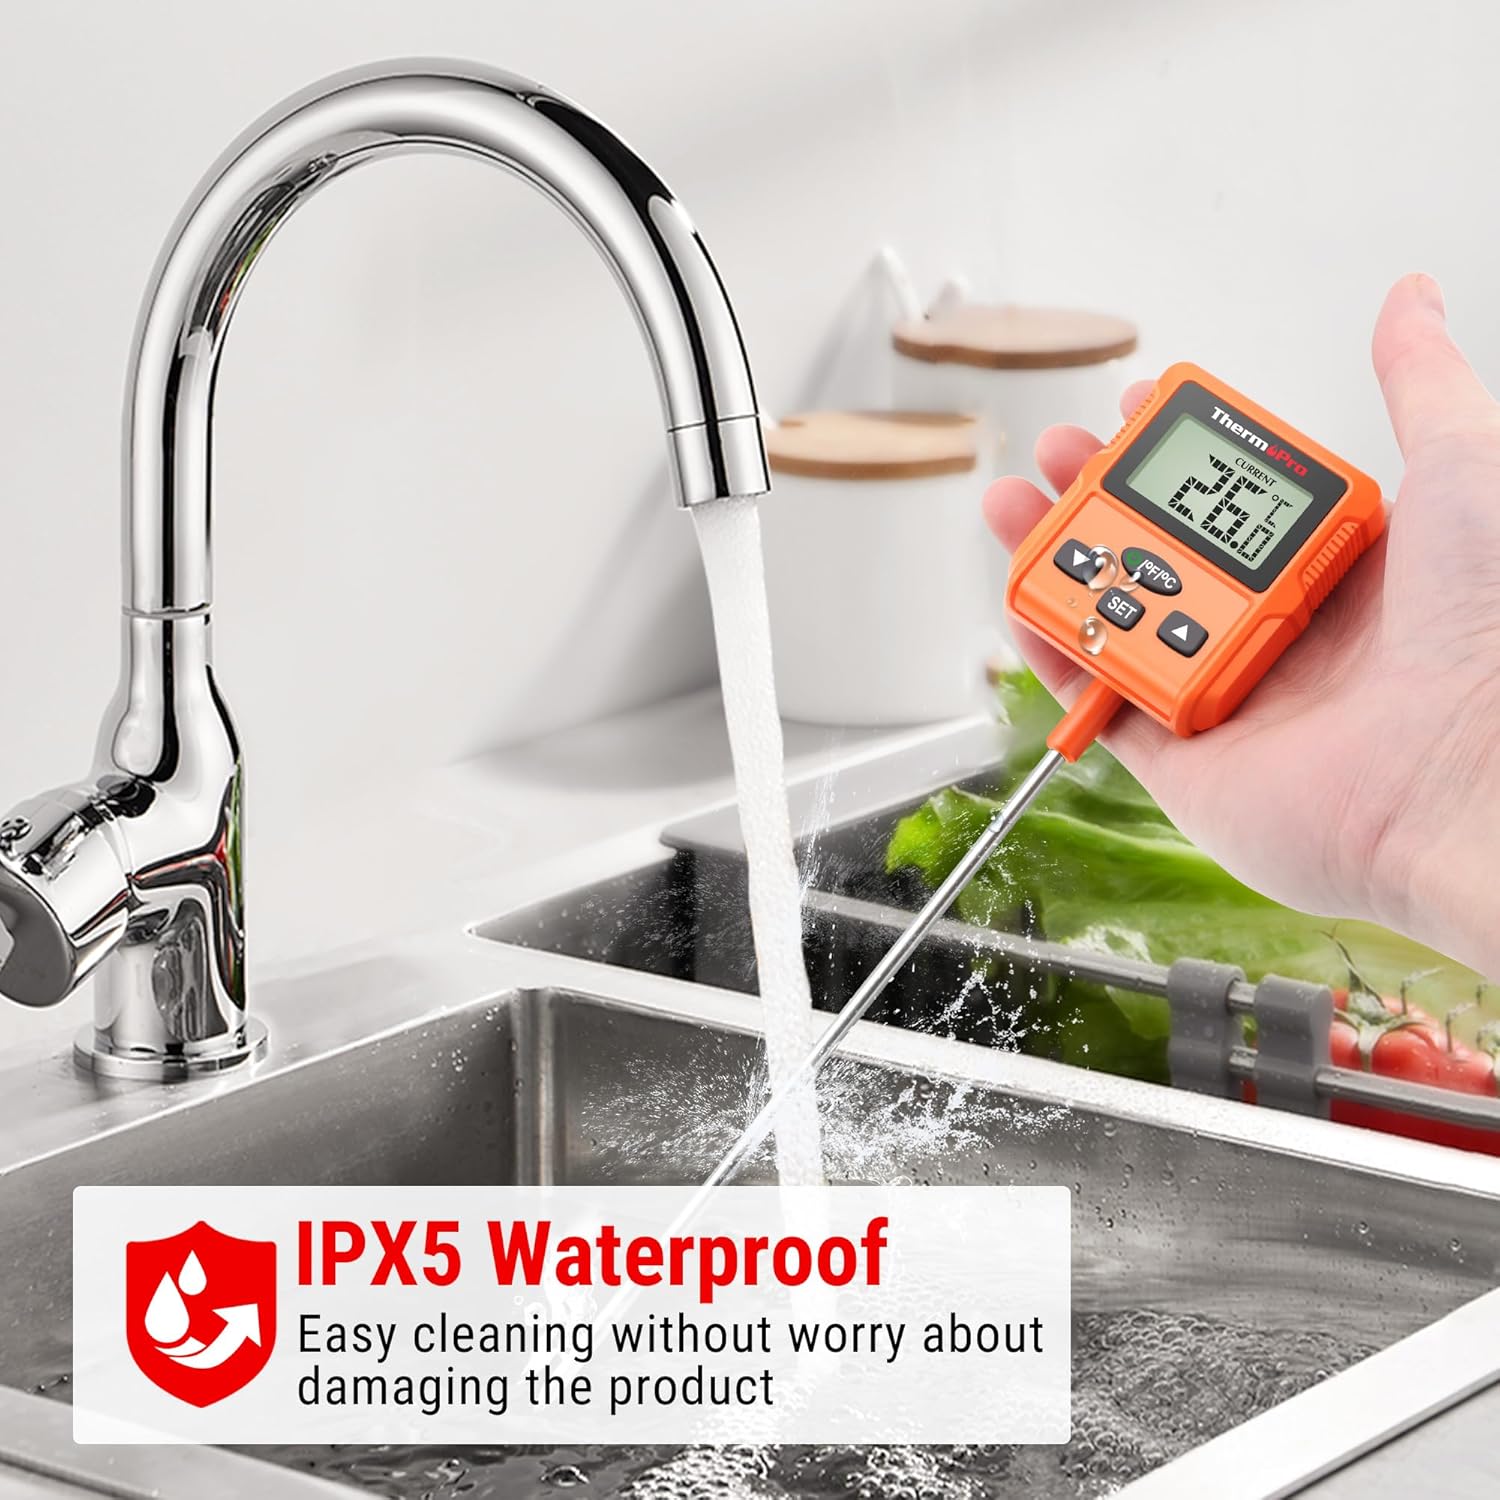
Image: The thermometer being rinsed under a kitchen faucet, highlighting its IPX5 waterproof design for easy cleaning.
Säilitamine
- Hoidke termomeetrit puhtas ja kuivas kohas toatemperatuuril.
- Keep the probe tip protected when not in use to prevent damage.
Veaotsing
| Probleem | Võimalik lahendus |
|---|---|
| Ebatäpsed temperatuurinäidud | Perform a calibration as described in the 'Calibration' section. Ensure the probe is fully inserted into the food/liquid and not touching the container. |
| Display Not Working / Blank Screen | Check if the AAA battery is installed correctly with proper polarity. Replace the battery if it is low or depleted. |
| Alarm ei helise | Ensure a target temperature has been set correctly. Verify the volume settings if applicable (though this model typically has a visual alarm). |
| Probe Not Responding | Ensure the probe is securely connected to the thermometer unit. If the issue persists, the probe may need replacement. |
Tehnilised andmed
| Spetsifikatsioon | Väärtus |
|---|---|
| Mudeli number | TP511 |
| Temperatuurivahemik | -50 °C kuni 300 °C (-58 °F kuni 572 °F) |
| Sondi pikkus | 20 cm (7.9 tolli) |
| Täpsus | ±0.5 °C (±0.9 °F) |
| Veekindluse reiting | IPX5 |
| Toiteallikas | 1 x AAA patareid |
| Kuva tüüp | Digitaalne LCD taustvalgustusega |
| Materjal | Plastic (unit), Stainless Steel (probe) |
| Mõõdud (üldine) | Ligikaudu 28.6 cm (11.26 tolli) pikk |
| Kaal | Approx. 170 grams (0.37 lbs) |
Pilt: Detailne view of the thermometer's dimensions, including overall length and probe length, along with the temperature range.
Garantii ja tugi
ThermoPro products are designed for reliability and performance. For specific warranty details, please refer to the warranty card included with your product or visit the official ThermoPro websaidile.
If you encounter any issues or have questions regarding your ThermoPro TP511 thermometer, please contact ThermoPro customer support. Contact information can typically be found on the product packaging or the official ThermoPro websaidile.