1. Sissejuhatus
Thank you for choosing the CREATE SILKAIR CONNECT 3-in-1 Mobile Air Conditioner. This versatile appliance is designed to provide cooling, dehumidification, and fan functions for your living space. With its Wi-Fi connectivity, you can conveniently control the unit via a mobile application. Please read this manual thoroughly before operation to ensure safe and efficient use.
Mudel: 64274_145198
Kaubamärk: LOO
2. Ohutusalane teave
Elektriseadmete kasutamisel järgige alati põhilisi ohutusnõudeid, et vähendada tulekahju, elektrilöögi ja vigastuste ohtu.
- Veenduge, et toiteallikas vastaks mahuletage märgitud reitingusildil.
- Ärge kasutage seadet kahjustatud juhtme või pistikuga.
- Hoidke seadet eemal soojusallikatest ja otsese päikesevalguse eest.
- Ärge blokeerige õhu sisse- ega väljalaskeavasid.
- Enne puhastamist või hooldust eemaldage seade alati vooluvõrgust.
- See seade kasutab R290 külmaainet. Ärge torgake külmaaine ringlust.
- Jälgige lapsi ja veenduge, et nad seadmega ei mängiks.
3. Pakendi sisu
Carefully unpack your air conditioner and check that all items are present and in good condition.
- CREATE SILKAIR CONNECT Mobile Air Conditioner Unit
- Väljalaskevoolik
- Window Sealing Kit (Adjustable window slider, hose adapter)
- Kaugjuhtimispult
- Kasutusjuhend

Figure 1: The CREATE SILKAIR CONNECT Mobile Air Conditioner unit shown alongside a smartphone displaying its control application interface.
4. Toote lõppview
4.1 Juhtpaneel

Figure 2: Close-up of the top-mounted control panel, featuring an LED display and touch-sensitive buttons for various functions such as power, mode selection, fan speed, and timer.
4.2 Komponendid ja mõõtmed
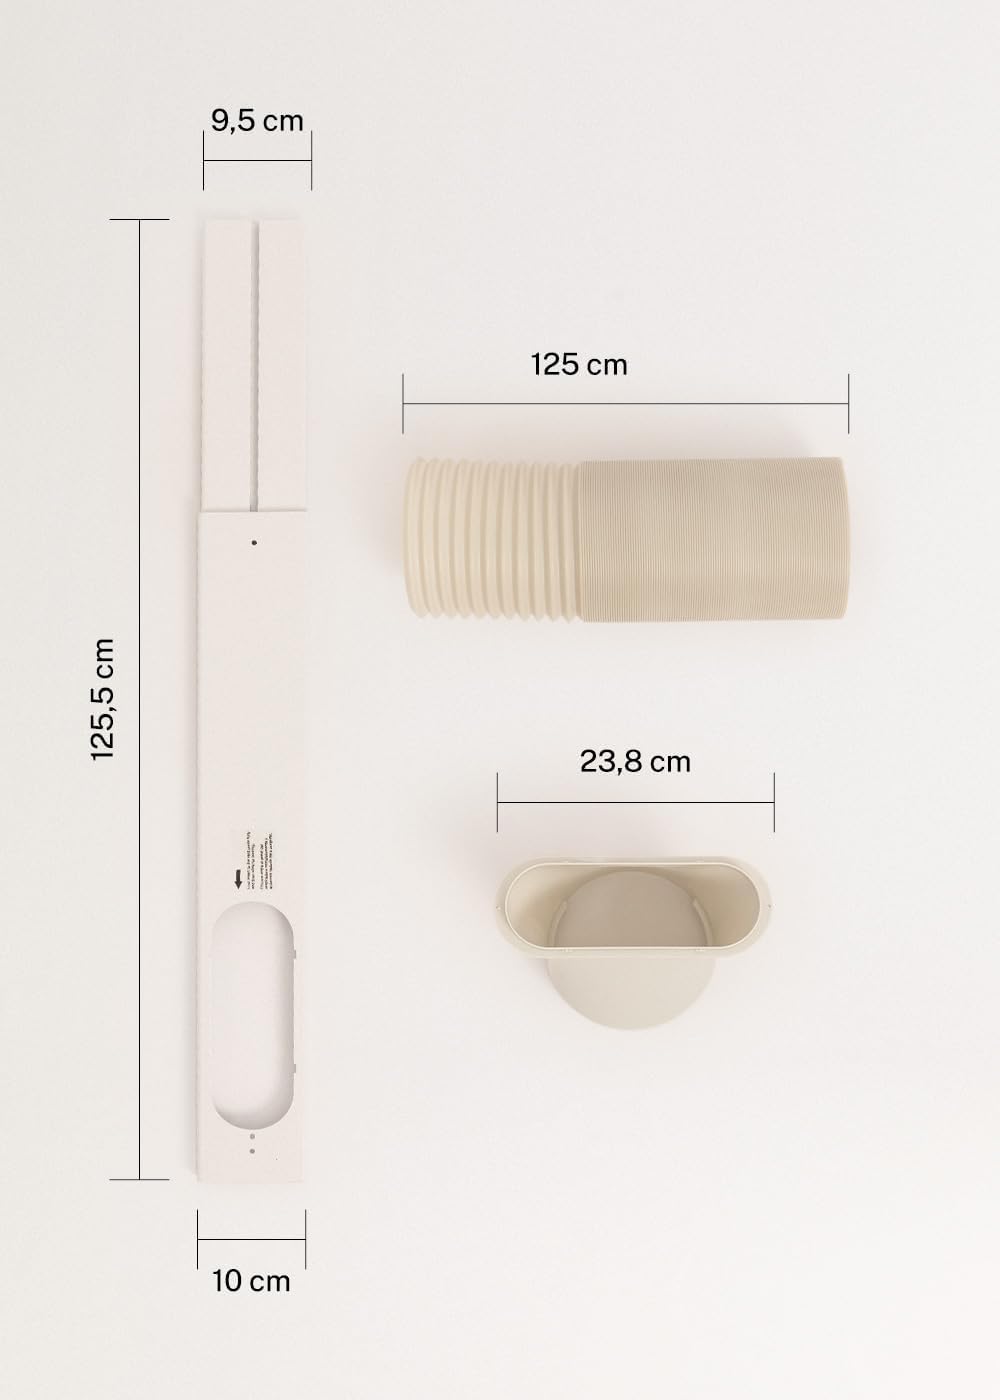
Figure 3: Detailed diagram illustrating the dimensions of the window sealing plate (125.5 cm length, 10 cm width, 9.5 cm adjustable width) and the exhaust hose (125 cm length) with its adapter (23.8 cm diameter).
5. Seadistamine ja installimine
Proper installation is crucial for the efficient operation of your mobile air conditioner.
5.1 Seadme positsioneerimine
- Asetage seade tasasele ja stabiilsele pinnale.
- Veenduge, et seadme ümber oleks vähemalt 30 cm vaba ruumi, et tagada piisav õhuvool.
- Asetage seade akna või väljalaskevooliku ava lähedale.
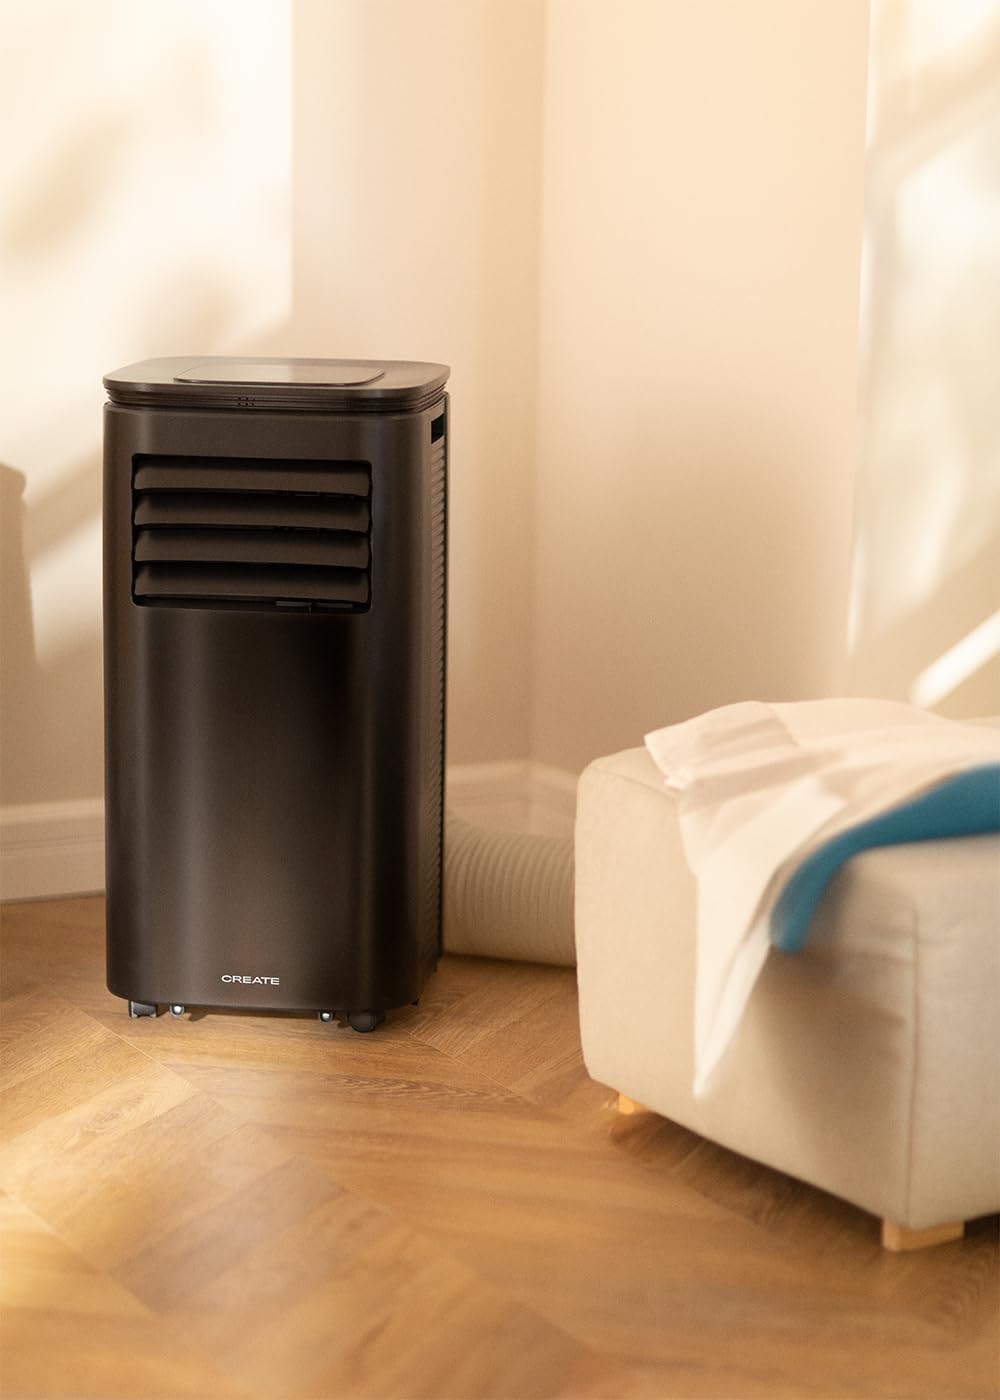
Figure 4: The air conditioner unit positioned in a room, demonstrating the typical setup with the exhaust hose directed towards a window for heat expulsion.
5.2 Installing the Exhaust Hose and Window Kit
- Kinnitage vooliku adapter väljalaskevooliku ühe otsa külge.
- Ühendage väljalaskevooliku teine ots seadme tagaküljel asuva õhu väljalaskeavaga.

Figure 5: Illustrates the secure connection of the flexible exhaust hose to the designated port at the rear of the air conditioning unit.
- Install the adjustable window sealing kit in your window opening. Extend it to fit the window frame.
- Insert the hose adapter into the opening of the window sealing kit.
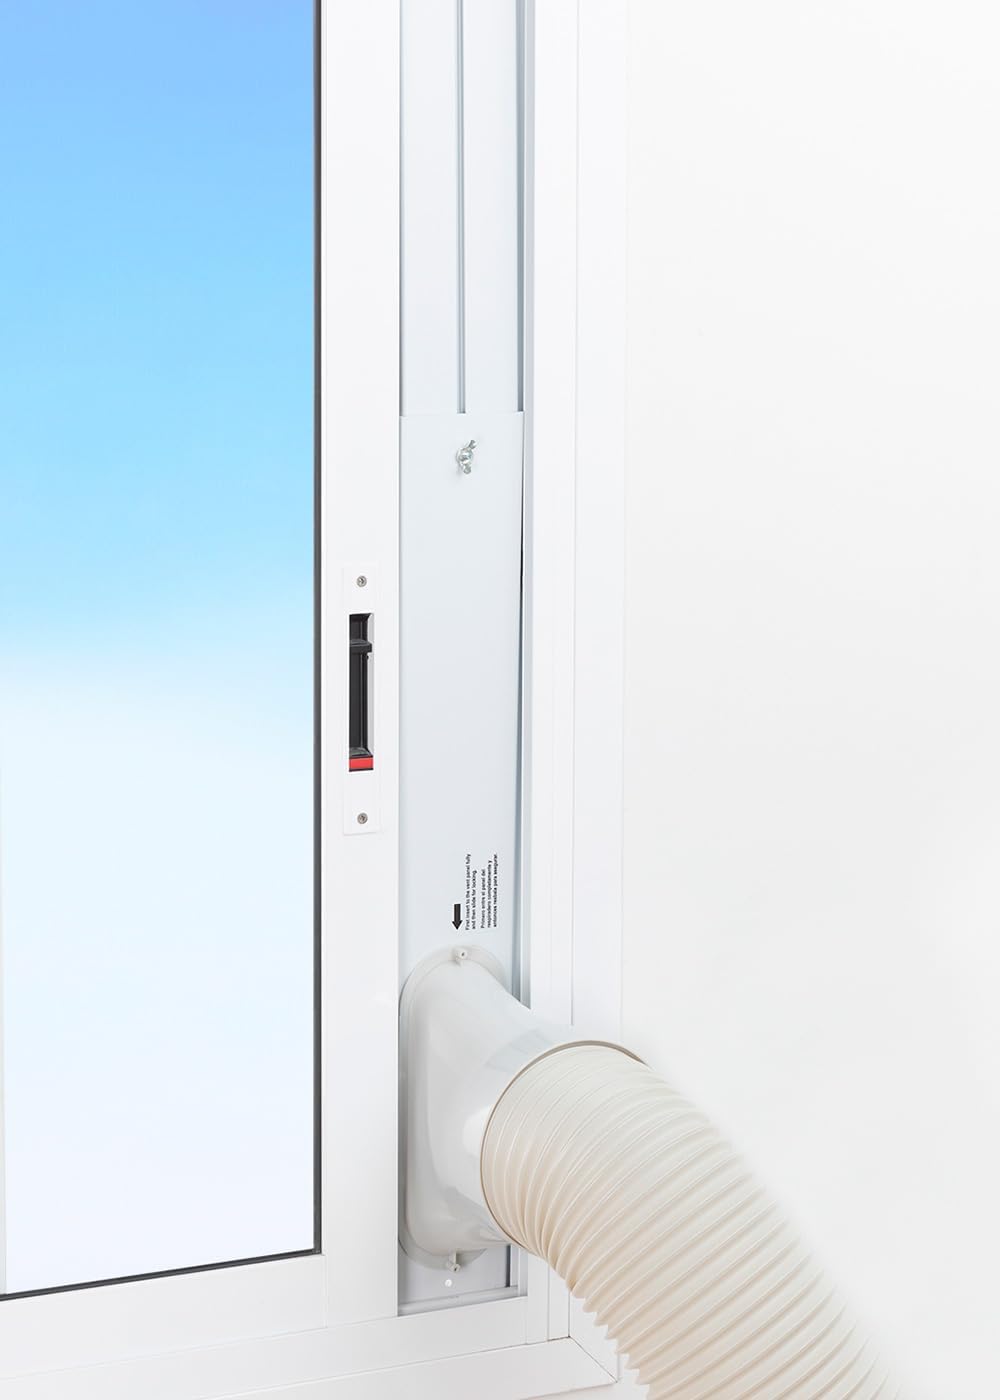
Figure 6: The window sealing kit is shown properly installed in a window frame, with the exhaust hose securely fitted into the kit's opening to vent hot air outside.
6. Kasutusjuhised
6.1 Juhtpaneeli kasutamine
The control panel on top of the unit allows direct operation.
- Toitenupp: Vajutage seadme SISSE või VÄLJA lülitamiseks.
- Režiimi nupp: Jahutus-, ventilaatori- ja õhukuivatirežiimide vaheldumisi vahetamine.
- Ventilaatori kiiruse nupp: Adjust fan speed (Low, High).
- Temperatuuri nupud (+/-): Adjust desired temperature in Cooling mode.
- Taimeri nupp: Set the auto-on or auto-off timer (up to 24 hours).
- Puhkerežiimi nupp: Aktiveerib vaiksema töörežiimi öiseks kasutamiseks.
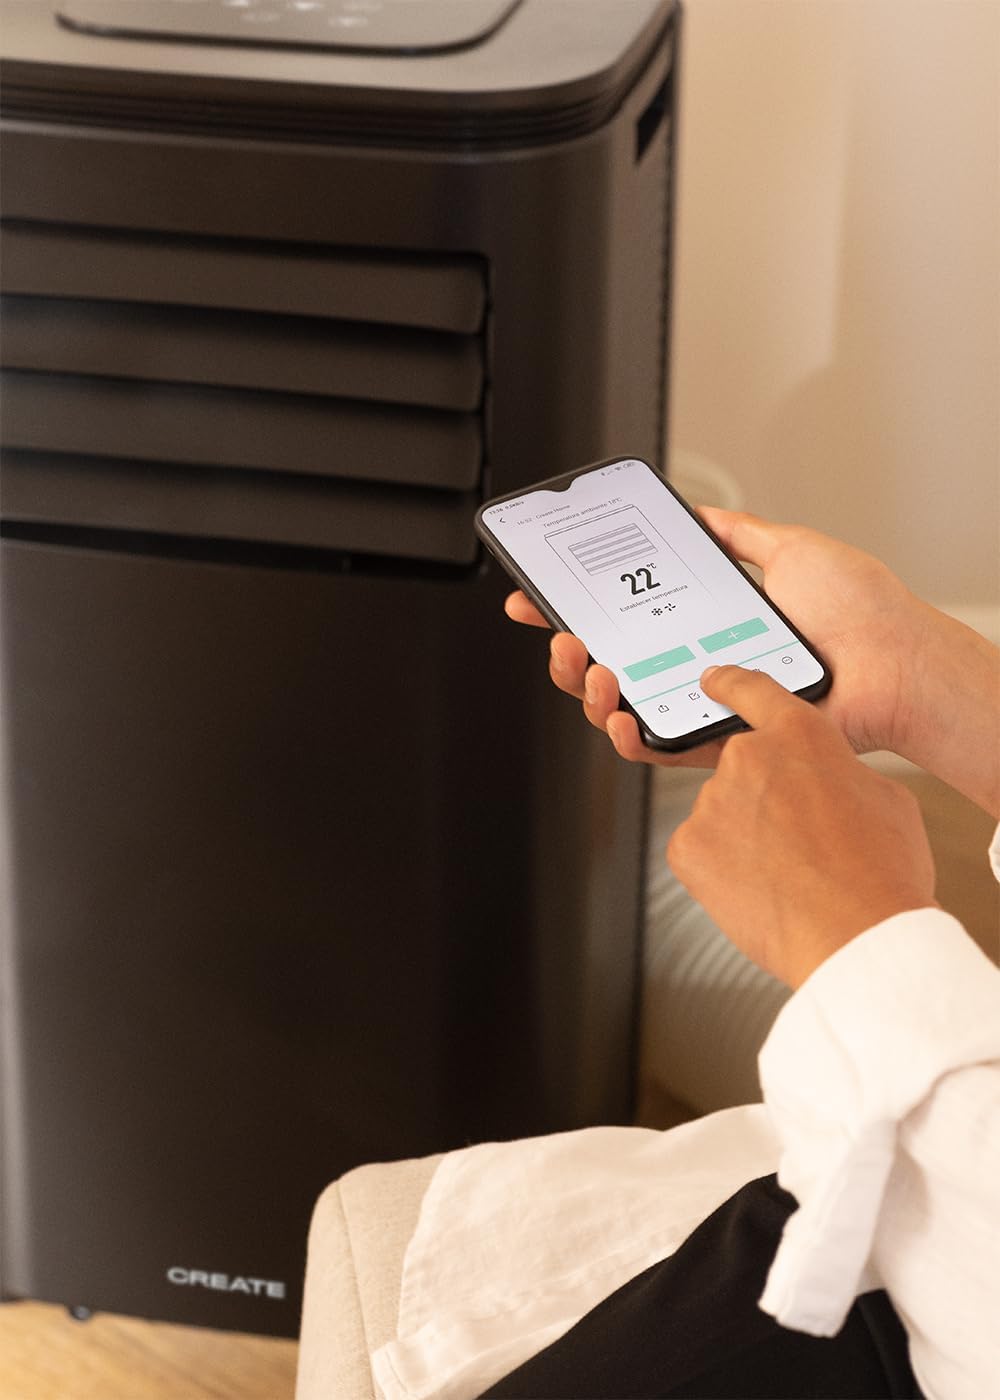
Figure 7: A user's hand interacting with the touch-sensitive control panel located on the top surface of the air conditioner, demonstrating direct manual operation.
6.2 Kaugjuhtimispuldi kasutamine
Kaugjuhtimispult pakub mugavat juhtimist ka kaugelt.

Figure 8: A hand holding the dedicated remote control for the air conditioner, illustrating its use for convenient operation from a distance.
6.3 WiFi ja rakenduste juhtimine
Download the CREATE Home app from your smartphone's app store. Follow the in-app instructions to connect your air conditioner to your home Wi-Fi network. Once connected, you can control all functions of the unit from your smartphone, including mode selection, temperature adjustment, fan speed, and timer settings.
Figure 9: A user interacting with the mobile application on a smartphone to remotely control the air conditioner, showcasing the Wi-Fi connectivity feature.
7. Hooldus
Regulaarne hooldus tagab seadme optimaalse jõudluse ja pikendab selle eluiga.
7.1 Õhufiltri puhastamine
Õhufiltrit tuleks puhastada iga kahe nädala tagant või sagedamini, olenevalt kasutusest ja õhukvaliteedist.
- Lülitage seade välja ja eemaldage see vooluvõrgust.
- Locate the air filter panel on the back of the unit.
- Eemaldage õrnalt filter.

Figure 10: Demonstrates the process of removing the air filter from the rear of the air conditioner unit for cleaning or replacement.
- Clean the filter with warm, soapy water or a vacuum cleaner. Rinse thoroughly and allow it to air dry completely before reinserting.
7.2 Vee väljalaskmine
In Dehumidifier mode or high humidity conditions, the internal water tank may fill up. The unit will stop operating when the tank is full. Drain the water from the drainage port at the bottom rear of the unit.
8. Veaotsing
| Probleem | Võimalik põhjus | Lahendus |
|---|---|---|
| Seade ei lülitu sisse | Puudub vool; Toitejuhe pole pistikupessa ühendatud; Veepaak on täis. | Kontrollige pistikupesa; ühendage toitejuhe vooluvõrku; tühjendage veepaak. |
| Seade ei jahuta tõhusalt | Air filter dirty; Exhaust hose not properly installed; Room too large; Doors/windows open. | Clean air filter; Ensure hose is sealed; Use in recommended room size (14-25 m²); Close doors/windows. |
| Kõva müra | Seade ei ole tasasel pinnal; ventilaatoris on takistus. | Place on flat surface; Check for obstructions. |
| Wi-Fi ühenduse probleemid | Vale WiFi parool; ruuter on liiga kaugel; rakenduse probleemid. | Verify password; Move unit closer to router; Restart app/unit. |
9. Tehnilised andmed
| Funktsioon | Spetsifikatsioon |
|---|---|
| Mudeli number | 64274_145198 |
| Jahutusvõimsus | 9000 BTU / 2270 Watt |
| Niiskuse eemaldamise võime | 24 liitrit päevas |
| Õhuvool | Kuni 350 m³/h |
| Soovitatav ruumi suurus | 14-25 m² |
| Müra tase | 65 dB |
| Külmutusagens | R290 (ECO-friendly) |
| Voltage | 240 volti |
| Wattage | 2600 vatti |
| Mõõdud (P x L x K) | 35.5 x 36.5 x 71.3 cm |
| Materjal | ABS |
| Energiatõhususe klass | A |

Figure 11: The energy efficiency label for the CREATE SILKAIR CONNECT, indicating an A-class energy rating, 2.6 kW cooling capacity, and a noise level of 65 dB. More details can be found at eprel.ec.europa.eu/qr/1580267.
10. Garantii ja tugi
For warranty information and technical support, please refer to the warranty card included with your product or visit the official CREATE websait. Hoidke ostutšekk ostutõendina alles.
Tootja: LOO
Kontakt: Refer to CREATE's official support channels.